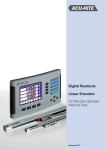
1
Operating Instructions
VRZ 740,780
Bidirectional Counters
r
DR. JOHANNES HEIDENHAIN
Precision Mechanics, Optics and Electronics . Precision Graduations
Post Box 1260 . D-8225 Traunreut . Telephone (08669) 31-I
Telex: 056831 . Telegramme: DIADUR Traunreut
I. Setting up and maintenance
1.1
Items of delivery
Bidirectional counter
VRZ 740
for 2 axes or
Bidirectional counter
VRZ 780
for 3 axes
Replacement fuse 0.4 A slow-blow
(in small compartment at rear of counter)
Mains coupling, separate
optional: mains cable 2.7 m long
Operating instructions and certificate of
inspection
VRZ 740
VRZ 780
(2 axes display)
(3 axes display)
1.2
Technical specifications
Type
Mechanical
Housing design
table model, cast housing
Dimensions
W 270 x H 221 x D 172 mm
Weight
approx. 5.6 kg
Operating temperature
Storage temperature
0” to +45” c
-30” to +70° c
Inputs
for Heidenhain transducers with
grating pitch 20 pm
data
Electrical data
Scanning frequency
25 kHz max.
Cable length
max. 20 m
Digital displays:
position value displays
keyboard display
7-segment LED’s
7% decades with sign
Metric/Inch converter
Display step
static, active for all displays
1 pm/2 pm or 0.00005” or 0.0001”
selectable
Datum points
Reference mark evaluation
4 floating datum points
The reference mark positions for all datum
points are automatically stored
independent of power supply. After power
failure, all datum points can be reproduced
by simply passing over the reference L
marks once.
Delta key
conversion of entered absolute
dimensions into incremental dimensions
(= “target” positioning)
Tool radius compensation
keys for entry, and addition to value in
keyboard display, orsubtraction from value
in keyboard display (stored independently
of power supply)
Dimmer switch
adjustment of display brightness
3
1.3
Dimensions
\
mm
/RZ 740
(2axes)
VRZ 780 (3
axes)
270
!5
133f0,l
87?OJ
i
view A
5
2. Mounting possibilities
The counter is cased in a cast aluminium
housing. The feet of the unit are provided
with M5- tapped holes which enable
securing onto tables or consoles from
underneath by means of screws
(see drawing of dimensions).
A further mounting possibility is provided
by securing the counter rear onto an angle
iron or pipe. Drill and tap required holes in
accordance with dimensions as indicated
in drawing of “rear panel” at any location
within the shaded areas. If the indicated
dimensions are not strictly observed then
‘,
_’
,
;
:
;_
_/,
this might result in penetration of the
housing and swat-f entering the counter
interior may cause malfunctions!
I’
‘.
::
,
‘~
‘_
)
view A
view A
6
sectional view B-B
3. Connect transducers,
mains connection
CAUTION: Do not engage or disengage
any connectors whilst equipment is under
power.
3.1
Protection
The front panels and the operating panel of
the counters are splashwater-proof.
The counters are provided with failure
signal (see page IO).
Counters VRZ 7401780
correspond to protection classification I of
the VDE-regulations VDE 0411 and are
built and tested in accordance with
DIN 57411 part l/VDE 0411 part 1
“Protective measures for electronic
measuring equipment”.
In order to maintain this condition and to
ensure safe operation, the operator must
comply with the instructions and
warnings which are contained in these
operating instructions.
3.2
Connection of transducers
URZ 740/780
All HEIDENHAIN linear transducers with
20 pm grating pitch
can be connected to VRZ 7401780.
If the standard 4-fold pulse evaluation is
modified to 2-fold (see 3.6 page 9) linear
transducers with
10 pm grating pitch
may also be used.
Connector
21235601
Angle encoders ROD without built-in pulse
shaping electronics (e.g. ROD 450) can
also be connected. Please observe that
the scanning signals are then interpolated
electronically 20-fold or IO-fold (after
modification of the pulse evaluation)
within the counter.
contact
designation
I
use
,
Lamp UL
IIL
+Imeasuring
signal
(O’el.)
el
input signals
electrical
values
5v+5%
approx. 120 mA
* internal shield to pin 9
external shield to connector housing
The transducer is connected via a g-pole
flange socket
(Heidenhain Ident;No. 20071901).
3
+
measuring
signal
(90’ el.)
Id
b
-
/
+
8
-
reference
mark signal
60
for Heidenhain linear transducers and
angle encoders without built-in pulse
shaping electronics
Y
ground
for
shieldir
3.3
Selection of mains voltage
The counters are set to 220 V- when
supplied, and can be converted to
100, 120, 140,200 or 240 V- :
Mains voltage selection
3.4
Mains connection
Wire.mains cable to enclosed mains
coupling (compl. mains cable available as
After removing mains fuse holder,
set voltage selector to desired voltage by
usinq a coin; replace mains fuse holder.
Exchanging
mains fuse
accessory) and insert mains coupling into
mains socket of counter. Push down
safety clamp
Wiring of Mains Coupling
CAUTION
Mains connection to contacts
Protective earth to
8
2
3
I
I
3.5
Counting direction
The transducers are supplied as follows:
\
Transducer label
\
Traversing direction of scale unit
for positive increasing values
Traversing direction of scanning
unit for positive increasing values
The counting direction can be altered for
each axis individually by shifting the
counting direction switch 1, 2 or 3 beneath
the cover at rear of counter.
Pulse evaluation
2-fold
4-fold
Counting direction
positive
negative
Axis
XYZ
X Y forVRZ740
Counting direction
positive
negative
Pulse evaluation
2-fold
4-fold
-OPEN-
Axis
XYZ
X Y for VRZ 740
3.6
Pulse evaluation
The pulse evaluation may be altered for all
axes simultaneously
at switch 4 of the
counting direction selector from the
standard 4-fold evaluation to 2-fold.
This setting permits connection of linear
transducers with IO pm grating pitch to the
counter.
9
II. Working with VRZ 740/780
By deciding upon counter VRZ 7401780,
you have purchased a unit which, due to
the practical design, makes positioning
easier, quicker and more economical.
This counter offers the possibility of
setting several datum points. Furthermore,
it is possible to position with “target”
counting whereby the tool radius can be
simultaneously taken into account.
Re-establishing the correlation between
datum points and reference marks of the
LS system is “automated”.
Traversing over the reference marks once
is sufficient to calibrate the counter in all
axes. (Previous determination of the
position value for the datum point is not
required.)
In addition to these advantages, the
counters are provided with keyboard entry
(keyboard display), selectable display step,
mm/inch converter, dimmer, direction
switch and pulse evaluation selector.
When reading the following explanations,
it is recommended to refer to the
illustration of the operating panel on
page 20. The encircled figures (0, 0,
0.. .) of a 3 axes counter are explained in
this illustration.
1.1
Absolute mode and incremental mode
In the absolute mode all measurements
refer to the “absolute” datum point, whilst
in incremental mode each immediately
preceding position serves as datum point.
Absolute mode
Example:
The left upper corner is the “absolute
datum point” for the measurements
1.2
Instructions for key-in of position
values or dimensions
Entry errors can be cleared by means of the
q @.
Values are entered in “mm” or “inch”,
whereby key-in of trailing zeroes is not
required.
An entered value remains within the
keyboard memory until it is overwritten by
a new value or cleared with the
button @ The finest decade of the keyboard display is rounded off to digital step
0.002 mm in operating mode “metric”2 pm,
and to 0.00005 inch in “imperial” operating
mode 0.00005.
An entry value can be preset into the
position displays @or can be repeated
any number of times as an incremental
dimension -in any axis and with changing
sign (see item 2.2).
Only negative sign “-‘I is displayed. Each
actuation of the sign change key
will
change the sign of the value in the
keyboard memory. For entry of negative
values, the following is applicable: first
enter value, then negative sign.
If the entered value in the kevboard disolav
, ,
is too large (> 5079.999 mm or
199.99995 inches), then each numeral in
the keyboard display will illuminate with
decimal point.
q
q
The machine is to be positioned to
a certain dimension.
Incremental mode
Example:
Measurements are carried out-starting
from the left upper corner - in increments
1.3
Traversing over reference marks when
first setting up
After initial connection of transducers, all
REF-memories of the counter must be
“activated”.
”
press REF key @:
reference mark indicators @ in the
position displays illuminate.
Traverse over reference marks in all axes;
referencemarkindicatorsareextinguished.
The machine is to be traversed by
a certain distance.
IO
1.4
Gilure signal
Failure of a transducer, cable defects etc.
are indicated by flashing of the appropriate
position display @.
Switch off counter, remedy the fault and
re-active counter. Alternatively, the failure
signal can be cancelled by pressing the
REF key (repeat, if reqd.).
1.5
Operating condition
is switched on
each time counter
Keyboard display
Position display
@
@
“0”
Displayed position values indicate
correlation between established datum
point & and reference mark.
IREF(
U
8
REF key
0.
“OFF”
mm
8
mm/inch
@
metric or imperial (depending on last mode
chosen)
Random switch-over from “mm” to “inch”
and vice-versa during measuring
procedure, whereby the displayed values
and all stored values are simultaneously
converted.
button
0
@
inch
0,001 mm
0.00005 inch
g
Display step
With the display step button @ either
0.001 mm
or 0.002 mm
or
0.00005 inch
or 0.0001 inch
can be selected as display step for the
position display.
Display brightness
maximum brightness
dimmer switch @for two brightness
settings
El
0,:02 mm
0.0001 inch
2. Establishing datum point
2,l
Selection of datum point
The counter permits establishing of four
floating datum points for the position
displays. The dimensioning of a workpiece
may be referenced to different datum
points, i.e. in the following example, datum
point & can be referenced to the
workpiece edge as starting point, and the
other datum points can be referenced to
the centering points of the bore holes for
positioning of the incremental dimensions:
Prior to setting a datum oint, one of the
datum point keys @ $to
El
is to be pressed -the corresponding
indicator lamp @ illuminates,
Switch-over between datum points is
possible at any time.
2.2
Preset
Presetting assigns fixed display values to
all positions.
Zero is often selected as datum point:
datum point
11.
.
.4
•I
Or
101
press clear button @
orzero
keyboard display @ shows “0”
press axis keys @
“0” appears in position display @
position value for workpiece datum point
(= reference value) entered: @
datum value appears in keyboard
display @
press appropriate axis
key@
datum value appears in position
display @
The counter can be preset to any datum
values as follows:
datum point
11.
.
.4
q .. . q
q
mm
If machine axes are now traversed, then
VRZ 740/780 always indicates the actual
position with reference to the selected
datum point. For presetting a determined
absolute position value (absolute nominal
position), traverse individual machine axes
such that the pre-determined position
value appears in the position displays @
2.3
Reference mark evaluation “FIEF”
In the case of switch-off of VRZ 7401780
or power failures the established correlation between positions and display values
is lost.
If the momentary position is known
(e.g. from the drawing), then the position
values can be directly re-entered in
accordance with item 2.2.
If this is not the case, then the datum
points which were established last can be
reproduced by means of the REF key.
Immediately upon counter switch-on, all
digits of the position displays will show
zero; the position displays @ will then
jump to those position values which had
been assigned to the transducer reference
marks by establishing the datum point &
prior to the operational interruption.
When switching to 12 , &? or &. , the
reference mark position values with regard
to these datum points will be displayed.
In order to reproduce the datum point,
simply press the REF key and traverse
over reference marks in all axes-displays
are activated and show the position values
with reference to the selected datum point
&,.&,&or.&.
This procedure is explained in detail as
follows:
12
For incremental dimensions two procedures are possible: eithertraverseto required
dimension by assigning value zero to the
starting position, or preset the nominal
value and position with “target” counting
to zero.
2.31
Calibration = reproduction of datum
points
(after operational interruption or power
failure)
a) selected counting mode prior to
interruption: mm
mm
g
REF
0
0
X + 0000000
@
display immediately after counter switch-on
X + 67.070
e
display value approx. 1.5 sec. after switch-on of counter
dimension 67.07 = position value of X-reference mark
for datum point k
q
mm
;g
REF
#
Ll
0
0
8
1
mm
{g$
X + 67.070
#
if REF key is pressed, the REF indicators in the position display
illuminate - counting function ceases
mm
<g
X + 67.070
+ 67.071
+ 67.072
8
machine traverse over reference mark of X-transducer.
REF indicator is extinguished and counting is resumed.
The displayed position value corresponds to the X-machine
position for the selected datum point & :
counter is calibrated in X-axis
mm
x + 0000000
e
display immediately after counter switch-on
X + 2.64065
Q
display value approx. 1.5 sec. after counter switch-on
dimension 2.64065” = position value X-reference mark
for datum point &
REF
0
0
$$$
q
REF
#
b) selected counting mode prior to
interruption: inch
;&$
Ll
1
X + 2.64065
#
if REF key is pressed, the REF indicators in the position displays
illuminate-counting
function ceases
X + 2.64065
+ 2.64070
+ 2.64175
8
machine traverse over reference mark of X-transducer,
REF indicator is extinguished and counting is resumed.
The displayed position value corresponds to the X-machine
position forthe selected datum point & :
the counter is calibrated in X-axis
REF remains activated; illumination of the
REF lamp indicates that the REF values
(position values relative to the reference
mark) are automatically stored when a
datum point is established and thus are
available for re-establishing this datum
point after power interruptions. If the
reference marks are inaccessible
(e.g. workpiece and milling tool are
clamped and reference mark cannot be
traversed over) REF should be switched
Off.
13
3. Positioning
with “target”
counting
In conjunction with the A-key@, absolute
dimensions can be positioned through
“target” counting.
This mode of positioning is more
convenient and safer than “traversing to a
nominal value”. Even with inexact
positioning (value other than zero in the
position display), errors in this operating
mode will not be accumulative as the
deviation is automatically taken into
account with the next positioning step in
this axis.
When entering the nominal dimension,
e.g. 120 mm, the position display shows
the deviation from the nominal value
“-70 mm”: in order to position the
nominal value, machine must be traversed
in “+” direction.
Position
display
Keyboard
display
x +50.00
0.00
x+0.00 0.00
q
n
Jl p-p-5-jx+O.OO
q
8
key- in of nominal value X + 120.0
x -70.00
120.0
by pressing the axis key, the deviation from the nominal value
appears in the position display
x -
0.05
120.0
position machine with “target” counting; “0” is not exactly
reached (difference of 0.05 mm with regard to nominal value)
119.95
120.0
when A-key is switched off, then the absolute dimension
referenced to datum point & will appear in position display
rY!il
4. Tool radius compensation
q
by pressing the A-key @ the value in the position display
is set to “0”
120.0
x
11
e.g. 50.0 in position display = actual position referenced to datum
point k
@
With the three
-keys, the tool radius
can be taken into account without
calculations during positioning.
For example, key-in milling cutter
diameter: by pressing the H -key @
the milling cutter radius is stored.
The value remains in memory until a new
diameter is entered (even after switch-off
of the counter).
If working onlywith one milling cutter in an
operation, it is recommended to store the
milling cutter radius prior to starting.
enter diameter
value @
diametervalueappearsin
8
keyboard display
milling cutter radius is stored and appears In keyboard
display @
When working with several milling cutters,
the appropriate radius is to be entered
after each tool than e.
After pressing the fl+ 4 -key @ the milling
cutter radius is added to the value in the
keyboard display @, or subtracted by
pressing m-key 0.
14
Pressing twice will result in addition or
subtraction of the total diameter.
After compensation, the value is
transferred or preset by pressing the
appropriate axis key as usual.
In conjunction with the A-key, positioning
is simply carried out with “target” counting
to zero (also see example on page 18)!
L-l
position display
03
keyboard display
9
x
0.00
10.25
x
0.00
5.125
milling cutter radius is stored
x
0.00
5.125
datum point
press A-key
x
0.00
25.75
key-in drawing dimension into keyboard
display
x
0.00
20.625
subtract milling cutter radius
X -20.625
20.625
transfer dimension to be traversed into
zosition display
x
0.00
20.625
Iraverse to target “0”
X +20.625
20.625
Nhen switching off the A-key,
the absolute dimension referenced to
3atum point &
appears in the position display
8
X
0n
8
enter milling cutter diameter
&
addressed
15
5. Setting lines of symmetry
The three o-keys
axially symmetrical
can also be utilized for
hole arrangements
store symmetry dimension 25.30
12.650 = symmetry dimension: 2 appears
n keyboard display
by means of
0X
q2
q
X
--
D
2
press A-key and axis key
0 appears in position display
enter 26.25 and then press
13.600 appears in keyboard
display
X = - 13.600 appears in position
display
q--D
2
and axis key
n
position machine by “target” counting for borehole 1 and drill hole
q+;
qX
position machine by “target”
16
press
q
+ P twice
press axis key
counting for borehole 2 and drill second hole
38.900 (= deviation from nominal value)
appears in keyboard display
-after pressing axis key-25.300
appears in the position display
6. Operating examples
6.1
1. Example
Working with several datum points.
Several identical workpieces are to be
machined with 4 boreholes. If the
appropriate values are referenced to the
datum points during machining of the first
workpiece, then a “program” has been
stored, i.e. all further identical parts can be
positioned by calling up the individual
datum points (without re-entering of
dimensions or re-checking drawing).
press clear key and axes keys
preset datum point 1
press delta key
enter distance values to first
borehole
x=-30
Y=-15
appears in position display
address datum point 2
datum point 2 preset
position machine towards zero
press clear key and axis key
Lln
lslEllxl
address datum point &
once again
press A-key
enter dimension X = 65 mm
boreholes are dimensioned from datum
point b
deviation from nominal value
= -35 mm appears in position display
position machine towards zero
1311511y/
enter dimension Y = 35 mm
deviation from nominal value
= -20 mm appears in position display
select reached position as datum
point&
datum point k
position machine towards zero
preset
press clear key and axis keys
address datum point &
once again
press A-key
enter dimension X = 30 mm
X = +35 mm appears in position
display
enter dimension X = 15 mm
Y = +20 mm appears in position
display
switch off A-key
drill is positioned on first borehole
position machine towards zero
q ljslly
position machine towards zero
I4
x = 30
Y = 15, i.e. deviation from datum point&
appears (for checking only)
;=0
Y=O
with datum point 12
When the next workpiece is placed into
the jig, then the 4 boreholes can
be directly positioned by call-up of the
various datum points.
The same example is applicable to inner
contour milling (with “target” counting however, ensure that tool radius is taken
into account).
17
6.2
S.Example
(for several datum points and tool radius
compensation)
Face C is to be milled and boreholes I, II, III
drilled in main and auxiliary dimensioning
on a workpiece:
Example: (mm)
0
+
i
1
tI
\,Y
I
I u.u
t;
01
machine
datum
I
(160.40 see *)
* see table page 19
18
milling cutter diameter 9.98 entered
milling cutter radius stored (R = 4.99)
position datum point b = machine datum
and preset in X and Y axis
-
lCElIX/IY/
0n
mm
+4
q
0X
-
position machine X and Y axis, until X = 0 and Y = 0 appears
in position display
press datum point key 12 !
preset datum point 12 = 0 in X and Y axis
press A-key
enter value X = 70 mm
add milling cutter radius
press X key. Deviation from nominal value = 74.99
appears in position display
position machine by “target” counting
mill face C
remove milling tool and insert appropriate drill
enter distance X = 50.35 for borehole I
(A-key still functional)
press X key. Deviation from nominal value +24.64 mm
appears in position display
ml
enter distance value Y = 25.00 for borehole I
(A-key still functional)
0Y
press Y key. Deviation from nominal position appears
in position display
-
position machine in X and Y axis by “target” counting
drill borehole I
press datum point key 13 !
enter dimension for borehole II, X = -10.05
(A-key still functional)
-
position machine in X-axis by “target” counting
drill borehole II
enter dimension for borehole III (A-key still functional)
x = +10.05
-20.1 mm appears in position display
(deviation from nominal position)
position machine by “target” counting
drill borehole III
Lln
8
press A-key once again (indicator of A-key extinguished).
the deviation from the datum point & appears in the position
display = + 10.05 mm (for checking purposes only)
by pressing the datum point key JI+ or & the corresponding
absolute dimension referenced to the datum points is displayed,
e.g. for datum point k
referenced to borehole III:
X = +160.40 mm
Y = +125.00 mm
19
7. Control panel
DR. JOHANNES HEIDENHAIN GmbH
D-8225 Traunreut
Telephone (0 86 69) 31-1, Telex 05 6831
DR.JOHANNES HEIDENHAIN
21393501
e. 10. 9/81
E Printed in West Germany
Rights of alteration reserved