1
Operating Instructions
13. How to solve possible faults?
fault
runout not o.k.
cause
elimination
the new chuck must be seated
with the collet
before checking runout clamp 2
to 3x the tool and first then check
dirt or chips are in chuck,
clamping sleeve, clamping nut or
at the tool shank
please clean every parts acc. to
item 3 and 5 very intensively
differential screw is clamped too
strong (use of a prolongation?)
and results in a deformation of
the chuck
cutting tool itself has a bad
runout, for example long drills
clamp the differential screw as
suggested in item 8, but first
check the runout of the internal
cone of the chuck
check tool acc. to item 5
collet does not clamp on the
whole length
tool shank to be inserted the
whole length of the collet better
till the stop
an old and wearied collet is used
always use new original
FAHRION HP+ collets
bearing in the pre-setter resp. in
the runout check machine is not
o.k.
bearing problem in the machine
runout is not o.k. after automatic
tool change
coolant is spouting through the
clamping sleeve
ZB20004 . GB 1H 102006 EF · Rev. B
no coolant comes through the
tool
internal cone of the machine is
wearied out or there is dirt/chips
automatic tool changer is not
aligning to the machine spindle
wrong seal is inserted – shank-Ø
is smaller than the Ø to be
sealed
Operating Instructions
Operating Instructions
Precision Collet Chuck
1. Product features
•
•
•
•
•
•
•
low concentricity and repeatable accuracy (3µm checked at a distance 3x diameter or at a maximum
of 50 mm from the face of chuck)
radial clamping of entire tool shank leads to remarkable runout
bridging of shanks with tolerance H10 without loss of accuracy
clamping force several times higher as with conventional collet chucks or hydraulic chucks by our new
wedge clamping mechanism, as well as quick and easy cutting tool change on the machine
designed for HSC and conventional applications
for drilling, milling, tapping and reaming
taps can be clamped in standard collets
2. Executions
The
chuck is deliverable in different executions:
Steep taper DIN69871, HSK, MAS/BT, CAT and on customers request.
3. General hints and cleanness for use of a
chuck
In order to guarantee faultless function of the chuck and the 3µm runout, original FAHRION collets type
HP+ (produced to DIN 6499) must be used.
Collet Chuck, Collet, Clamping Sleeve at thread and all cylindrical and conic parts must always be clean
and free of chips and dirt.
The chucks are generally intended for the acceptance of interchangeable seals. The HP+ collets are
supplied with fitting seals. We recommend to use the seals always, as they protect possible entry of dirt
and chips into the chuck.
clamp chuck by hand to check
The clamping sleeve and the seals must be checked before inserting and be cleaned, if necessary.
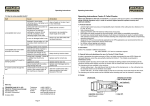
4. Design
replace seal
aggressive coolant
replace seal
tool is inserted with the edge
through the seal
replace seal
coolant bores in the chuck resp.
in the stop are resinified or the
coolant supply of the machine is
resinified
clean the coolant bores with a
cleaning medium (not acidic,
because of the rust)
FRANKEN GmbH & Co. KG · Fabrik für Präzisionswerkzeuge
Frankenstraße 7/9a · 90607 Rückersdorf · GERMANY · Telefon (09 11) 95 75-5 · Telefax (09 11) 95 75
[email protected] · www.emuge-franken.de · www.frankentechnik.de
Page 4
Page 1
Operating Instructions
Operating Instructions
5. Tool check
8. Clamping of the tool
Check the runout of the tool shank to the cutting edge to ensure that the cutting tool is acceptable. This
can be done for example on a template or in a prism.
Please use a Hexagon Tee key for clamping and do not use a prolongation! We even recommend to use
a torque setting wrench not to overclamp the chuck. Now clamp the differential screw with the Hexagon
Tee key or the torque setting wrench clockwise tight. The tools are clamped with a multiple of your hand
power.
6. Clamping of the tool
•
Screw in the differential screw with the Hexagon Tee key (only possible on one side) till it stops. Then
turn slightly back, because if you open to much the chuck starts to clamp the tool!
•
•
Put the seals into the clamping sleeve. The vulcanised side must be in the direction of the collet!
Torque schedule for clamping a HP chuck
type
max. clamping torque
HP16
6 Nm
4,5 ft lb
internal hex of the differential screw
Hex 3 mm
Insert the collet into the chuck.
HP25
18 Nm
13 ft lb
Hex 4 mm
HP32
HP40
25 Nm
45 Nm
18 ft lb
33 ft lb
Hex 5 mm
Hex 6 mm
9. Changing of the collet
Take the Hexagon Tee key and turn the differential screw anti-clockwise till the clamping wedge (2
threaded pieces) is stopped by the backstop. Then turn slightly back, because if you open to much the
chuck starts to clamp the tool!
Take out the tool, screw-out the clamping sleeve and then take out the collet and clean the cone.
•
Screw on the clamping sleeve into the clamping nut till it backstops. Then insert the tool through the
seal and collet till it backstops.
For cleaning of the internal cone of the chuck screw out the clamping wedge so that the ejection sleeve
will be draw back to the chuck, clean the cone and screw-in the differential screw again, before clamping
a new diameter (very important).
Attention:
Before clamping a new collet please take care for items 3 and 5 and use always an
original FAHRION HP+ collet.
10. Changing of the tool
After using the chuck there are normally chips and dirt at the seals. When changing the tools these parts
can enter into the chuck. The runout can be influenced then!
We recommend to remove always the tool, the collet and the clamping sleeve from the chuck when
replacing a tool and to clean everything.
11. Attendance
It is very important that the clamping wedges are running easy. The more difficult it is to move these parts
the less is the clamping force. In this case it is necessary to grease the parts. To do this the clamping
sleeve has to be removed and the clamping wedges have to be turned out.
Grease now the visible threads of the clamping wedges. We recommend Altemp Q NB50 from Klüber.
7. Tool length pre-setting
12. Safety
The tool pre-setting is possible from the front by a screw driver.
Be aware of the safety instructions of the machine or other tools used! Never work with open machine
door, especially at high speed or use of HSK tapers can lead a break and/or a crash of the HSK tool
clamping/acceptance and/or the cutting tool to serious injuries
adjustable length of the stop screw
HP16
3 mm
HP25
5 mm
HP32
5 mm
HP40
5 mm
Page 2
Page 3
Operating Instructions
Operating Instructions
5. Tool check
8. Clamping of the tool
Check the runout of the tool shank to the cutting edge to ensure that the cutting tool is acceptable. This
can be done for example on a template or in a prism.
Please use a Hexagon Tee key for clamping and do not use a prolongation! We even recommend to use
a torque setting wrench not to overclamp the chuck. Now clamp the differential screw with the Hexagon
Tee key or the torque setting wrench clockwise tight. The tools are clamped with a multiple of your hand
power.
6. Clamping of the tool
•
Screw in the differential screw with the Hexagon Tee key (only possible on one side) till it stops. Then
turn slightly back, because if you open to much the chuck starts to clamp the tool!
•
•
Put the seals into the clamping sleeve. The vulcanised side must be in the direction of the collet!
Torque schedule for clamping a HP chuck
type
max. clamping torque
HP16
6 Nm
4,5 ft lb
internal hex of the differential screw
Hex 3 mm
Insert the collet into the chuck.
HP25
18 Nm
13 ft lb
Hex 4 mm
HP32
HP40
25 Nm
45 Nm
18 ft lb
33 ft lb
Hex 5 mm
Hex 6 mm
9. Changing of the collet
Take the Hexagon Tee key and turn the differential screw anti-clockwise till the clamping wedge (2
threaded pieces) is stopped by the backstop. Then turn slightly back, because if you open to much the
chuck starts to clamp the tool!
Take out the tool, screw-out the clamping sleeve and then take out the collet and clean the cone.
•
Screw on the clamping sleeve into the clamping nut till it backstops. Then insert the tool through the
seal and collet till it backstops.
For cleaning of the internal cone of the chuck screw out the clamping wedge so that the ejection sleeve
will be draw back to the chuck, clean the cone and screw-in the differential screw again, before clamping
a new diameter (very important).
Attention:
Before clamping a new collet please take care for items 3 and 5 and use always an
original FAHRION HP+ collet.
10. Changing of the tool
After using the chuck there are normally chips and dirt at the seals. When changing the tools these parts
can enter into the chuck. The runout can be influenced then!
We recommend to remove always the tool, the collet and the clamping sleeve from the chuck when
replacing a tool and to clean everything.
11. Attendance
It is very important that the clamping wedges are running easy. The more difficult it is to move these parts
the less is the clamping force. In this case it is necessary to grease the parts. To do this the clamping
sleeve has to be removed and the clamping wedges have to be turned out.
Grease now the visible threads of the clamping wedges. We recommend Altemp Q NB50 from Klüber.
7. Tool length pre-setting
12. Safety
The tool pre-setting is possible from the front by a screw driver.
Be aware of the safety instructions of the machine or other tools used! Never work with open machine
door, especially at high speed or use of HSK tapers can lead a break and/or a crash of the HSK tool
clamping/acceptance and/or the cutting tool to serious injuries
adjustable length of the stop screw
HP16
3 mm
HP25
5 mm
HP32
5 mm
HP40
5 mm
Page 2
Page 3
Operating Instructions
13. How to solve possible faults?
fault
runout not o.k.
cause
elimination
the new chuck must be seated
with the collet
before checking runout clamp 2
to 3x the tool and first then check
dirt or chips are in chuck,
clamping sleeve, clamping nut or
at the tool shank
please clean every parts acc. to
item 3 and 5 very intensively
differential screw is clamped too
strong (use of a prolongation?)
and results in a deformation of
the chuck
cutting tool itself has a bad
runout, for example long drills
clamp the differential screw as
suggested in item 8, but first
check the runout of the internal
cone of the chuck
check tool acc. to item 5
collet does not clamp on the
whole length
tool shank to be inserted the
whole length of the collet better
till the stop
an old and wearied collet is used
always use new original
FAHRION HP+ collets
bearing in the pre-setter resp. in
the runout check machine is not
o.k.
bearing problem in the machine
runout is not o.k. after automatic
tool change
coolant is spouting through the
clamping sleeve
ZB20004 . GB 1H 102006 EF · Rev. B
no coolant comes through the
tool
internal cone of the machine is
wearied out or there is dirt/chips
automatic tool changer is not
aligning to the machine spindle
wrong seal is inserted – shank-Ø
is smaller than the Ø to be
sealed
Operating Instructions
Operating Instructions
Precision Collet Chuck
1. Product features
•
•
•
•
•
•
•
low concentricity and repeatable accuracy (3µm checked at a distance 3x diameter or at a maximum
of 50 mm from the face of chuck)
radial clamping of entire tool shank leads to remarkable runout
bridging of shanks with tolerance H10 without loss of accuracy
clamping force several times higher as with conventional collet chucks or hydraulic chucks by our new
wedge clamping mechanism, as well as quick and easy cutting tool change on the machine
designed for HSC and conventional applications
for drilling, milling, tapping and reaming
taps can be clamped in standard collets
2. Executions
The
chuck is deliverable in different executions:
Steep taper DIN69871, HSK, MAS/BT, CAT and on customers request.
3. General hints and cleanness for use of a
chuck
In order to guarantee faultless function of the chuck and the 3µm runout, original FAHRION collets type
HP+ (produced to DIN 6499) must be used.
Collet Chuck, Collet, Clamping Sleeve at thread and all cylindrical and conic parts must always be clean
and free of chips and dirt.
The chucks are generally intended for the acceptance of interchangeable seals. The HP+ collets are
supplied with fitting seals. We recommend to use the seals always, as they protect possible entry of dirt
and chips into the chuck.
clamp chuck by hand to check
The clamping sleeve and the seals must be checked before inserting and be cleaned, if necessary.
4. Design
replace seal
aggressive coolant
replace seal
tool is inserted with the edge
through the seal
replace seal
coolant bores in the chuck resp.
in the stop are resinified or the
coolant supply of the machine is
resinified
clean the coolant bores with a
cleaning medium (not acidic,
because of the rust)
FRANKEN GmbH & Co. KG · Fabrik für Präzisionswerkzeuge
Frankenstraße 7/9a · 90607 Rückersdorf · GERMANY · Telefon (09 11) 95 75-5 · Telefax (09 11) 95 75
[email protected] · www.emuge-franken.de · www.frankentechnik.de
Page 4
Page 1