1
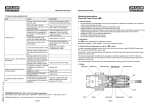
Operating Instructions
13. How to solve possible faults?
fault
Operating Instructions Centro P Collet Chucks
Cause
elimination
dirt/swarf in chuck body,
clamping sleeve, clamping nut or
at the tool shank
cutting tool itself inaccurate, for
example long drills
unacceptable tool runout
clean all parts ref. to item 3 and
5 very intensively
ZB20005.GB
1H 102006 EF · Rev. A
no coolant comes through the
tool
1. Product features
•
tool shank is not clamped
sufficiently, minimum 2/3 (at
small Ø completely) of the
clamping length of the collet
tool shank to be inserted the
whole length of the collet
•
•
•
•
a worn or damaged collet in use
always use new ER Collets with
narrowed tolerance
wrong seal is inserted – shank-Ø
is smaller than the Ø to be
sealed
aggressive coolant
tool is inserted with the cutting
edge through the seal
coolant bores in the chuck, stop
screw or the coolant supply of
the machine are impaired.
extreme high system accuracy and repeatability (5m checked at the cutting tool at a distance of 3 x
D, max. 50 mm)
high clamping forces
gripping of shanks with H10 tolerance without loss of accuracy
tool shanks are axially clamped on the entire length, which leads to remarkable concentricity
the extra long, double length guide between chuck body and clamping nut results in perfect stability
with maximum compactness, which minimises bending and compression loads without compromising
operating clearances.
designed for HPC and conventional applications (for HPC applications we recommend the Mini nut
versions as their construction reduces wind noise)
for drilling, milling, tapping and reaming
taps can be clamped in standard collets
2. Executions
internal cone of the machine is
worn or there is dirt/swarf
automatic tool changer is not
aligned to the machine spindle
•
•
•
bearing problem in the machine
coolant is spouting through the
clamping sleeve
Please pay attention to the fact that Centro P is a precision collet chuck system, and constructed to
clamp nominal diameters only, in order to achieve highest possible system accuracy and
optimum stability!
check tool ref. to item 5
bearing in the pre-setter or in the
accuracy check machine is not
o.k.
unacceptable tool runout after
automatic tool change
Operating Instructions
Centro P is available in different executions:
SK, HSK, MAS/BT, CAT and on customers request.
clamp chuck by hand to check
replace seal for correct size
replace seal for new one
replace seal if damaged and reposition tool
clean the coolant bores with a
cleaning medium (not acidic,
because of the rust)
3. General hints and cleanliness for use of a Centro P Collet Chuck
In order to guarantee the system accuracy of 5m, we highly recommend the use of ER Collets with
narrowed tolerance, since they are perfectly matched to Centro P. The Collets are produced to
DIN6499/ISO15488.
To maintain system accuracy and in order not to damage the sliding surfaces of the clamping nut the
cylindrical double guides before and after the thread, and the thread itself must be free of swarf and dirt.
The clamping nuts are available in two versions:
• Version without seal – the collet face is flush to the face of the clamping nut, i.e. the cutting tool can
be clamped shorter and is therefore more stable
• Version with seal – for inner coolant supply as well as to avoid entry of dirt and swarf into the chuck.
The clamping nut and the seals must be checked before inserting and must be cleaned if necessary.
4. Design
Sales by:
FRANKEN GmbH & Co. KG
Fabrik für Präzisionswerkzeuge
Frankenstraße 7/9a
DE-90607 Rückersdorf
Telephone
Facsimile
E-Mail
Internet
October 2006
Page 4
+49/911/9575-5
+49/911/9575-327
[email protected]
www.emuge-franken.de
www.frankentechnik.de
Page 1
Operating Instructions
Operating Instructions
5. Tool check
8. Clamping of the cutting tool
Inspect and clean the tool shank to be clamped. Check the accuracy from the shank to the cutting edge
(this can be done for example in a vee block).
Clamping is made by either a hook wrench DIN1810-B with pin for standard nuts or special wrench for the
mini nuts.
For the standard nuts, sizes ER16 as well as size ER32 we recommend to use a torque setting wrench
with the respective heads for clamping, especially for milling in order to get the optimum clamping forces.
The maximum clamping torque is also mentioned on the clamping nut.
6. Tool length pre-setting
Tool length pre-setting is possible from the front as well as from the rear through the chuck body.
In order to clamp the cutting tool in the optimum position (i.e. as short as possible, but as long as
necessary), we offer three types of adjustable stops:
• form U, for long tool shanks that go through the collet into the collet chuck,
• form W, when the tool shank ends in the collet. This is particularly the case with small diameters
(note: minimum 2/3 of the clamping length of the collet should be clamped) and
• form R is a blank, which can be adapted to the diameter of the collet. The diameter of the adjustable
stop must be minimum 0,5 mm smaller than the nominal diameter of the collet, in order to ensure that
the collet clamps only the shank of the cutting tool.
Schedule of the torque moments for clamping the chucks
max. clamping
type
wrenches
torque
ER16M
28Nm
6681.16M
heads for torque setting
wrenches
ER16
50Nm
6681.16
6692.10
ER32
105Nm
6681.32
6692.20
7. Clamping of the cutting tool
•
•
If necessary, insert the fitting seal (the vulcanised side must locate against the collet face).
Press the collet axially into the clamping nut until the collet head clips into the extraction groove (note:
no eccentric).
9. Changing of the collet
When loosening the clamping nut the collet is extracted out of the chuck body. Having removed the
cutting tool from the collet, lateral pressure the collet leaves will aid removal from the clamping nut.
In order not to damage the collet we highly recommend the use of our collet extractor, with which the
collet can be removed safely and easily from the clamping nut.
Attention:
Before repeated insertion and clamping of a collet please make reference to items 3
and 5 and use only ER Collets with narrowed tolerance.
10. Changing of the cutting tool
•
•
•
Insert the cutting tool into the collet.
Length pre-setting from the front with screw driver/socket wrench.
Screw on the clamping nut by hand loose on the chuck body.
It must be ensured that there is no swarf or dirt on the surfaces of the collet, which could negatively
influence the system accuracy and damage the collet.
When changing the cutting tool, the clamping nut and the collet should be removed from the chuck body
and cleaned thoroughly.
11. Maintenance
A special maintenance additional to normal cleaning processes is not necessary.
12. Safety
Be aware of the safety instructions of the machine or other tools used! Never work with open machine
door, especially at high speed or when using HSK tapers. Collisions at high speed could result in
breakage of the cutting tool or collet chuck causing serious injury.
•
•
Insert the cutting tool till it backstops.
Alternatively length pre-setting from the rear with T-handle hex wrenches.
Page 2
Page 3
Operating Instructions
Operating Instructions
5. Tool check
8. Clamping of the cutting tool
Inspect and clean the tool shank to be clamped. Check the accuracy from the shank to the cutting edge
(this can be done for example in a vee block).
Clamping is made by either a hook wrench DIN1810-B with pin for standard nuts or special wrench for the
mini nuts.
For the standard nuts, sizes ER16 as well as size ER32 we recommend to use a torque setting wrench
with the respective heads for clamping, especially for milling in order to get the optimum clamping forces.
The maximum clamping torque is also mentioned on the clamping nut.
6. Tool length pre-setting
Tool length pre-setting is possible from the front as well as from the rear through the chuck body.
In order to clamp the cutting tool in the optimum position (i.e. as short as possible, but as long as
necessary), we offer three types of adjustable stops:
• form U, for long tool shanks that go through the collet into the collet chuck,
• form W, when the tool shank ends in the collet. This is particularly the case with small diameters
(note: minimum 2/3 of the clamping length of the collet should be clamped) and
• form R is a blank, which can be adapted to the diameter of the collet. The diameter of the adjustable
stop must be minimum 0,5 mm smaller than the nominal diameter of the collet, in order to ensure that
the collet clamps only the shank of the cutting tool.
Schedule of the torque moments for clamping the chucks
max. clamping
type
wrenches
torque
ER16M
28Nm
6681.16M
heads for torque setting
wrenches
ER16
50Nm
6681.16
6692.10
ER32
105Nm
6681.32
6692.20
7. Clamping of the cutting tool
•
•
If necessary, insert the fitting seal (the vulcanised side must locate against the collet face).
Press the collet axially into the clamping nut until the collet head clips into the extraction groove (note:
no eccentric).
9. Changing of the collet
When loosening the clamping nut the collet is extracted out of the chuck body. Having removed the
cutting tool from the collet, lateral pressure the collet leaves will aid removal from the clamping nut.
In order not to damage the collet we highly recommend the use of our collet extractor, with which the
collet can be removed safely and easily from the clamping nut.
Attention:
Before repeated insertion and clamping of a collet please make reference to items 3
and 5 and use only ER Collets with narrowed tolerance.
10. Changing of the cutting tool
•
•
•
Insert the cutting tool into the collet.
Length pre-setting from the front with screw driver/socket wrench.
Screw on the clamping nut by hand loose on the chuck body.
It must be ensured that there is no swarf or dirt on the surfaces of the collet, which could negatively
influence the system accuracy and damage the collet.
When changing the cutting tool, the clamping nut and the collet should be removed from the chuck body
and cleaned thoroughly.
11. Maintenance
A special maintenance additional to normal cleaning processes is not necessary.
12. Safety
Be aware of the safety instructions of the machine or other tools used! Never work with open machine
door, especially at high speed or when using HSK tapers. Collisions at high speed could result in
breakage of the cutting tool or collet chuck causing serious injury.
•
•
Insert the cutting tool till it backstops.
Alternatively length pre-setting from the rear with T-handle hex wrenches.
Page 2
Page 3
Operating Instructions
13. How to solve possible faults?
fault
Operating Instructions Centro P Collet Chucks
Cause
elimination
dirt/swarf in chuck body,
clamping sleeve, clamping nut or
at the tool shank
cutting tool itself inaccurate, for
example long drills
unacceptable tool runout
clean all parts ref. to item 3 and
5 very intensively
ZB20005.GB
1H 102006 EF · Rev. A
no coolant comes through the
tool
1. Product features
•
tool shank is not clamped
sufficiently, minimum 2/3 (at
small Ø completely) of the
clamping length of the collet
tool shank to be inserted the
whole length of the collet
•
•
•
•
a worn or damaged collet in use
always use new ER Collets with
narrowed tolerance
wrong seal is inserted – shank-Ø
is smaller than the Ø to be
sealed
aggressive coolant
tool is inserted with the cutting
edge through the seal
coolant bores in the chuck, stop
screw or the coolant supply of
the machine are impaired.
extreme high system accuracy and repeatability (5m checked at the cutting tool at a distance of 3 x
D, max. 50 mm)
high clamping forces
gripping of shanks with H10 tolerance without loss of accuracy
tool shanks are axially clamped on the entire length, which leads to remarkable concentricity
the extra long, double length guide between chuck body and clamping nut results in perfect stability
with maximum compactness, which minimises bending and compression loads without compromising
operating clearances.
designed for HPC and conventional applications (for HPC applications we recommend the Mini nut
versions as their construction reduces wind noise)
for drilling, milling, tapping and reaming
taps can be clamped in standard collets
2. Executions
internal cone of the machine is
worn or there is dirt/swarf
automatic tool changer is not
aligned to the machine spindle
•
•
•
bearing problem in the machine
coolant is spouting through the
clamping sleeve
Please pay attention to the fact that Centro P is a precision collet chuck system, and constructed to
clamp nominal diameters only, in order to achieve highest possible system accuracy and
optimum stability!
check tool ref. to item 5
bearing in the pre-setter or in the
accuracy check machine is not
o.k.
unacceptable tool runout after
automatic tool change
Operating Instructions
Centro P is available in different executions:
SK, HSK, MAS/BT, CAT and on customers request.
clamp chuck by hand to check
replace seal for correct size
replace seal for new one
replace seal if damaged and reposition tool
clean the coolant bores with a
cleaning medium (not acidic,
because of the rust)
3. General hints and cleanliness for use of a Centro P Collet Chuck
In order to guarantee the system accuracy of 5m, we highly recommend the use of ER Collets with
narrowed tolerance, since they are perfectly matched to Centro P. The Collets are produced to
DIN6499/ISO15488.
To maintain system accuracy and in order not to damage the sliding surfaces of the clamping nut the
cylindrical double guides before and after the thread, and the thread itself must be free of swarf and dirt.
The clamping nuts are available in two versions:
• Version without seal – the collet face is flush to the face of the clamping nut, i.e. the cutting tool can
be clamped shorter and is therefore more stable
• Version with seal – for inner coolant supply as well as to avoid entry of dirt and swarf into the chuck.
The clamping nut and the seals must be checked before inserting and must be cleaned if necessary.
4. Design
Sales by:
FRANKEN GmbH & Co. KG
Fabrik für Präzisionswerkzeuge
Frankenstraße 7/9a
DE-90607 Rückersdorf
Telephone
Facsimile
E-Mail
Internet
October 2006
Page 4
+49/911/9575-5
+49/911/9575-327
[email protected]
www.emuge-franken.de
www.frankentechnik.de
Page 1