1
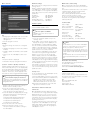
Menu structure
Network settings
Maintenance and cleaning
The network can be configured in the "Network
settings" menu.
DHCP is activated or deactivated by clicking the
"Use DHCP" box. "DHCP" is active as standard.
If the LAN adapter is not assigned an IP address
within 10 seconds it uses the following network
parameters:
Before cleaning, disconnect the LAN adapter
from the mains. Pull it out of the socket outlet for
this.
IP address:
Subnet mask:
Gateway:
Primary DNS server:
Secondary DNS server:
192.168.1.50
255.255.255.0
192.168.1.1
192.168.1.1
192.168.1.1
The product is maintenance-free. Leave repair to
a qualified expert. Clean the product with a
clean, soft, dry and lint-free cloth.
The cloth may be dampened with luke-warm
water for removal of heavier soiling.
Do not use solvent-based cleaning materials.
The plastic housing and inscription may be
adversely affected.
Technical data
Firmware update
The firmware of the LAN adapter can be updated
in the "Firmware update" menu.
i
230 V / 50 Hz
Power consumption:
1.2 W
Connected load:
max. 3860 VA
Transmission interval:
2 to 3 minutes
(dynamic)
Do not update via WLAN
No WLAN connection can be used for a
firmware update.
File
Power supply:
Transmission
frequency:
868.35 MHz
Free field range:
100 m
• Changing the LAN adapter: with several LAN
adapters the required LAN adapter can be
changed here.
To update the firmware:
Temperature range:
0 to 50 °C
1. Select the "Firmware update" entry in the
"Settings" menu.
Dimensions (WxHxD):
57 x 127 x 40 mm
• Exit: the program is exited.
✓ The update is then installed. A progress bar
Settings
• Network settings: the network is configured
here
• Language: language selection for the software
interface
• Firmware update: the firmware can be updated here
• Factory reset: the LAN adapter can be reset
here
Help
• Help: the manual is displayed
• Information: display of program information
Location - channel 1 (Home) / channel 2
If weather data from two different locations, e.g.
home and holiday home, are to be displayed by
the energy and weather display, then the display
for your home location should be assigned to
channel 1. In this case, "Home" appears in the
forecast area of the energy and weather display.
i
Modifying the setting at the energy
and weather display for channel 2.
If channel 2 is to be assigned to the energy and
weather display, "LAN 2" must be selected in the
configuration menu.
1. Select the corresponding tab: for example:
Channel 1 (Home) for the home location, or
Channel 2 for the holiday location
2. Select the country and location for the
weather forecast by manually entering these
or by specifying via the drop-down list.
3. Select the data to be displayed by the energy
and weather display. The following display
possibilities are available:
• Minimum and maximum temperature
• Temperature and probability of rain
• Temperature and wind speed
• Temperature and humidity
4. Select the time zone of the location.
5. After specifying the settings, click on
"Accept" to transfer the channel settings to
the LAN adapter.
displays the progress of the update process.
The LAN adapter is restarted after the update.
Here the connection between the PC and LAN
adapter is interrupted. A message is displayed
on the screen if the restart is completed and the
update has been successfully installed.
The restart of the LAN adapter means that synchronisation to assigned energy and weather
displays is lost. In this case the energy and
weather display searches for the LAN adapter
during the next 15 minutes. In order to manually
restore synchronisation, the assignment of the
LAN adapter to the energy and weather display
can be reassigned, as specified in the "Assigning
the LAN adapter" section.
If the update could not be installed successfully
an error message appears on the screen. In this
case check the network settings and repeat the
update procedure.
i
Note
The manufacturer or seller of this LAN adapter
accepts no responsibility for incorrect values
and any consequences that may ensue.
The manufacturer or seller has no influence on
the transmitted weather data and forecasts. The
weather data are made available by an external
provider.
The manufacturer does not assume warranty for
uninterrupted availability and correctness of
data.
Declaration of Conformity
The LAN adapter may be operated in all
EU and EFTA countries.
The declaration of conformity can be
downloaded at www.download.gira.de.
Warranty
Factory reset
In case of malfunctions, the LAN adapter can be
reset to the factory settings:
1. Pull the LAN adapter out of the socket outlet.
2. Press both buttons (Channel 1 and Channel 2)
simultaneously and then insert the LAN
adapter into the socket outlet again. Press
and hold both buttons here for 3 seconds.
✓ Both LEDs flash rapidly for 2 seconds and
light up for a further 5 seconds.
Transmission behaviour and radio
interference
The LAN adapter transmits data at periods of
2 - 3 minutes to the energy and weather display.
Radio transmission occurs on a non-exclusive
transmission path, and interference cannot be
excluded for this reason. For further information
please consult the energy and weather display
operating instructions.
In order to manually restore synchronisation, the
assignment of the LAN adapter to the energy
and weather display can be deactivated and
reassigned, as specified in the "Assigning the
LAN adapter" section.
We provide a warranty in accordance with the
statutory requirements.
Please send the device postage paid with error
description via the specialist trade to our central
customer service centre.
Gira
Giersiepen GmbH & Co. KG
Service Center
Dahlienstraße 12
42477 Radevormwald