1
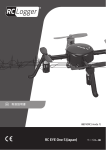
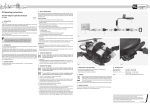
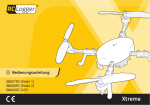
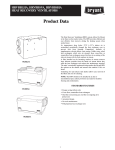
Operating instructions
RC EYE OneLINK
No. 89036RC
Version 11/13
1. INTRODUCTION
Dear customer,
Thank you for making the excellent decision to purchase this RC Logger® product. You now have
a high-quality product with a name that represents outstanding products.
This product complies with the applicable National standards and regulations. We kindly request
the user to follow the operating instructions, to preserve this condition and to ensure safe
operation! These operating instructions relate to this product. They contain important notices on
commissioning and handling. Please take this into consideration when you pass the product on
to third parties. Please keep these instructions for further reference!
All company names and product designations contained herein are trademarks of the respective
owners. All rights reserved.
We wish you a great deal of enjoyment with your new RC Logger® product!
Please download the latest version of the operating instructions from our
website at www.rclogger.com. Navigate to the product page and open the
“Downloads” tab. Click on “Operating instructions” to start the download.
2. INTENDED USE
This product is intended for working with the RC EYE ONE S (not included) or RC EYE ONE
Xtreme (not included) to allow controlling via branded remote control transmitters. With suitable
cables, the “OneLINK” is compatible with remote control transmitters from the most popular
brands in the model craft industry.
Read the instructions carefully and keep them. Make this product available to third parties only
together with its operating instructions.
>> If it is no longer possible to operate the product safely, take it out of operation and protect it
from any accidental use. Safe operation can no longer be guaranteed if the product:
-- is visibly damaged,
-- is no longer working properly,
-- has been stored for extended periods in poor ambient conditions or
-- has been subjected to any serious transport-related stresses.
>> Please handle the product carefully. Jolts, impacts or a fall even from a low height can damage
the product.
>> Also observe the safety and operating instructions of any other devices which are connected
to the product.
>> Not following the instructions in these operating instructions may result in dangers such as
short circuit, fire, electric shock, etc. Observe the safety information under all circumstances!
Miscellaneous
>> Consult an expert when in doubt about operation, safety or connection of the device.
>> Maintenance, modifications and repairs are to be performed exclusively by an expert or at a
qualified shop.
>> If you have questions which remain unanswered by these operating instructions, contact our
technical support service or other technical personnel.
6. OPERATING ELEMENTS
9
8
7
6
1
2
3
4
5
1
2
3
4
5
6
7
8
9
Button “ON/OFF”
Button “Bind” / “Select-Frequency”
Button “Learning” / “Upgrade-Firmware”
Battery compartment
Receiver body
microUSB port
Status LED
Antenna connector
Antenna
From here onwards the “RC EYE OneLINK” is referred to as “OneLINK”.
3. DELIVERY CONTENT
>>
>>
>>
>>
>>
>>
>>
RC EYE OneLINK
2.4 GHz Antenna
Futaba box trainer cable (89056RC)
JR mono plug trainer cable (89058RC)
Micro USB to USB Cable (89060RC)
2 x 1.5 V AAA battery
Operating instructions
4. PRODUCT COMPATIBILITY
The TX module can be used in combination with the following other RC Logger products:
>> Micro USB Trigger Port Cable (89059RC)
>> Futaba Round Trainer Cable (89057RC)
7. INSTALLING THE ANTENNA
Connect the antenna to the “OneLINK” before applying voltage to the
“OneLINK”. If the “OneLINK” is powered on without the antenna installed for
more than 5 mins, it may be damaged.
Connect the included 2.4 GHz antenna to the antenna connector (8) at the top of the
“RC EYE OneLINK”.
8. INSERTING BATTERIES
Open the battery compartment at the rear by sliding the compartment cover towards the bottom.
Insert two AAA type batteries into the compartment. Observe the polarities as indicated in the
battery compartment. After inserting the batteries the status LED (7) lights up.
9. CONNECTING TO A REMOTE TRANSMITTER
When using the “OneLINK”, turn off signal transmission via antenna on your
transmitter. Signal should only be transmitted via trainer port. Read the
operating instructions of your transmitter for more information.
5. SAFETY INSTRUCTIONS
Read the operating instructions carefully and especially observe the safety
information. If you do not follow the safety instructions and information on
proper handling in this manual, we assume no liability for any resulting
personal injury or damage to property. Such cases will invalidate the warranty/
guarantee.
Persons / Product
>> The device is not a toy. Keep it out of the reach of children and pets.
>> Do not leave packaging material lying around carelessly. These may become dangerous
playing material for children.
>> Protect the product from extreme temperatures, direct sunlight, strong jolts, high humidity,
moisture, flammable gases, vapours and solvents.
>> Do not place the product under any mechanical stress.
Connect the microUSB port (6) on the “OneLINK” to the trainer port of your transmitter by a
suitable cable. Refer to the cable compatibility table of section “22. Compatibility table” and select
the correct cable for your transmitter. If no transmitter is learned the “OneLINK” waits for correct
learning after first startup.
LED indications
Solid
No signal received from transmitter
Flashing slowly
“OneLINK” is transmitting on the chosen channel
Troubleshooting
Transmitter
Is the transmitter turned on?
Cable
Faulty cable connection. Disconnect and re-connect
the cable.
10. POWER ON/OFF
15. LOW BATTERY ALERT
To turn the “OneLINK” on, press the button “ON/OFF” (1) once. To turn the “OneLINK” off, press
and hold the “ON/OFF” button for approx. 3 seconds. The status LED (7) goes out. Note the
following conditions when using the “OneLINK”:
>> If the “OneLINK” is turned off when cable is not connected, a short press to the button ON/
OFF (1) turns the “OneLINK” on until signal received from the transmitter (connected and
turned on).
>> Auto power off: The “OneLINK” turns off automatically if no user input is detected for 7
minutes. You can wake the “OneLINK” by pressing the “ON/OFF” button.
A repeated beep sound at 5 seconds interval indicates depleted batteries. You must stop
operation immediately and replace the batteries before operating again.
11. LEARNING
Ensure no mixer is applied on your transmitter and put throttle to zero position. Hold and press
the button “Learning” (3) for approx. 3 seconds to enable learning mode for the remote control.
The “OneLINK” emits a buzzing sound indicating the mode is enabled. As a next step you must
learn the channels with the transmitter:
1st channel :
push throttle to max and back to 0
2nd channel :
push rudder to left and back to 0
3rd channel :
push nick to front and back to 0
4th channel :
push roll to left and back to 0
5th channel :(for flight mode)
turn on a 3 CH switch and then off
6th channel : (for height hold / normal / acromode function)
turn on a 3 CH switch and then off
7th channel : (for Camera triggers)
turn on a 2 CH switch (or button) and then off
A short buzzer beep indicates each channel is learnt. Also status LED (5) blinks n-th times when
the n-th channel is learnt (example: For channel 6, the status LED will blink 6 times). After the last
channel is learnt, the status LED (7) blinks slowly.
16. FIRMWARE UPGRADE
You may upgrade the firmware via a computer. Proceed as follows to upgrade the firmware:
1. Use the provided Micro USB to USB cable and connect the “OneLINK” to a computer via the
microUSB port (6).
2. Remove the batteries from the battery compartment.
3. While pressing and holding the “Upgrade-Firmware” button insert the batteries into the
battery compartment. The “OneLINK” shows up as a USB mass storage device in your
computer (It may take up to 3 minutes).
4. In the shown USB mass storage drive replace the file “firmware.bin” with the latest firmware
file.
Further information can be found on http://www.rclogger.com.
17. MAINTENANCE, CARE AND REPAIR
>>
>>
>>
>>
Remove the batteries before cleaning and maintenance.
Regularily clean the “OneLINK” with a dry cloth.
Do not use abrasive cleaners or alcohol.
Repairs should only be handled by a professional.
18. DISPOSAL
General
Learning of 7th channel is not a must. After an 8 second delay from learning of 6th
channel learning mode will automatically be quit if no input for 7th channel is made.
Batteries / rechargeable batteries
12. FREQUENCY SELECTION
The “OneLINK” is equipped with double frequency. Depending on your needs you can switch
the frequencies. Press and hold the button “Select-Frequency” for approx. 3 seconds to enter
frequency selection mode. Select desired frequency by following below table:
Frequency selection
89036RC
In order to preserve, protect and improve the quality of environment, protect
human health and utilise natural resources prudently and rationally, the user
should return unserviceable product to relevant facilities in accordance with
statutory regulations. The crossed-out wheeled bin indicates the product needs
to be disposed separately and not as municipal waste.
915 MHz
(RC EYE ONE)
Press button “Select-Frequency” repeatedly until
status LED blinks 1 time and 3 buzzer sounds
are emitted.
2.4 GHz
(RC EYE ONE S /
RC EYE Xtreme)
Press button “Select-Frequency” repeatedly until
status LED blinks 2 times and 1 buzzer sound is
emitted.
Confirm selection by pressing the “ON/OFF” button. After that the “OneLINK” emits one beep
sound.
13. CHANNEL SELECTION MODE
This section is only valid for RC EYE ONE.
1. Hold and press the button “Select-Frequency” (3) for approx. 3 seconds to switch to
frequency selection mode. Once frequency selection mode is enabled the “OneLINK” emits
a beep sound and the status LED (7) goes out.
2. Press the button “Learning” to navigate through channels 1 – 5. Each channels is indicated
by the corresponding number of beep sounds (example: Channel 5, five beep sounds).
3. To cancel/close the channel selection mode, press the button “ON/OFF” . The “OneLINK”
emits one beep sound and enters operation mode again. The status LED blinks slowly.
14. BINDING
To bind the “OneLINK” to your model craft, proceed as follows:
1. Press button “Bind” (2) once. The “OneLINK” enters binding mode for 20 seconds.
2. The “OneLINK” is being bound to the “RC EYE ONE/S/Xtreme”. The status LED (7) blinks
fast during binding and blinks slowly again once binding has completed.
3. Check the status LED on your “RC EYE ONE S” / “RC EYE Xtreme” to confirm successful
binding.
The user is legally obliged (battery regulation) to return used batteries and
rechargeable batteries. Disposing used batteries in the household waste is
prohibited! Batteries/ rechargeable batteries containing hazardous substances
are marked with the crossed-out wheeled bin. The symbol indicates that the
product is forbidden to be disposed via the domestic refuse. The chemical
symbols for the respective hazardous substances are Cd = Cadmium, Hg =
Mercury, Pb = Lead. You can return used batteries/ rechargeable batteries free of
charge to any collecting point of your local authority, our stores or where batteries/
rechargeable batteries are sold.
Consequently you comply with your legal obligations and contribute to environmental protection!
19. FCC COMPLIANCE STATEMENT
FCC ID:
Y2H-89036RC
Statement according to FCC part 15.19:
This device complies with Part 15 of the FCC Rules. Operation is subject to the following two
conditions:
>> This device may not cause harmful interference, and
>> This device must accept any interference received, including interference that may cause
undesired operation.
Statement according to FCC part 15.21:
Modifications not expressly approved by this company could void the user’s authority to operate
the equipment.
20. PRODUCT SUPPORT
Visit “http://www.rclogger.com/index.php/contact-us” or call +852 2559 2662 for product support.
Additionally visit our support forum at “http://rclogger.com/forum”.
21. TECHNICAL DATA
Operating voltage..............................................2 x 1.5 V/DC AAA batteries
Transmission Frequency...................................915 MHz / 2.4GHz
Dimensions (W x H x D)....................................59 x 65 x 21.5 mm
Weight...............................................................70 g
22. COMPATIBILITY TABLE
Cable
Supporting Brand
Supporting Model
Futaba®
4YF (72 MHz), 4YBF, 6EX,
6J, 7C, 8FG, 8J, 9C, 10C,
12FG & 14SG,
4YF (2.4 GHz), 12Z, 14MZ
& 18MZ
Tower Hobbies®
4TH & 6XM
Futaba®
4VF, 5U, 6A, 6DA, 6H, 6YF,
6YG, 7NFK, 8U & 9Z
Hitec®
Neon, Flash 4sx, 5, 5sx,
Focus 4, 6, Laser 4, 6,
Optic 5 (72 MHz),
Optic 6 (72 MHz, 2.4 GHz),
Eclipse 7 (72 MHz),
Prism 7 & Prism 7X
Tower Hobbies®
4FM & 6FM
JR®
All aircraft transmitters with
trainer/DSC jack
Spektrum®
DX4e, DX5e, DX6, DX6i &
DX7, DX7s, DX8, DX10t &
DX18
Graupner®
MX-16
Hitec®
Optic 5, Optic 6 Sport &
Eclipse 7 (2.4 GHz)
Hitec®
Aurora 9
These operating instructions are published by CEI Conrad Electronic International (HK) Limited, 18th Floor,
Tower 2, Nina Tower, No. 8 Yeung Uk Road, Tsuen Wan, New Territories, Hong Kong.
All rights including translation reserved. Reproduction by any method, e.g. photocopy, microfilming, or the
capture in electronic data processing systems require the prior written approval by the editor. Reprinting, also
in part, is prohibited. The operating instructions reflect the current technical specifications at time of print. We
reserve the right to change the technical or physical specifications.
© 2013 by CEI Conrad Electronic International (HK) Limited
V2_1113-JH(1)