1
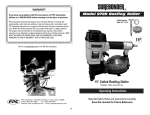
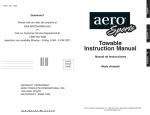
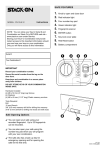
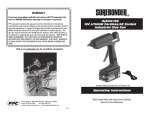
®
WARRANTY
Model 9625 Pneumatic Stapler
If you have any problems with this tool, please call FPC
Corporation toll-free at 1-800-860-3838 before returning it to the
place of purchase.
FPC Corporation warrants this product to be free from defects in material and
workmanship, under normal conditions of use and when used in accordance
with FPC operating instructions, for a period of 90 days from the date of
purchase by the user. Within the 90 days warranty FPC at its option shall
repair or replace this product. The product must be returned at the
distributor/user expense, either within warranty or out. Repaired or replaced
products will receive a 60 day warranty. USER MUST BE USING THE PROPER
STAPLES FOR THIS WARRANTY TO BE VALID. WARRANTY IS VOID IF
INCORRECT TYPE OF STAPLES ARE USED.
Visit us at surebonder.com for our full line of products
1/4"
Crown
Uses
SUREBONDER ®
350 Series
1/4" Crown Staples
18
Gauge
3/8" thru 1"
and most 18 gauge 1/4" crown staples
Operating Instructions
Read Safety Rules and Instructions Carefully
Save this manual for Future Reference
FPC Corporation - 355 Hollow Hill Drive - Wauconda, IL 60084
Phone: (847) 487- 4583
Fax: (847) 487-0174
website: www.surebonder.com e-mail: [email protected]
0112
IMPORTANT SAFETY WARNINGS:
THE SAFETY WARNINGS BELOW CANNOT COVER ALL POSSIBLE SITUATIONS THAT MAY
OCCUR. THESE BASIC SAFETY PRECAUTIONS SHOULD ALWAYS BE FOLLOWED TO PROTECT
AGAINST PERSONAL INJURY TO THE OPERATOR OR OTHER PERSONNEL IN THE AREA, AS
WELL AS DAMAGE TO THE EQUIPMENT. READ AND UNDERSTAND THESE WARNINGS BEFORE
USING EQUIPMENT.
Keep tool away from children, and DO NOT allow children near work area.
Do not allow children or untrained personnel to handle this tool.
DO NOT operate this stapler while tired, or under the influence of drugs,
alcohol, or medication that makes you drowsy.
Never point the stapler at yourself or others - always assume that the
Stapler is loaded, and proceed with caution.
Wear safety glasses and ear protection. The tool operator and all personnel
in the work area must wear safety glasses that protect the front and side,
to avoid eye injury. Ear plugs should be worn to avoid hearing damage.
If operator will be working in a situation where overhead work will be done
(i.e. on a ladder, stairs, or scaffolding) a hard hat must be worn.
Never wear loose clothing or jewelry because it can get caught in the moving parts of this tool.
Make sure long hair is covered, to avoid getting it caught in stapler.
Keep the tool pointed away from yourself and others at all times. Keep hands and all body parts
away from rear area of stapler (near air hose) to guard against injury. Keep hands and feet away
from firing head during use.
Keep proper balance and footing at all times - do not over-reach.
Never use oxygen, bottled gas or any type of combustible fuel
as a power source - it can cause an explosion and serious injury.
AIR
Do not use near flammable liquids or gases - the stapler sparks
During operation, and could cause an explosion and serious injury.
Use an air hose that will withstand at least 150 psi, OR 150% of the maximum pressure of the
compressor.
Never connect this tool to compressed air if the pressure could exceed 200 psi, as the stapler
could burst. Use only clean, dry, regulated compressed air, with pressure not exceeding 120 psi.
Do not use a non-relieving coupler with this stapler - if used, the stapler could remain charged
with air after disconnecting, and would still be able to drive a staple even after being
disconnected. The stapler and air hose must have a coupling so that all pressure is removed
from the stapler when the coupling is disconnected.
Do not depress the trigger or safety mechanism while loading staples - accidental firing of a
staple can occur. Keep your fingers away from the trigger when not firing staples. Always keep
the stapler pointed downward during loading.
Do not use an air hose that is too long - tool operator can trip over it. Make sure all connections
are tight.
Disconnect air hose from stapler
- before performing maintenance
- when clearing a jam
- when tool is not in use
- when moving it to another location
- when handing stapler to another person
(WARNINGS continued next page)
1
www.surebonder.com
Disconnect stapler from air supply before loading staples, to prevent a staple being fired during
connection to air hose.
Preparing for Use
APPLICATIONS
If the stapler has been stored in a cold environment, bring it to a warm area and allow it to warm
up before using.
Including, but not limited to: insulation, roofing felt, house wrap, auto and marine vinyl trim,
cabinet felt, cabinet backs, screen door repair, small furniture, light trim, molding and picture
frames, and general staple use.
Loading
- Make sure stapler is disconnected from air supply.
- Only use the proper size and type of staple with this stapler, as specified under "Staples".
- Depress the track release lever to release the spring-loaded staple magazine; slide the magazine
out (back) as far as it will go.
- Turn the stapler upside down. Place a full strip of staples into the staple magazine, with the
staple points facing upward (away from the tool). Slide the staple magazine closed until the
track release lever snaps back into place with a click. (Closing the staple magazine while
staples are loaded engages the spring-load mechanism, so it will take slightly more pressure to
slide the magazine closed.)
Using the Stapler
- This stapler is equipped with a contact safety mechanism; the trigger will not operate unless the
contact mechanism is firmly depressed against the surface to be stapled.
- Grip the body of the stapler firmly, make sure that the contact mechanism is placed securely
against work surface, and pull the trigger to drive a staple.
- Remove finger from the trigger.
- To drive another staple, move the stapler to next area on work surface to be stapled, and repeat
these steps.
After Stapling
- Disconnect the air hose from the stapler.
- Remove all staples from the staple magazine of the stapler.
- Place 5-6 drops of oil (included in case) into the air inlet.
- Shut off air compressor and drain any moisture from the compressor tank.
- Drain the air line filter; clean the filter element, then blow air in opposite direction to remove any
dirt/debris.
- Keep lubricator filled with oil (included in case).
FEATURES
- View window for staples
- Adjustable exhaust
- Rubber hand grip for comfort
- Firing Safety mechanism
- Easy drop-in staple loading
OPERATION
The Surebonder 9625 Pneumatic Stapler is designed to use 1/4" crown heavy-duty wire
staples in 3/8", 5/8", 3/4", 7/8" and 1" leg lengths. For best results, use Surebonder Duty
Staples.
AIR SUPPLY
This stapler is designed to operate on clean, dry, regulated compressed air, between 60 and
100 psi. It is preferable to include an air filter, pressure regulator, and automatic oiler within 15
feet of the tool, if possible.
An air filter is needed to remove contaminates and moisture that are contained in compressed
air; filtering will significantly prolong the life of the tool. If an automatic oiler is not installed,
place 5 to 6 drops of oil into the tool's air inlet at the beginning of each work day.
The staple gun comes factory-equipped with a male quick connector. The staple gun must
always be connected to the air supply with a coupling that removes all pressure when it is
disconnected.
NOTE: all components used with this staple gun (air hose, connectors, regulators,
filters, etc) must be rated at 150 psi, OR 150% of the maximum compressor
potential, whichever is higher. Do not connect this staple gun to a system with
maximum potential air pressure greater than 200 psi.
AIR CONNECTION SETUP
Clearing Staple Jams
- Disconnect the air hose from the stapler.
- Carefully remove staple strip from staple magazine.
- Remove any remaining loose staples from inside the staple magazine, using pliers to grasp the
staples, if necessary.
- Once jammed staples have been removed, reload stapler.
To Air Tool
Quick Connector Quick Coupler
60
40
20
0
120
140
160
To compressor
Lubricator
3
80 100
4
Regulator
Filter