1
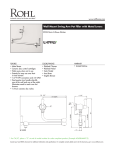
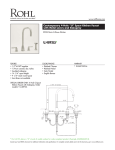
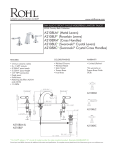
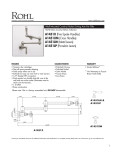
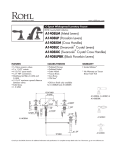
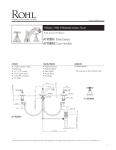
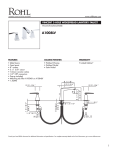
www.rohlhome.com
Three Hole Country Spout Widespread Lavatory Faucet with Lever
Handles
ROHL Perrin & Rowe® Bath
U.3720L*
FEATURES
COLORS/FINISHES
WARRANTY
• Swivel spout
• Spout, valve housing, handles, and
pop-up made from solid brass
• 2 x 1 1/8" hole cutouts, 1 x 1 3/8"
hole cutout
• 1/4-turn ceramic disc valves
• Unique handle fixing clip, engineered
to increase the life of the valve
• 1/2" NPSM connections
• Includes both porcelain and metal
lever inserts
• 1.5 GPM
• 1 3/4" max. deck depth
•
•
•
•
•
• Limited Lifetime
Polished Chrome
Polished Nickel
Satin Nickel
Inca Brass
English Bronze
* For CA/VT, place a ”-2” at end of model number for code compliant product. (Example A3608LMAPC-2)
Consult your local ROHL showroom for additional information and specifications. For complete warranty details and a list of showrooms, go to www.rohlhome.com.
www.rohlhome.com
U.3720L Spare Parts
Consult your local ROHL showroom for additional information and specifications. For complete warranty details and a list of showrooms, go to www.rohlhome.com.
www.rohlhome.com
The Traditional Bathroom Collection
Installation & User Guide
U.3700L-2 U.3701X-2 U.3705L-2 U.3706X-2 U.3720L-2 U.3721X-2
U.3730L-2 U.3731X-2 U.3741L-2 U.3742X-2 U.3760L-2 U.3761X-2
U.3765L-2 U.3766X-2
3 Ho le Widespre ad s
Congratulations on the purchase of your Perrin & Rowe Bathroom Faucet.
Correctly installed and with sensible care, it will give many years of trouble free service.
Before you proceed... We recommend you engage the
services of a registered plumber to install this product.
Read the instructions on this leaflet carefully.
P R E PA R AT I O N
Flush the plumbing system before installing the mixer faucet.
This is to avoid plumbing residues clogging the aerated outlet,
or possibly damaging the ceramic valves. This is especially
important where extensive plumbing work has been carried out.
The Hot supply should be on the left when viewed from the
front of the fitting.
CHECK LIST
! Temperature of the hot water supply does not exceed 185 F !
! Recommended minimum water supply pressure - 30 psi !
! Recommended maximum water supply pressure - 75 psi !
! Ideal performance obtained with equal hot & cold pressures !
A S S E M B LY - Refer to Fig 1.
Fig 1.
Installation of Faucet
Assemble the nozzle by placing the hoses through the hole
in the worksurface ensuring that the base ring & seal are in
place.
Place clamp plate and securing nut onto the clamp bolt, tighten
with spanner provided to underside of worksurface.
Connect the side valves to the nozzle using the flexible hoses.
Assemble and connect pop-up waste.
To assemble sidevalve, ensure the spacer ring, clamp plate
and securing nut are in place on the valve body, then from
the underside of worksurface, push the valve body through
the hole. Assemble rosette as shown so that the valve body
thread shows at top.
Ensure all connections are firmly tightened.
Ensure that the connection for the flexible hose is facing
towards the nozzle.
Spacer washer to be used in installations where work
surface has a thickness ranging from 1/8” to 1 7/8”.
Assemble cover & handle onto the valve body ensuring that
it is aligned properly. If it is not, remove and turn a few
splines until correct alignment achieved.
Screw the rosette up to the underside of cover.
Repeat this procedure for the cold valve.
Tighten securing nut to under side of work surface.
Connect Hot & Cold water supplies to side valve inlets.
Remove pop-up from waste. Unscrew and remove top waste,
complete with foam seal, through waste hole in basin/bidget.
Offer bottom waste, complete with rubber seal, to underside of
basin/bidet and screw top waste into bottom waste. Ensure
that pop up shaft is in position alongside pop up rod. (Shaft
can be cut shorter if space is restricted). Slide fixed end of
clamp bracket onto pop up shaft. Lift pop up rod and then
lower into swivel end of clamp bracket. Adjust position of clamp
bracket to achieve maximum movement of pop up shaft. Place
pop up into waste and adjust movement using the screw in the
bottom of the pop up.
Consult your local ROHL showroom for additional information and specifications. For complete warranty details and a list of showrooms, go to www.rohlhome.com.
www.rohlhome.com
9.24193
9.21370*
9.20765*
9.01625*
9.19193*
9.25552
9.20372*
9.25552
9.26411*
Solid
9.12451*
9.26410
Porcelain
9.17384*
9.12451*
9.01451/Hot*
9.01451/Cold*
9.25552
9.20702*
9.01372*
9.18380*
9.18380*
9.19653*
9.18380*
9.19653*
9.13146
9.18700*
9.25552
9.130195/Right
9.13145/Right
9.130196/Left
9.13146/Left
9.20740*
9.30701
9.19653*
9.26709
9.18380*
9.26400
9.03700
9.26705*
9.28400
9.01730*
9.20730*
9.01730*
9.20705*
9.25716
9.18730*
9.18705*
9.25719*
U.3705-2/
U.3706-2
U.3705/U.3706
U.3730-2/
U.3731-2
U.3730/U.3731
Fig 2.
Spare Parts - *Where indicated specify color
BEFORE USE
CARE & MAINTENANCE
Carefully check the installation for leaks.
If further building work is to be carried out in the vicinity, cover
the faucet with a plastic bag to avoid damaging the finish.
Occasional cleaning with warm soapy water, followed by a polish with a
soft cloth is all that is required to keep the plated finish in good
condition.
Please ensure that the installation complies with the local
plumbing codes.
O P E R AT I O N
Ceramic disc valves are fitted as standard to this mixer tap. Flow from
FULLY OFF to FULLY ON is achieved by rotating the handles a quarter turn.
When using pop up waste, push down on plug to seal the waste prior to
filling the bowl. Push down on pop up knob to discharge waste water.
Do not use proprietary abrasive liquids, powders, or pads to clean the
faucet. You will damage the plated finish and void your guarantee.
An aerator is fitted to the outlet of the spout, this may need occasional
cleaning. This will be evident when the water flow slows down to an
unacceptable level. To accomplish this unscrew the outlet in a counterclockwise direction and remove the aerator, rinse thoroughly in clean
water and re-install.
GUARANTEE AND LIABILITY
Your bathroom product has been manufactured to the high standard
HANDLE VARIANTS
S PA R E PA RTS A N D SE R V I CE
Both porcelain and solid levers are included with U.3700L-2, U.3705L-2, U.3720L-2,
U.3730L-2, and U.3760L-2 models.
1) Unscrew lever bolt A from lever ball B by
HOW TO CHANGE
3 Parker
Irvine
CA 92618
(714) 557-1933
Perrin & Rowe is a trademark of Triflow Concepts Ltd.
C
A
D
B
A
E
F
E
hand.
2) Remove metal lever insert C and seal D.
3) Place one of the replacement seals E onto
lever bolt A and slide to the end. Place
porcelain lever insert F onto lever bolt A
B
and slide to the end of the bolt.
4) place the other replacement seal E onto
lever bolt A and slide to the end of the
porcelain lever insert.
5) Screw lever bolt and porcelain lever insert
assembly back into lever ball B and screw
down tightly by hand
903700U/2 01/08
Consult your local ROHL showroom for additional information and specifications. For complete warranty details and a list of showrooms, go to www.rohlhome.com.