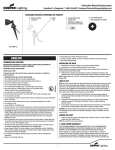
1
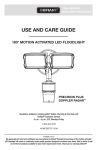
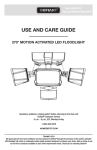
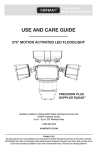
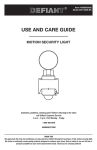
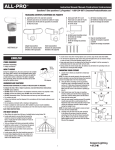
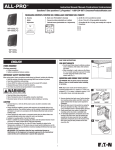
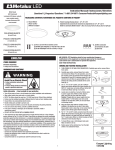
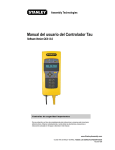
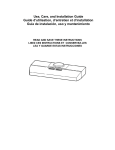
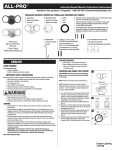
Item #1000 015 611
Model #MSLED1801DF
Use and Care Guide
180° motion activated SOLAR
led floodlight
Questions, problems, missing parts? Before returning to the store call
Defiant® Customer Service
8 a.m. - 6 p.m., EST, Monday-Friday
1-866-308-3976
homedepot.com
THANK YOU
We appreciate the trust and confidence you have placed in Defiant® through the purchase of this motion activated
solar LED floodlight. We strive to continually create quality products designed to enhance your home. Visit us online
to see our full line of products available for your home improvement needs. Thank you for choosing Defiant®!
Table of Contents
Table of Contents.......................................2
Safety Information.....................................2
Warranty....................................................3
Pre-Installation..........................................3
Installation.................................................5
Operation...................................................6
Care and Cleaning.....................................7
Troubleshooting.........................................7
Safety Information
CAUTION
□□ Do not operate the luminaire fitting with a missing or damaged lens.
□□ Fixture is suitable for wall mount only. NOT suitable for ground mount installation.
□□ Do not cut the solar panel wire. Discontinue use if the wire becomes frayed or broken.
□□ Lithium-Ion batteries must be disposed of in accordance with local waste ordinances and regulations.
□□ This device complies with Part 15 of the FCC Rules. Operation is subject to the following two conditions:
(1) This device may not cause harmful interference, and (2) this device must accept any interference received,
including interference that may cause undesired operation. Under Part 15 of the FCC Rules, any changes or
modifications to the motion detector described in this instruction sheet that are not expressly approved by
Cooper Lighting, LLC could void the user’s authority to operate the equipment.
NOTE: This equipment has been tested and found to comply with the limits for a Class B digital device,
pursuant to Part 15 of the FCC Rules. These limits are designed to provide reasonable protection against
harmful interference in a residential installation. This equipment generates, uses and can radiate radio
frequency energy and if not installed and used in accordance with the instructions, may cause harmful
interference to radio communications. However, there is no guarantee that interference will not occur in a
particular installation. If this equipment does cause harmful interference to radio or television reception,
which can be determined by turning the equipment off and on, the user is encouraged to try to correct the
interference by one or more of the following measures:
- Reorient or relocate the receiving antenna.
- Increase the separation between the equipment and receiver.
- Connect the equipment into an outlet on a circuit different from that to which the receiver is connected.
- Consult the dealer or an experienced radio/TV technician for help.
WARNING: FCC Regulations state that any unauthorized changes or modifications to this equipment not
expressly approved by the manufacturer could void the user’s authorization to operate this equipment.
IMPORTANT SAFETY INFORMATION
When using product, basic precautions should always be followed, including the following:
□□ Read and follow these instructions.
□□ Heed all warnings, including below warnings AND those included on product.
□□ Save these instructions and warnings.
□□ For outdoor use only.
□□ Disassembling your fixture will void the warranty.
2
Warranty
The following warranty is exclusive and in lieu of all other warranties, whether express, implied or statutory
incluiding, but not limited to, any warranty of merchantability or fitness for any particular purpose.
Cooper Lighting, LLC (“Cooper Lighting”) warrants to customers that, for a period of two years from the date of
purchase, Cooper Lighting’s products will be free from defects in materials and workmanship. The obligation of
Cooper Lighting under this warranty is expressly limited to the provision of replacement products. This warranty
is extended only to the original purchaser of the product. A purchaser’s receipt or other proof of date of original
purchase acceptable to Cooper Lighting. This is required before warranty performance shall be rendered.
This warranty does not apply to Cooper Lighting products that have been altered or repaired or that have been
subjected to neglect, abuse, misuse or accident (including shipping damages). This warranty does not apply to
products not manufactured by Cooper Lighting which have been supplied, installed, and/or used in conjunction
with Cooper Lighting products. Damage to the product caused by replacement bulbs or corrosion or discoloration
of brass components are not covered by this warranty.
Limitation of liability: In no event shall Cooper Lighting be liable for special, indirect, incidental, or consequential
damages (regardless of the form of action, whether in contract, strict liability, or in tort including negligence), nor
for lost profits; nor shall the liability of Cooper Lighting for any claims or damage arising out of or connected with
these terms or the manufacture, sale, delivery, use, maintenance, repair or modification of Cooper Lighting products,
or supply of any replacement parts therefore, exceed the purchase price of cooper Lighting products giving rise to a
claim. No labor charges will be accepted to remove or install fixtures.
Contact the Customer Service Team at 1-866-308-3976 or visit www.HomeDepot.com.
Pre-Installation
Before beginning assembly of product, make sure all
parts are present. Compare parts with package contents
list and hardware contents. If any part is missing
or damaged, do not attempt to assemble the product.
Estimated Assembly Time: 20 minutes
NOTE: No electrical wiring to your household is
necessary for this product.
□□ Allow fixture to receive four full days of sunlight
while in OFF mode to fully charge the battery.
□□ Locate solar panel in an area that will receive the
maximum amount of sunlight during the daylight
hours. Locate panel to receive at least 3-4 hours
of direct sunlight daily.
□□ Test your charged unit before
permanently installing.
□□ Install the motion sensor 8–12 feet above
the ground. Motion sensor is less sensitive
above 12 feet.
Sensor detects motion that moves
across the detection zone.
□□ Locate motion sensor so motion moves across
detection zone.
□□ Locate sensor away from heat producing sources
to prevent false triggering. Also be very careful not
to include objects such as windows, white walls
and water in the detection zone.
3HOMEDEPOT.com
Please contact 1-866-308-3976 for further assistance.
Pre-Installation (continued)
□□ Locate fixture away from moving objects such as
trees, large shrubs, and street traffic.
□□ You will need to adjust the angle of the solar panel throughout the year as seasons change in order to keep it
at the best possible angle to the sun.
□□ Keep solar panel clear of any objects that will block the sunlight.
□□ During periods of several cloudy days, the battery may fall below the operating level and will need to be
recharged with sunlight.
Tools Required
Philips
screwdriver
hardware included
NOTE: Hardware shown to actual size.
AA
BB
Part
Description
AA
Fixture mounting screw
2
BB
Solar panel mounting screw
4
4
Quantity
Pre-Installation (continued)
PACKAGING CONTENTS
A
Single head
position
Twin head
position
B
Part
Description
Quantity
A
Light fixture
1
B
Solar panel with 16 ft. cord
1
5HOMEDEPOT.com
Please contact 1-866-308-3976 for further assistance.
Installation
1
2
Mounting the fixture
□□ Locate area in which you would like to install
your light fixture.
□□ Using the fixture mounting screws (AA)
provided, mount fixture (A) to a solid surface
8–12 feet above the ground by placing the
screws through the holes on either side of
the fixture. Adjust sensor head so that control
switches are facing the ground.
NOTE: For fixture to operate properly, the solar panel (B)
must be located in an area that will receive the maximum
amount of sunlight and is free from obstructions.
Mounting the solar panel
□□ Using the solar panel mounting screws (BB)
provided, mount solar panel (B) to a solid
surface (Fig. 3). Adjust the angle of the
solar panel (B) so that it will receive the
maximum amount of direct sunlight during
the daylight hours.
NOTE: For best results, locate panel to receive at least
3-4 hours of direct sunlight daily.
BB
BB
B
AA
AA
A
3
BB
BB
Connecting the fixture to the
solar panel
□□ Carefully route the wire from the solar panel
(B) to the fixture (A) and plug it into the
connector extending from the side of the
fixture housing (A). Make sure to push the
connector plugs tightly together until you hear
two clicks to ensure they are fully engaged.
A
B
6
Operation
2 Setting the ON time
1 Testing the motion sensor
□□ Move slide switch on bottom of sensor to
“1 min.” or “3 min.” Light will turn ON at night
when motion is detected and turn OFF at the
selected time interval after motion stops.
NOTE: Make sure you allow fixture to receive four
full days of sunlight while in OFF mode to fully charge
the battery.
NOTE: Fixture has a warm up period of about one minute.
Light will turn on during this period. Once the light turns
off, you are ready to test.
□□ Move slide switch on bottom of the sensor to
“TEST”.
□□ Aim sensor toward the general direction in
which motion will occur. Always position the
sensor head with control switches facing
toward the ground.
□□ Walk across the detection zone at the
farthest distance you wish your detector
to detect motion.
□□ For more range, aim sensor slightly upward.
For less range, aim sensor slightly downward.
Light will turn off 4 seconds after motion
stops. Allow 5 seconds after light turns off
before your next test.
A
NOTE: Allow 5 seconds after light turns off before your
next test.
Bottom of sensor
A
Bottom of sensor
7HOMEDEPOT.com
Please contact 1-866-308-3976 for further assistance.
Care and Cleaning
□□ Proper care should ensure the longest possible life for your battery.
□□ Make sure that your solar panel is located in a sunny location.
□□ When battery is low, the fixture will flash twice to indicate it will automatically turn OFF and the red LED
indicator light will blink every 5 seconds at night. When battery is at minimum required charge or higher,
the red LED indicator light will be off. The fixture will not turn ON until the battery has recharged to the
operating level.
□□ To ensure proper recharge, turn fixture OFF and allow fixture to receive 4 full days of sunlight before
turning the fixture ON.
□□ It will be necessary to periodically clean the solar panel with soft wet cloth.
Troubleshooting
Problem
Light does not
come ON with
motion at night.
Possible Cause
Solution
□□ Surrounding external ambient
light is too bright. (If so, the
unit may think it is daytime.)
□□ Re-aim the head.
□□ Fixture is not charging during
the day.
□□ Solar panel must be connected to the connector
extending from the side of the fixture housing
when charging.
□□ Relocate or reposition the unit away from
the light.
□□ Solar panel must be receiving direct sunlight to
charge during day (reposition if shadowed).
□□ Solar panel must be clean and free from debris.
□□ Make sure batteries have been charged for 4 full
days of sunlight prior to turning the fixure ON.
□□ When battery is low, the fixture will blink twice
and automatically turn OFF until the battery is
charged to the operating level.
Light stays ON at
night and does
not turn OFF.
□□ There is motion in the
detection zone.
□□ Make sure the sensor is not picking up moving
objects such as trees, traffic, etc.
□□ Reposition motion sensor.
□□ If the light continues to stay on, contact
Customer Service.
Light is ON
during the day.
□□ The switch on the bottom of
the motion sensor is in the
TEST mode.
□□ Move the switch to 1 min. or 3 min.
□□ The motion detector is
shadowed.
□□ Reposition motion sensor.
8
Troubleshooting (continued)
Problem
Light comes ON
for no apparent
reason at night.
Possible Cause
Solution
□□ There is motion in the
detection zone.
□□ Make sure the sensor is not picking up moving
objects such as trees, traffic, etc.
TEST FOR YOUR SELF:
□□ Cover the sensor lens with black electrical
tape to prevent sensor from detecting
motion. If the light stays off, something in
the detection zone is triggering the sensor.
If this is the case, reposition the sensor head.
□□ If the light stays on with the sensor lens
covered, contact Customer Service.
9HOMEDEPOT.com
Please contact 1-866-308-3976 for further assistance.
Questions, problems, missing parts? Before returning to the store,
call Defiant® Customer Service
8 a.m.-6 p.m., EST, Monday-Friday
1-866-308-3976
HOMEDEPOT.COM
Retain this manual for future use.
Printed in China
825-0991
Artículo #1000 015 611
Model #MSLED1801DF
GUÍA DEL USUARIO Y
DE MANTENIMIENTO
LUZ DE RESALTE LED SOLAR ACTIVADA POR
MOVIMIENTO CON GIRO DE 180°
¿Preguntas, problemas, faltan piezas? Antes de devolver el producto al negocio
en el que lo compró, llame al Servicio de atención al cliente de Defiant®.
De lunes a viernes, de 8 a. m. a 6 p. m., Hora Estándar del Este (EST)
1-866-308-3976
homedepot.com
GRACIAS
Le agradecemos toda la confianza que ha depositado en Defiant® al comprar esta luz de resalte LED activada
por movimiento. Nos esforzamos por seguir creando productos de calidad diseñados para mejorar su casa.
Visite nuestro sitio web para conocer nuestra línea completa de productos disponibles para los proyectos
de mejora de su casa. ¡Gracias por elegir a Defiant®!
Índice
Índice.......................................................12
Información de seguridad.......................12
Garantía...................................................13
Pasos previos a la instalación................14
Instalación...............................................16
Operación.................................................17
Cuidado y limpieza..................................18
Solución de problemas............................19
Información de seguridad
PRECAUCIÓN
□□ No ponga en funcionamiento el accesorio lumínico si le falta o tiene dañado algún lente.
□□ Adecuado para instalarse en la pared solamente. No es adecuado para instalarse montándolo en el suelo.
□□ No corte el cable del panel solar. Descontinúe el uso si el cable se pela o se rompe.
□□ Las baterías de ión de litio deben desecharse de conformidad con las ordenanzas y normas locales sobre
disposición de desechos.
□□ Este dispositivo cumple con la Parte 15 de las Reglas de la Comisión Federal de Comunicaciones (FCC) de
los E. U. de A. La operación está sujeta a las dos condiciones siguientes: (1) Este dispositivo no puede causar
interferencia dañina, y (2) este dispositivo debe aceptar toda interferencia recibida, incluyendo la interferencia
que pueda causar un funcionamiento indeseado. Según la Parte 15 de las Reglas de la FCC, todo cambio o
modificación al detector de movimiento descripto en esta hoja de instrucciones que no esté expresamente
aprobado por Cooper Lighting, LLC podría anular la autorización del usuario para operar el equipo.
NOTA: Este equipo ha sido probado, y se ha verificado que cumple con los límites de un dispositivo digital
Clase B, de acuerdo con la Parte 15 de las Reglas de la FCC. Estos límites están diseñados a fin de proveer
una protección razonable contra la interferencia dañina en una instalación residencial. Este equipo genera,
usa y puede irradiar energía de radio frecuencia, y si no se instala y utiliza de acuerdo con las instrucciones,
puede causar interferencia dañina en las comunicaciones de radio. Sin embargo, no se garantiza que
no vaya a producirse interferencia en una instalación en particular. Si este equipo efectivamente causa
una interferencia dañina en la recepción de radio o televisión, lo que puede determinarse apagándolo y
encendiéndolo, se recomienda al usuario que trate de corregir la interferencia por medio de una o más de
las siguientes medidas:
- Reoriente o cambie de lugar la antena receptora.
- Aumente la separación entre el equipo y el receptor.
- Conecte el equipo en un tomacorriente que esté en un circuito diferente de aquél al que se conecta
el receptor.
- Consulte a su proveedor, o a un técnico de radio/TV experimentado, para que le ayuden.
ADVERTENCIA: Las Reglamentaciones de la FCC establecen que todo cambio o modificación no
autorizados en este equipo, que no estén aprobados expresamente por el fabricante, podrían anular la
autorización del usuario para operar el equipo.
INSTRUCCIONES IMPORTANTES DE SEGURIDAD
Al utilizar el producto, siempre se deben seguir las precauciones básicas, incluído lo siguiente:
□□ Lea y siga estas instrucciones.
□□ Tenga en cuenta todas las advertencias, incluyendo las advertencias a continuación Y aquellas incluidas
en el producto.
□□ Guarde estas instrucciones y advertencias.
□□ Se debe utilizar en exteriores solamente.
□□ Si desarma el accesorio, se anulará la garantía.
12
Garantía
La siguiente garantía es exclusiva y reemplaza a todas las demás, ya sean implícitas, explícitas o estatutarias,
incluidas entre otras, las garantías de comerciabilidad e idoneidad para un fin particular.
Cooper Lighting, LLC (“Cooper Lighting”) garantiza a sus clientes que los productos de Cooper Lighting no
presentarán defectos en los materiales y en la fabricación durante un período de dos años desde la fecha de
compra. La obligación de Cooper Lighting según esta garantía se limita expresamente al suministro de los
productos de reemplazo. Esta garantía se extiende sólo para el comprador original del producto. Un recibo del
comprador u otra prueba de la fecha de compra original aceptable para Cooper Lighting. Esto es necesario para la
ejecución de la garantía.
Esta garantía no se aplica a los productos de Cooper Lighting que hayan sido alterados o reparados o que
estuvieron sujetos a negligencia, abuso, mal uso o accidente (incluso los daños durante el envío). Esta garantía
no se aplica a los productos Cooper Lighting no fabricados por Cooper Lighting que hayan sido sumvvinistrados,
instalados o utilizados junto con los productos Cooper Lighting. Los daños del producto causados por bombillas de
reemplazo, corrosión o decoloración de los componentes de latón no están cubiertos por esta garantía.
Limitación de responsabilidad: Cooper Lighting no será responsable legal en ningún caso de daños indirectos,
accidentales o resultantes (sin importar la acción legal, ya sea por contrato, responsabilidad estricta o de forma
extracontractual incluyendo la negligencia) tampoco de la pérdida de ganancias, Cooper Lighting tampoco será
responsable de reclamos o daños que surjan o estén conectados con estos términos o con la fabricación, venta,
entrega, uso, mantenimientom, reparación o modificación de los productos de Cooper Lighting o del suministro de
cualquier pieza de repuesto que exceda el precio de compra de los productos de Cooper Lighting originando un
reclamo. No se aceptarán cargos por mano de obra para quitar o instalar los accesorios.
Contacte al departamento de servicio al cliente al 1-866-308-3976 o visite www.HomeDepot.com.
Pasos previos a la instalación
Antes de comenzar a ensamblar el producto, asegúrese
de tener todas las piezas. Compare las piezas con
la lista del contenido del paquete y los aditamentos
mencionados. No intente ensamblar el producto si falta
alguna pieza o si éstas están dañadas.
Tiempo estimado de ensamblaje: 30 minutos
NOTA: No es necesario instalar ningún cableado eléctrico
en su hogar para este producto.
□□ Permita que el accesorio reciba luz solar durante
cuatro días completos mientras está en modo
OFF (APAGADO) para que la batería se cargue
totalmente.
□□ Coloque el panel solar en un área tal que reciba
la máxima cantidad de luz solar durante las horas
del día. Para obtener mejores resultados, ubique el
panel de modo tal que reciba al menos 3-4 horas
de luz directa del sol por día.
□□ Pruebe la unidad cargada antes de instalarla
definitivamente.
13HOMEDEPOT.com
Llame al 1-866-308-3976 si precisa más ayuda.
Pasos previos a la instalación (continuación)
□□ Instale su portalámparas a 8–12 pies
(2,4–3,7 m) del piso. El detector de movimiento
es menos sensible si se encuentra a una altura
superior a los 12 pies (3,7 m).
□□ Coloque el detector de movimiento de manera que
se mueva por toda la zona de detección.
□□ Coloque el detector lejos de fuentes de calor
para prevenir una falsa activación. Siempre que
sea posible trate de no introducir en el área
de detección objetos tales como calefactores,
aparatos de aire acondicionado, respiraderos de
lavaderos y superficies reflectantes tales como
ventanas, pare des blancas y agua.
□□ Coloque el detector de movimiento lejos de
objetos en movimiento tales como árboles y
tráfico callejero.
□□ Deberá ajustar el ángulo del panel solar a medida
que avance el año y cambien las estaciones, para
poder mantener el mejor ángulo respecto del sol.
□□ Conserve el panel solar libre de cualquier objeto
que pudiera interceptar la luz solar.
□□ Durante aquellos períodos en los que haya varios
días nublados, la batería caerá debajo del nivel
de carga suficiente y necesitará recargarse con
la luz solar.
herramientas requeridas
Destornillador
en cruz (Phillips)
14
El sensor detecta cualquier movimiento
en la zona de detección.
Pasos previos a la instalación (continuación)
TORNILLERÍA INCLUIDA
NOTA: La tornillería se muestra en su tamaño real.
AA
Pieza
BB
Descripción
Cantidad
AA
Tornillo de montaje del
accesorio
2
BB
Tornillo de montaje del
panel solar
4
CONTENIDO DEL PAQUETE
A
Posición de cabezal
simple
Posición de cabezal
doble
B
Pieza
Descripción
Cantidad
A
Accesorio
1
B
Panel solar con un cable
de 4,87 m (16 pies)
1
15HOMEDEPOT.com
Llame al 1-866-308-3976 si precisa más ayuda.
Instalación
1
2
Montaje del accesorio
□□ Ubique la zona en la que desea instalar su
artefacto de luz.
□□ Usando los tornillos de montaje del accesorio
provistos, monte el artefacto en una superficie
sólida, a 2,45 – 3,65 m (8 – 12 pies) de altura
sobre el suelo, insertando los tornillos en
los agujeros situados a ambos lados del
artefacto. Ajuste el cabezal sensor, de modo
que los interruptores de control queden
mirando hacia el suelo. Retire la etiqueta del
frente del cabezal sensor.
NOTA: Para que el artefacto funcione debidamente, el
panel solar debe quedar ubicado en una zona en la que
reciba la máxima cantidad posible de luz solar, y esté
libre de obstrucciones.
Montaje del panel solar
□□ Usando los tornillos de montaje del solar
panel (BB) provistos, monte el panel solar (B)
en una superficie sólida. Ajuste el ángulo del
panel solar (B), de modo que reciba la máxima
cantidad de luz solar directa durante las
horas de luz diurna.
NOTA: Para obtener mejores resultados, ubique el panel
de modo tal que reciba al menos 3-4 horas de luz directa
del sol por día.
BB
BB
B
AA
AA
BB
BB
A
3
Conexión del accesorio con
el panel solar
□□ Cuidadosamente conduzca el cable que
conecta el panel solar (B) con el accesorio (A)
y conéctelo al extensor del conector que sale
del lateral del alojamiento del accesorio (A).
A
B
16
Operación
probar el sensor
1 Cómo
de movimiento
NOTA: Asegúrese de que el accesorio haya captado
luz solar durante cuatro días completos mientras
está en modo OFF (APAGADO) para que la batería se
cargue totalmente.
NOTA: El accesorio tiene un período de calentamiento
de alrededor de un minuto. Durante este período, se
encenderá la luz y el accesorio puede ser probado.
□□ Lleve el interruptor deslizante ubicado en el
fondo del sensor hasta la posición “TEST”
(“PRUEBA”).
□□ Apunte el sensor hacia la dirección en general
en la cual se producirán los movimientos.
Asegúrese de que el cabezal sensor esté
posicionado de modo tal que los interruptores
de control queden mirando hacia el suelo.
□□ Camine a través de la zone de detección tan
lejos como desee que su detector registre
movimiento.
□□ Para un rango mayor, oriente ligeramente
el detector hacia arriba. Para un rango
menor, oriente la cabeza del detector
ligeramente hacia abajo. Las luces se
apagarán 4 segundos después de que
ya no haya movimiento.
NOTA: Después de que la luz se haya apagado, deje
pasar cinco segundos antes de pasar a la próxima prueba.
del tiempo
2 Configuración
de ENCENDIDO
□□ Mueva el interruptor de pendiente sobre la base
del sensor a “1 min.” o “3 min.” En la noche,
al detectar movimiento, se encenderá la luz, y
se apagará una vez que haya transcurrido el
intervalo especificado después de que haya
cesado el movimiento.
A
Parte inferior del sensor
A
17HOMEDEPOT.com
Llame al 1-866-308-3976 si precisa más ayuda.
Cuidado y limpieza
□□ El cuidado adecuado debería asegurar el máximo tiempo de vida posible de la batería.
□□ Asegúrese que el panel solar esté colocado en un lugar donde le de el sol.
□□ Cuando la batería esté baja, el accesorio parpadeará dos veces indicando que se apagará
automáticamente y la luz indicadora LED de color rojo se encenderá de manera intermitente cada
5 segundos en la noche hasta que la batería sea cargada hasta el nivel operante. Cuando la batería tenga
un mínimo requerido de carga o más, el indicador de luz LED roja permanecerá apagado. El accesorio no
se encenderá hasta que se haya recargado la batería con el nivel suficiente como para funcionar.
□□ Para garantizar que el accesorio se recargue adecuadamente, apáguelo y déjelo captar luz solar durante
cuatro días completos antes de encenderlo.
□□ Es necesario limpiar periódicamente el panel solar con un paño suave humedecido.
18
Diagnostico y solución de problemas
Problema
La luz no se
enciende durante
la noche aunque
haya movimiento.
Causa Posible
Acción Correctiva
□□ La luz ambiental exterior es
demasiado brillante. (Sí es
así, para la unidad es de día).
□□ Redirija el cabezal del sensor.
□□ El accesorio no carga durante
el día.
□□ El panel solar debe estar conectado al extensor
del conector que sale del lateral del alojamiento
del accesorio.
□□ Reubique o reoriente el accesorio.
□□ El panel solar debe estar recibiendo luz solar
para cargarse durante el día (reposicione si
está en la sombra).
□□ El panel solar debe estar limpio y libre
de residuos.
□□ Antes de encender el accesorio, asegúrese de
que las baterías se hayan cargado con la luz del
sol por 4 días completos.
□□ Cuando la batería esté baja, el accesorio
parpadeará dos veces indicando que se
apagará automáticamente hasta que se
haya recargado la batería con el nivel
suficiente como para funcionar.
La luz se
enciende durante
la noche y no
se apaga.
□□ Hay movimiento en la zona
de detección.
La luz se
enciende
durante el día.
□□ Los controles en la base del
detector de movimiento se
encuentran en el modo de
“TEST” (“PRUEBA”).
□□ Coloque el interruptor en “1 min.” o “3 min.”
□□ Hay sombra sobre el detector
de movimiento.
□□ Reoriente el sensor de movimiento.
□□ Hay movimiento en la zona
de detección.
□□ Asegúrese de que el sensor no esté reaccionando
a objetos móviles tales como árboles, tráfico, etc.
El accesorio se
enciende durante
la noche y no
se apaga.
□□ Asegúrese de que el sensor no esté reaccionando
a objetos móviles tales como árboles, tráfico, etc.
□□ Reoriente el sensor de movimiento.
□□ Si las luces permanecen encendidas,
póngase en contacto con el servicio de
asistencia al cliente.
COMPRUÉBELO USTED MISMO:
□□ Cubra la lente del sensor con la cinta aislante
negra para evitar que detecte movimiento. Si
las luces permanecen apa gadas, hay algo
en el área de detección que está activando el
sensor. Si éste es el caso, reoriente el sensor
de movimiento.
□□ Si las luces permanecen encendidas con
la lente del sensor cubierta, póngase en
contacto con el servicio de asistencia
al cliente.
19HOMEDEPOT.com
Llame al 1-866-308-3976 si precisa más ayuda.
¿Preguntas, problemas, faltan piezas? Antes de devolver el producto al negocio
en el que lo compró, llame al Servicio de atención al cliente de Defiant®.
De lunes a viernes, de 8 a. m. a 6 p. m., Hora Estándar del Este (EST)
1-866-308-3976
HOMEDEPOT.COM
Conserve este manual para consultarlo en el futuro.
Impreso en China
825-0991