1
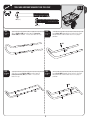
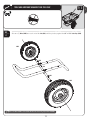
MODEL N° 65034 Co py OWNER’S MANUAL Keep this Identification Number in case you must contact our Customer Service Department. SAFETY INFORMATION SAFETY ALERT SYMBOLS AND SIGNAL WORDS The safety information in this manual is denoted by the safety alert symbol: The level of risk is indicated by the following signal words: SIGNAL WORDS Warning Hazards or unsafe practices which COULD result in severe personal injury or death if the warning is ignored. If the warning sticker becomes unreadable, you can re-order it from Customer Service: Co py 1-800-225-3865 INSTRUCTION #1096324 E WARNING When using the Wheelbarrow, always heed these warnings: t%POPUBMMPXPUIFSTUPSJEFJO8IFFMCBSSPX5IF rider can fall out, or the Wheelbarrow can tip over causing serious injury. t%POPUFYDFFEUIFNBYJNVNXFJHIUPGMCT t3FEVDFMPBEJGXPSLJOHPOIJMMTPSTMJQQFSZ surfaces. t/FWFSFYDFFENQI t"MXBZTCFHJOmMMJOHUIFSFBSPGUIFUVC*GB heavy item is tossed into the tub in front of the BYMFUIFXIFFMCBSSPXXJMMRVJDLMZUJQGPSXBSE causing the handles to jerk upward and possibly IJUUIFQFSTPOmMMJOHUIFUVCPSBOZPOFJOUIF handles’ path. t4JODFUIFMPBEJTNBJOMZUSBOTGFSSFEUISPVHIUIF wheel and not the user, our wheelbarrow is easy to overload. 9/28/2011 2 BEFORE BEGINNING ASSEMBLY Keep the hardware bags and their contents separate. If any parts are missing, call our Customer Service Department 5FTUmUBMM#PMUTCZJOTFSUJOHUIFNJOUPUIFJSSFTQFDUJWFIPMFT*GOFDFTTBSZDBSFGVMMZTDSBQF BXBZBOZFYDFTTQPXEFSDPBUJOHCVJMEVQGSPNJOTJEFUIFIPMFT%POPUTDSBQFBXBZBMM PGUIFQPXEFSDPBUJOH#BSFNFUBMNBZSVTU:PVNBZOFFEUPQPVOETPNF#PMUTJOUP place with a hammer or mallet. 7FSJGZUIBUBMMCPMUTmUCZJOTFSUJOHUIFNJOUPUIFJSSFTQFDUJWFIPMFT*GOFDFTTBSZDBSFGVMMZ TDSBQFBXBZBOZFYDFTTQPXEFSDPBUJOHGSPNJOTJEFUIFIPMFT%POPUTDSBQFBXBZBMM UIFQPXEFSDPBUJOH#BSFNFUBMDBOSVTU:PVNBZOFFEUPUBQTPNFCPMUTFOQMBDFXJUI a hammer or rubber mallet. *Two adults required to complete assembly* (+ one adult to read the instructions) Only adults should assemble this unit. Do not allow children to enter the assembly area until after assembly is complete. TOOLS REQUIRED FOR THIS ASSEMBLY 1/2” Wrench Phillips Screwdriver Safety Glasses 3 ASSEMBLY GUIDES Refer to the following areas throughout the instructions to assist in the assembly process: This area is located at the top, left-hand corner of the page and indicates which tools and hardware are needed to complete the assembly steps on a page. TOOLS AND HARDWARE REQUIRED FOR THIS PAGE SEC This area is located at the top, right-hand corner of the page and shows an image of the product with shaded parts indicating which section is being assembled. This area is usually located in the bottom, left-hand corner of a step and indicates that special attention is needed to perform a particular part of a step. ! These areas are usually located in the bottom, right-hand corner of a step and indicate that damage to the product or serious injury may occur if the caution or warning is not heeded. # Note: CAUTION WARNING Throughout the Parts & Hardware List, Part & Hardware Identifiers, and instructions are three-letter IDs. These IDs are below the images of the parts and hardware to help you locate and identify the parts and hardware during assembly. These IDs are not necessarily on the parts themselves. ADZY wYw1BO)FBE4DSFX 4 PARTS LIST ID "3# "3$ "3% "3& Item Description Tub 3JHIU)BOEMF#BS -FGU)BOEMF#BS 3PMM#BS Qty 2 ID "3' "3( ".6 Item Description Connection Sleeve "YMF Wheel Qty 2 2 HARDWARE LIST ID Item Description DBH Axle Frame Hardware "3) wYw$PUUFS,FZ ""0 w/ZMPDL/VU "3+ w6#PMU "3* w"YMF&OE1MVH DBI Handles-to-Tub Assembly Hardware "7' "7( "#% ""/ wYw3PVOE1IJMMJQT)FBE#PMU w$VTUPN1MBTUJD4QBDFS w'MBU8BTIFS w$BQ/VU Qty 2 2 ID Item Description DBJ Tub-to-Frame Assembly Hardware "7) ""0 "#% wYw3PVOE1IJMMJQT)FBE#PMU w/ZMPDL/VU w'MBU8BTIFS 2 2 2 2 5 Qty PARTS IDENTIFIER Parts shown at 10% of Actual Size AMUY Wheel ARBY Tub AREY 3PMM#BS 28 1/4” ARGY "YMF 19” ARFY Connection Sleeve ARCY 3JHIU)BOEMF#BS ARDY -FGU)BOEMF#BS 6 HARDWARE IDENTIFIER AXLE FRAME ASSEMBLY HARDWARE [DBH] "DUVBM4J[F ARJY w6#PMU ARHY wYw$PUUFS,FZ AAOY w/ZMPDL/VU ARIY w"YMF&OE1MVH HANDLES-TO-TUB ASSEMBLY HARDWARE [DBI] "DUVBM4J[F AVFY wYw3PVOE1IJMMJQT)FBE#PMU AVGY w$VTUPN 1MBTUJD4QBDFS ABDY w'MBU8BTIFS TUB-TO-FRAME ASSEMBLY HARDWARE BAG [DBJ] "DUVBM4J[F AVHY wYw3PVOE1IJMMJQT)FBE#PMU ABDY w'MBU8BTIFS 7 AAO9 w/ZMPDL/VU AANY w$BQ/VU SEC 1. 1 AXLE FRAME ASSEMBLY HARDWARE BAG REQUIRED: DBH, DBI, DBJ HARDWARE REQUIRED AXLE FRAME ASSEMBLY HARDWARE "DUVBM4J[F ARJY w6#PMU AAOY w/ZMPDL/VU ARHY wYw$PUUFS,FZ ARIY w"YMF&OE1MVH AVFY wYw3PVOE1IJMMJQT)FBE#PMU AVHY wYw3PVOE1IJMMJQT)FBE#PMU PARTS REQUIRED 1BSUTTIPXOBUPG"DUVBM4J[F 28 1/4” ARGY "YMF AREY 3PMM#BS 19” ARFY Connection Sleeve AMUY Wheel TOOLS REQUIRED 1/2” Wrench Safety Glasses 8 SEC TOOLS AND HARDWARE REQUIRED FOR THIS PAGE 1 AVFY AVHY SEC 1.1 Slide a Roll Bar (ARE)PWFSUIFUXP Connection Sleeves (ARF)BTTIPXO&OTVSFUIFIPMFTMJOFVQ SEC 1.2 Insert Bolts (AVF)UISPVHIUIFTFIPMFTJOUIF3PMM #BSUPIPMEUIF$POOFDUJPO4MFFWFTJOQSPQFS position. AVF ARF AVF ARF ARE SEC 1.3 SEC Slide the second Roll Bar (ARE)PWFSUIFUXP Connection Sleeves (ARF)BTTIPXO&OTVSFUIF holes line up. 1.4 Insert Bolts (AVH)UISPVHIUIFTFIPMFTJOUIF3PMM #BSUPIPMEUIF$POOFDUJPO4MFFWFTJOQSPQFS position. AVH AVH ARE 9 1. SEC TOOLS AND HARDWARE REQUIRED FOR THIS PAGE 1. 1/2” AAOY ARJY ARHY SEC 1.5 ! &OTVSFUIFAxle (ARG) is centered, BOEDPOOFDUJUUPUIF3PMM#BS"TTFNCMZVTJOHUXP 5/16” U-Bolts (ARJ) and GPVS 5/16” Nylock Nuts (AAO). Finally, remove Bolts (AVF and AVH). Note: Tighten Nuts securely. AVH AAO AAO 9 3/4” 9 3/4” AVF ARG ARJ ! SEC 1.6 Note: The Axle should extend 9 3/4” from the center of the U-bolt to the end of Axle. ARJ Insert a 3/4” x 1 1/8” Cotter Key (ARH) into the second hole from each end of the Axle (ARG) as shown. ARH ARH 10 1 SEC TOOLS AND HARDWARE REQUIRED FOR THIS PAGE SEC 4MJEFPOF Wheel (AMU) over each end of the Axle (ARG) until they butt up against the 3/4” x 1 1/8” Cotter Keys (ARH). 1.7 AMU ARH ARG ARH AMU ! 1 Note: Assemble the Wheels onto the Axle with the valve stems facing away from the Tub (ARB). 11 1. SEC TOOLS AND HARDWARE REQUIRED FOR THIS PAGE 1. ARHY ARIY SEC 1.8 Secure the Wheels (AMU) to the Axle (ARG)CZJOTFSUJOHPOF 3/4” x 1 1/8”Cotter Key (ARH) through each hole at the FOETPGUIF"YMFBTTIPXO*OTFSUPOF 1” Axle End Plug (ARI)JOUPFBDIFOEPGUIF"YMF ARH AMU ARI ARH AMU ARI 12 1 SEC 2 HANDLES-TO-TUB ASSEMBLY HARDWARE REQUIRED HARDWARE BAG REQUIRED: DBI 2. HANDLES-TO-TUB ASSEMBLY HARDWARE "DUVBM4J[F ABDY w'MBU8BTIFS AVFY wYw3PVOE1IJMMJQT)FBE#PMU AANY w$BQ/VU AVGY w$VTUPN1MBTUJD4QBDFS PARTS REQUIRED 1BSUTTIPXOBUPG"DUVBM4J[F ARBY Tub ARCY 3JHIU)BOEMF#BS TOOLS REQUIRED 1/2” Wrench Phillips Screwdriver Safety Glasses 13 ARDY -FGU)BOEMF#BS SEC TOOLS AND HARDWARE REQUIRED FOR THIS PAGE 2. SEC 2.1 Turn the Tub (ARB) upside down and lay the Left & Right Handle Bars (ARD & ARC) over the bottom of the Tub so the IPMFTJOUIF)BOEMF#BSTBMJHOXJUIUIFIPMFTPOUIFCPUUPNPGFBDITJEFPGUIF5VC ARD ARB ARC 14 2 SEC TOOLS AND HARDWARE REQUIRED FOR THIS PAGE 2 AVFY 2. 1/2” AVGY AANY SEC Secure the Left & Right Handle Bars (ARD & ARC) to the back of the Tub (ARB)VTJOHUXP 5/16” x 3” Round Phillips Head Bolts (AVF)UXP 5/16” Flat Washers (ABD)UXP 5/16” Custom Plastic Spacers (AVG)BOEUXP 5/16” Cap Nuts (AAN). 2.2 ! ABDY Note: Only hand tighten Nuts in this step. AAN ARB AVG AAN AVG ABD ARD AVF ABD ARC AVF 15 SEC 3 TUB-TO-FRAME ASSEMBLY HARDWARE REQUIRED HARDWARE BAG REQUIRED: DBJ TUB-TO-FRAME ASSEMBLY HARDWARE "DUVBM4J[F 3. AVHY wYw3PVOE1IJMMJQT)FBE#PMU AAOY w/ZMPDL/VU TOOLS REQUIRED 1/2” Wrench Phillips Screwdriver Safety Glasses 16 ABDY w'MBU8BTIFS SEC TOOLS AND HARDWARE REQUIRED FOR THIS PAGE 3 3. SEC Carefully turn the Tub (ARB)PWFSBOEQMBDFJUPOUPUIF3PMM#BS8IFFM"TTFNCMZ"MJHOUIFIPMFTBTTIPXO 3.1 ARB 17 SEC TOOLS AND HARDWARE REQUIRED FOR THIS PAGE 3 1/2” AVHY ABDY 3. AAOY SEC 3.2 Secure the Handles to the upper back of the Tub (ARB)VTJOHTJY 5/16” x 2” Round Phillips Head Bolts (AVH)TJY 5/16” Flat Washers (ABD)BOETJY 5/16” Nylock Nuts (AAO). AVH AVH AVH ABD AVH ABD ABD AVH ABD AVH ABD ABD ARB AAO WARNING AAO %POPUPWFSUJHIUFOUIF$BQ/VU*GUIFFOEPG UIF#PMUCSFBLTUISPVHIUIFQMBTUJDDBQDBMMPVS $VTUPNFS4FSWJDF%FQBSUNFOU&YQPTFEUISFBET POUIFFOEPGUIF#PMUNBZDBVTFTFSJPVTJOKVSJFT AAO AAO SEC Tighten all hardware. 3.3 18 SEC 4 BUILD WALL EXTENSIONS ADD EXTENSIONS SEC 4.1 4UBOEBSEwYwBCPVUwYw CPBSETDBOCFJOTFSUFEJOUPUIFGPVSTMPUTPOUIFTJEFTPGUIF5VC to FYUFOEUIFXBMMTPGUIF8IFFMCBSSPXBOEIPMEBIJHIFSTUBDLPGEFCSJT 4. WARNING %POPUFYDFFEMCPSNPSFUIBOZPVDBO DBSSZ%POPUBQQMZFYDFTTJWFPVUXBSEPS inward pressure on boards. 19 2-YEAR LIMITED FACTORY WARRANTY LIFETIME PRODUCTS, INC. RESERVES THE RIGHT TO MAKE SUBSTITUTIONS TO WARRANTY CLAIMS IF PARTS ARE UNAVAILABLE OR OBSOLETE. -JGFUJNFXIFFMCBSSPXTBSFXBSSBOUFEUPUIFPSJHJOBMQVSDIBTFSUPCFGSFFGSPNEFGFDUTJONBUFSJBMBOEXPSLNBOTIJQGPS BQFSJPEPGUXPZFBSTGSPNUIFEBUFPGPSJHJOBMSFUBJMQVSDIBTF5IFXPSEiEFGFDUTwJTEFmOFEBTJNQFSGFDUJPOTUIBUJNQBJS the use of the product. Defects resulting from misuse, abuse or negligence will void this warranty. This warranty does not cover defects due to improper installation, alteration, or accident. This warranty does not cover damage caused by WBOEBMJTNSVTUJOHiBDUTPGOBUVSFwPSBOZPUIFSFWFOUCFZPOEUIFDPOUSPMPGUIFNBOVGBDUVSFS 5IFUJSFTXIFFMTBOEBYMFJODMVEFEXJUIUIFXIFFMCBSSPXBSFOPUDPWFSFECZUIJTZFBSMJNJUFEGBDUPSZXBSSBOUZCVU BSFDPWFSFECZBTFQBSBUFZFBSXBSSBOUZ 5IJTXBSSBOUZJTOPOUSBOTGFSBCMFBOEJTFYQSFTTMZMJNJUFEUPUIFSFQBJSPSSFQMBDFNFOUPGQBSUT XIJDINBZCFEFUFS mined upon inspection by the manufacturer to be defective in material or workmanship. Shipping charges to and from the factory as well as labor costs are not covered and are the responsibility of the purchaser. 5IJTXBSSBOUZEPFTOPUDPWFSTDSBUDIJOHPSTDVGmOHPGUIFQSPEVDUUIBUNBZSFTVMUGSPNOPSNBMVTBHF*OBEEJUJPOEF fects resulting from intentional damage, negligence, unreasonable use, improper loading or overloading, and installation PGJNQSPQFSFRVJQNFOUXJMMWPJEUIJTXBSSBOUZ -JBCJMJUZGPSJODJEFOUBMPSDPOTFRVFOUJBMEBNBHFTJTFYDMVEFEUPUIFFYUFOUQFSNJUUFECZMBX4PNF4UBUFTEPOPUBMMPX UIFFYDMVTJPOPSMJNJUBUJPOPGJODJEFOUBMPSDPOTFRVFOUJBMEBNBHFTTPUIJTMJNJUBUJPONBZOPUBQQMZUPZPV8IJMFFWFSZ attempt is made to embody the highest degree of safety in the wheelbarrow, freedom from injury cannot be guaranteed. 5IFVTFSBTTVNFTBMMSJTLPGJOKVSZSFTVMUJOHGSPNUIFVTFPGUIJTQSPEVDU"MMNFSDIBOEJTFJTTPMEPOUIJTDPOEJUJPOBOE no representative of the company may waive or change this policy. 5IJTXBSSBOUZJTFYQSFTTMZJOMJFVPGBMMPUIFSXBSSBOUJFTFYQSFTTFEPSJNQMJFEJODMVEJOHXBSSBOUJFTPGNFSDIBOUBCJMJUZ PSmUOFTTGPSVTFUPUIFFYUFOUQFSNJUUFECZ'FEFSBMBOE4UBUFMBX5IJTXBSSBOUZHJWFTZPVTQFDJmDMFHBMSJHIUTBOEZPV may also have other rights which vary from state to state. PLEASE INCLUDE YOUR DATED SALES RECEIPT AND PHOTOGRAPHS OF DAMAGED PARTS. 3&1035130%6$5%&'&$54*/83*5*/(50 -JGFUJNF1SPEVDUT*OD10#PY$MFBSmFME65 PSDBMM.'BNUPQN.45 REGISTER YOUR PRODUCT FOR QUICKER CUSTOMER SERVICE. 7JTJUXXXMJGFUJNFDPNPSDBMMUPSFHJTUFSZPVSQSPEVDUUPEBZ FOR INTERNATIONAL WARRANTY CLAIMS: "MMXBSSBOUZDMBJNTNVTUCFBDDPNQBOJFECZBTBMFTSFDFJQU3FQPSUBMMXBSSBOUZDMBJNTJOXSJUJOHUPZPVSSFHJPOBMTBMFT TVQQPSUSFQSFTFOUBUJWF1MFBTFJODMVEFZPVSEBUFETBMFTSFDFJQUBOEQIPUPHSBQITPGEBNBHFEQBSUT 5P*EFOUJGZUIFSFQSFTFOUBUJWFGPSZPVSSFHJPO1MFBTFWJTJUXXXMJGFUJNFDPNJOUFSOBUJPOBM ©Lifetime Products, Inc. 20