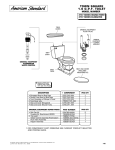
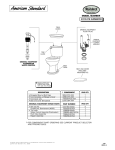
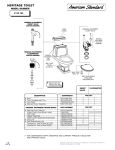
1
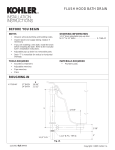
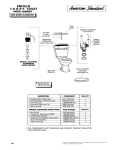
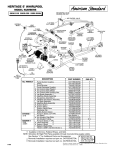
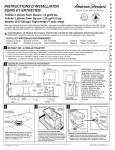
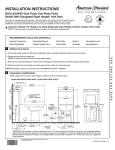
OVER THE
RIM DRAIN
Installation
Instructions
1599.205.XXX SERIES
BATH WASTE AND OVERFLOW
WITH TOE TAPPER DRAIN PLUG
Thank you for selecting American-Standard...the benchmark
of fine quality for over 100 years.
To ensure that your installation proceeds smoothly--please
read these instructions carefully before you begin.
U.S. Patent No. 4,294,289, Patents Pending
753732-100 Rev.1.5
TOOLS REQUIRED
Channel Locks
Adjustable Wrench
ROUGH-IN DIMENSIONS
Plumbers' Putty or Caulking
Phillips Screwdriver
7"
NOTE: OVERFLOW TUBE ASSEMBLY
ROTATED 90 DEGREES IN THIS VIEW.
UNDER SIDE OF
OVERFLOW LEDGE
TOE TAPPER
DRAIN PLUG
20-13/16"
XX MIN. XX MAX.
2-13/16" DIA.
4"
1-1/2" OD TAILPIECE
7-3/4"
1
INSTALL DRAIN PLUG AND ELL
Apply putty to underside of DRAIN PLUG (1) and drop into
drain opening.
Slip RUBBER WASHER (2) on from below and thread
DRAIN PLUG (1) into DRAIN ELL ASSEMBLY (3).
1
PUTTY
2
NOTE: TUB IS SHOWN CUT AWAY
FOR CLARITY OF INSTALLATION.
3
BATH DRAIN OUTLET
2
INSTALL OVERFLOW ASSEMBLY AND DRAIN TEE
Loosen SLIP JOINT NUT & SEAL (1) and install onto OVERFLOW TUBE (2). Install
OVERFLOW TUBE ASSEMBLY (2) into the appropriate leg of the DRAIN TEE (3).
Apply sealant to threads of TAILPIECE (6) and thread into DRAIN TEE (3). FIG.1.
Loosen SLIP JOINT NUT & SEAL (4) and install onto DRAIN ELL
ASSEMBLY (5). Install DRAIN ELL ASSEMBLY (5) into the horizontal
leg of the DRAIN TEE (3). FIG 2.
2
1
3
FIG.1
FIG.2
4
5
6
3
SEALANT
NOTE: TUB IS SHOWN CUT AWAY
FOR CLARITY OF INSTALLATION.
SECURE OVERFLOW ASSEMBLY TO TUB
Apply a bead of silicone sealant to upper edge of 0VERFLOW GASKET (1).
Install OVERFLOW GASKET (1) onto OVER FLOW FLANGE (2).
Push OVER FLOW TUBE ASSEMBLY (3) up flush against underside of ledge.
Install and align mounting holes in RETAINING PLATE (4) with holes in OVER FLOW FLANGE (2). Insert MOUNTING
SCREWS (5) and tighten to secure OVER FLOW FLANGE (2) to TUB. Note: RETAINING PLATE (4) must be installed as
shown with open side facing out.
Tighten SLIP JOINT NUTS (6, 6a)
to make water tight connections.
5
4
SEALANT
1
2
3
6
NOTE: TUB IS SHOWN CUT AWAY
FOR CLARITY OF INSTALLATION.
6a
753732-100 Rev.1.5
4
INSTALL OVERFLOW ESCUTCHEON
3
Install OVERFLOW ESCUTCHEON (1) onto
RETAINING PLATE (2). Use MOUNTING
SCREWS (3) to secure OVERFLOW
ESCUTCHEON (1). Fig. 1.
4
1
Peel protective tape from the AMERICAN
STANDARD LOGO (4). Align LOGO (4) and
press into place. Fig. 2.
2
Thread TOE TAPPER DRAIN PLUG (5) into
DRAIN PLUG (6)
4
FIG.1
1
FIG.2
5
NOTE: TUB IS SHOWN CUT AWAY
FOR CLARITY OF INSTALLATION.
6
5
ABOVE FLOOR OUTLET
Note: Waste outlet can be installed either above the floor
or below floor. Fig.1.
For above floor drain outlet, Rotate DRAIN TEE
ASSEMBLY (1) 90 degrees so TAILPIECE (2)
faces out the back from tub as shown. Fig.2.
TYPICAL ABOVE FLOOR
INSTALLATION
ROUGH FLOOR
TUB
TUB
2
6
ABOVE FLOOR ROUGH
BELOW FLOOR ROUGH
1
NOTE: TUB IS SHOWN CUT AWAY
FOR CLARITY OF INSTALLATION.
753732-100 Rev.1.5
OVER THE RIM DRAIN
1599.205.XXX
753744-0070A
AM. STD. BUBBLE LOGO
753918-XXX0A
OVERFLOW
ESCUTCHEON
W/BUBBLE LOGO
753917-0070A
RETAINING PLATE
WITH SCREWS
753635-0070A
OVERFLOW FITTING
753629-XXXOA
TOE TAPPER DRAIN
Replace the "XXX" with
appropriate finish code
CHROME
WHITE
LINEN
POL. BRASS
BRUSHED SATIN
BLACK
002
020
222
099
295
178
753630-0020A
DRAIN PLUG
751977-0070A
DRAIN PLUG
WASHER
HOT LINE FOR HELP
For toll-free information and answers to your questions, call:
1 (800) 442-1902
Weekdays 8:00 a.m. to 6:00 p.m. EST
IN CANADA 1-800-387-0369 (TORONTO 1-905-306-1093)
Weekdays 8:00 a.m. to 7:00 p.m. EST
IN MEXICO 01-800-839-12-00
Product names listed herein are trademarks of American Standard Inc.
© American Standard Inc. 2006
753732-100 Rev.1.5