1
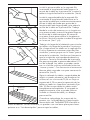
Install the second plank in the second
row by inserting the short end tongue
into the previously installed plank groove.
Align the plank so the long side tongue
tip is positioned just over the groove lip
of the plank in the first row. Working from
the end seam, with a low angle insert the
long tongue into the groove of the
adjoining plank. Very little force is required
to seat the tongue into the groove. You
will feel the tongue lock into the groove.
(See 7 and 8)
6
Work across the length of the room
installing planks along the wall in the first
row and then aligning the planks in the
second row. It is critical to keep these two
rows straight and square, as they are the
“foundation” for the rest of the installation.
Check squareness and straightness often.
Cut the last plank in the first row to fit
approximately 5/16in short of the end
wall. Planks may be cut with a utility knife
using the “score and snap” technique.
Often times the remainder of this plank
may be used to start the third row. (See 9)
7
8
5
3
1
4
9
5/16 in
Expansion
Gap
2
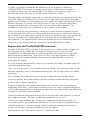
Continue installing planks, being certain
to maintain a random appearance and
offset end seams by at least 6in. Maintain
a 5/16in expansion space at all fixed
vertical surfaces. (See 10) Check to be
certain all planks are fully engaged. If
slight gapping is noticed, the gap can be
tapped closed by using a scrap of flooring
and a tapping block.
When fitting under door casings, etc. the
flexibility and low angle of connection of
the TrafficMASTER™ InterLock product
become evident. If necessary, a flat pull
bar or “last board puller” may be used to
assist in locking the planks.
10
When fitting around obstacles or into
irregular spaces, TrafficMASTER InterLock can be cut easily and cleanly
using a utility knife with a sharp blade. It is often beneficial to make a
cardboard template of the area and transfer this pattern to the plank.
3