1
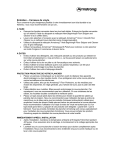
A R MSTRO N G ® VIN YL TIL E FL O O R I N G INSTALLATION, CARE AND MAINTENANCE WHY ARMSTRONG® VINYL TILE? • Easy to clean • Broad selection of styles and colors • Durable • Economical • Scuff Resistant • Softer and warmer underfoot than most hard-surface flooring • Easy installation INSTALLATION MATERIALS Tools: ❑ Utility knife ❑ Medium grit sandpaper ❑ Sanding block ❑ Smooth edge trowel ❑ Tape measure ❑ Short nap paint roller ❑ Chalk and chalk line ❑ Rolling pin ❑ Carpenter’s square ❑ S-184 Patch & Skim Coat ❑ S-183 Underlayment ❑ S-185 Latex Primer ❑ New Beginning Resilient Deep Cleaning Floor Stripper ❑ S-199 One Part Embossing Leveler ® ESTIMATING • Find your room size on chart • Number in square is how many cartons you need • Charts include at least five extra tiles per 100. These extra tiles are needed to allow for waste and odd room size. NOTE: Armstrong vinyl tile flooring is packaged in different quantities. Be sure you use the correct estimating chart. 6' 8' 10' 12' 14' 16' 18' 20' 6' 1 2 2 2 3 3 3 4 8' 6' 8' 10' 12' 14' 16' 18' 20' 6' 2 2 3 3 4 4 5 5 7 2 2 3 3 4 4 4 5 8' 2 3 4 4 5 6 6 10' 2 3 3 4 4 5 5 6 10' 3 4 5 5 6 7 8 9 12' 2 3 4 4 5 6 6 7 12' 3 4 5 6 7 8 9 10 16 Tile Carton (18" x 18") 24 Tile Carton (12" x 12") 6' 8' 10' 12' 14' 16' 18' 20' 6' 8' 10' 12' 14' 16' 18' 20' 6' 2 2 3 3 3 4 4 5 6' 1 2 2 2 2 3 3 3 8' 2 3 3 4 4 5 5 6 8' 2 2 2 3 3 3 4 4 10' 3 3 4 5 5 6 7 7 10' 2 2 3 3 4 4 5 5 12' 3 4 5 5 6 7 8 9 12' 2 3 3 4 4 5 5 6 30 Tile Carton (12" x 12") 45 Tile Carton (12" x 12") FLOOR CARE RECOMMENDATIONS Floor Protectors • Floor protectors evenly distribute furniture weight and help prevent indentations from forming on your vinyl floor New Beginning® Resilient Deep Cleaning Floor Stripper • For all no-wax vinyl floors • Solves tough cleaning problems Once ’n Done® Resilient & Ceramic Cleaner • No-rinse floor cleaner for no-wax vinyl, ceramic and stone floors Shinekeeper® Resilient High Gloss Floor Finish • For all high-gloss vinyl floors • Restores gloss and shine to older floors PREPARE SUBFLOOR Step 1. Inspect and prepare subfloor. Subfloor must be clean, dry, and smooth. A subfloor is the surface over which your new Armstrong® tile flooring is installed. IF INSTALLING OVER… VINYL FLOORING (only single-layer) Must be noncushioned-backed and firmly bonded. Check for loose vinyl, gapped seams, cuts, tears, rips, or other damage. Do not install over tile below grade level. PLYWOOD If installing a new plywood subfloor, use APA Underlayment Grade. For new or existing plywood subfloors, check for loose panels, gapped joints, knots, nail holes or other damage. CONCRETE/CERAMIC Must be clean, dry, and dust-free. Check for cracks, scaling, levelness, and other damage. Tiles can be installed over a painted concrete floor (self-stick only). If installing over ceramic tile, terrazzo, or marble, ensure that the tiles are firmly bonded. PREPARE Use New Beginning® Resilient Deep Cleaning Floor Stripper to remove dirt and wax buildup Use utility knife to remove loose vinyl. Use S-184 Patch & Skim Coat for patching or filling textured surfaces Use S-183 Underlayment or S-184 Patch & Skim Coat for patching or leveling S-199 One Part Embossing Leveler fills and levels embossing on your old vinyl floor Use smooth edge trowel for applying S-199 Use smooth edge trowel for applying S-184 Use medium grit sandpaper and a sanding block for smoothing rough areas of the underlayment Use S-185 Latex Primer for a superior bond Use short nap paint roller for applying S-185 Use smooth edge trowel for applying S-183 and S-184 mixture Use medium grit sandpaper and a sanding block for smoothing rough areas of the underlayment Use S-185 Latex Primer for a superior bond Use short nap paint roller for applying S-185 PLAN THE LAYOUT for indoor use only Step 2. Find the center of each of the end walls and strike a chalk line at the center of the room. Use medium grit sandpaper and a sanding block for smoothing rough areas of the underlayment Step 3. At the midpoint of the center line, create a perpendicular line using a carpenter’s square. Center line midpoint Step 4. Leave release paper on back of tile, and position tiles in one quadrant of the room to determine border tile size. Shift the starting line(s) 6" (if necessary) to maximize border tile size. INSTALL TILE CUTTING THE BORDER TILE FINISH Step 5. Peel release paper from tile and install at intersection. Install one quadrant of tile at a time. Make sure arrows on back of all tiles point in the same direction. Lay tiles in pattern shown at right, using chalk lines as a guide. Make sure tiles are butted tightly at all edges to prevent separation. Step 6. For straight cuts place a loose tile (A) face up exactly on top of the last full tile, making sure the arrows are pointed in the proper direction. Place another full tile (B) on top of tile (A) with its edge against the wall. Using tile (B) as a guide, mark the face of tile (A) with a pencil. Step 7. Roll installed tiles to bond to floor. DO NOT wash floor for five days. Cut border tiles with utility knife. For irregular cuts, make a pattern and transfer it to a tile. Replace wall base and moldings. WARRANTY LIFETIME THE ARMSTRONG DIY LIMITED RESIDENTIAL WARRANTY FOR DIY VINYL TILE FLOORING† Premium Floors – Harbor™ Collection, Natural Visuals™ Deluxe Floors – Granite Mills™ • What is covered and for how long? The Armstrong Do-It-Yourself (DIY) lifetime warranty for Armstrong resilient tile means that for the lifetime from the date of purchase, if for ANY reason you are dissatisfied with your floor, we will give you replacement tile. 10-YEAR THE ARMSTRONG DIY LIMITED RESIDENTIAL WARRANTY FOR DIY VINYL TILE FLOORING Select Floors – Stylistik® II • What is covered and for how long? The Armstrong Do-It-Yourself (DIY) 10-year limited warranty for Armstrong resilient tile means that for the ten years from the date of purchase, if for ANY reason you are dissatisfied with your floor, we will give you replacement tile. 6-YEAR THE ARMSTRONG DIY LIGHT COMMERCIAL WARRANTY Premium Floors – Harbor™ Collection, Natural Visuals™ For light commercial installations (foot traffic in property management locations and low-traffic retail shops) the product is warranted to be free from manufacturing defects for six years from the date of purchase. If a defect covered by this warranty is reported to Armstrong in writing within six years of purchase, Armstrong will supply new material of the same or similar grade sufficient to repair or replace the defective material. Installation requirements Proper installation plays a key role in the performance of Armstrong floors. For installation of vinyl tile, these basic guidelines should be followed: • Store tiles for 48 hours in room where they will be installed. Keep room at a minimum of 65º F during that time and during installation. After installation, temperature should not fall below 65º F for the first 48 hours, and not below 55º F after that. • If room is heated by radiant coils in the subfloor, the TEMPERATURE OF THE FLOOR should not exceed 85º F. • The subfloor should be level, clean, and free of wax, grease, oil or dust. • If necessary, patch or fill any cracks in the subfloor with Armstrong Patch or Latex Underlayment. • If installing over existing vinyl, use liquid underlayment or embossing leveler to smooth any texture or embossing on the old floor. • Install over smooth, well-bonded resilient floors, ceramic, terrazzo, marble or over dry concrete and wood floors with a plywood overlay. What will Armstrong do if you are dissatisfied? We will provide replacement Armstrong tile of comparable quality, color and pattern. We exclude any liability for installation costs or other damages. What is NOT covered by this warranty? THERE ARE NO WARRANTIES BEYOND THIS EXPRESSED WARRANTY. ALL OTHER WARRANTIES, INCLUDING WARRANTIES OF MERCHANTABILITY OR FITNESS FOR A PARTICULAR PURPOSE, ARE EXCLUDED. ARMSTRONG EXCLUDES ANY LIABILITY FOR LOST PROFITS OR ANY OTHER INDIRECT, SPECIAL OR CONSEQUENTIAL DAMAGES. THE REMEDIES CONTAINED HEREIN ARE THE ONLY REMEDIES AVAILABLE BREACH OF THIS WARRANTY. What should you do if you have a problem? We want you to be happy with your Armstrong floor. If you’re not, call your retail store. They can answer your questions and, if necessary, start to process a claim. If you have further questions, please call us at 1 800 233 3823. PLEASE KEEP YOUR RECEIPT. The receipt is required to verify proof of purchase and purchase date. What is excluded from this warranty? Armstrong excludes and will not pay incidental or consequential damages under this warranty. By this we mean any loss, expense, or damage other than to the flooring itself that may result from a defect in the flooring. No implied warranties extended beyond the terms of this written warranty. Note: Some jurisdictions do not allow exclusion or limitations of incidental or consequential damages or limitations on how long an implied warranty lasts, so the above limitations or exclusions may not apply to you. This warranty gives you specific legal rights, and you may also have other rights, which vary from jurisdiction to jurisdiction. This warranty is effective November, 2012. Warranty owner This warranty applies only to Do-It-Yourself (DIY) installations by a homeowner for his or her own residential end use. This warranty extends only to the original end user and is not transferable. †Visit www.armstrong.com for warranty details, limitations and exclusions. Care and maintenance Proper care and maintenance will help ensure your floor always looks its best. Simply follow our maintenance and prevention steps outlined below. Immediately after installation • Maintain room temperature at 65º F for 48 hours after installation is completed. This assures proper curing, setting and bonding of products. • The adhesive under your floor needs time to thoroughly dry after installation. Therefore, we recommend that you do not scrub or wash your floor for five days. Caring for your floor • Sweep or vacuum regularly to remove loose dirt, which can scratch your floor. NOTE: we do not recommend vacuums that have a beater bar since it can visibly damage your flooring surface. Additionally, we do not recommend electric brooms with hard plastic bottoms with no padding as use may result in discoloration and deglossing. • Never use highly abrasive scrubbing tools on any Armstrong floor. • Wash your floor regularly with Armstrong Once ’n Done® Resilient & Ceramic Floor Cleaner.* • F or heavy duty cleaning, use Armstrong New Beginning ® Resilient Deep Cleaning Floor Stripper.* •D o NOT use detergents, abrasive cleaners, or “mop and shine” products. These products may leave a dull film on your floor. •O ver time, if the shine on your floor begins to dull, Armstrong Shinekeeper ® Resilient High Gloss Floor Finish* can be used to renew your floor’s shine. Do NOT use paste wax or solvent-based polishes. • Vinyl flooring, like other types of smooth floors, can become slippery when wet. Allow time for floor to dry after washing. Immediately wipe up wet areas from spills, foreign substances, or wet feet. Proactive protection for your floor • When moving appliances or heavy furniture, lay a plywood panel on your floor and “walk” the items across it. This protects your floor from scuffing and tears. • Use floor protectors, such as Armstrong Floor Protectors, on furniture to reduce indentation. The heavier the item, the wider the floor protector needed. • Be careful will rolling casters. They can damage the floor. Therefore, we do not recommend them. If you choose to use them, the double-wheel type is the best option. • Place a walk-off mat at outside entrances to reduce the amount of dirt brought into your home. We strongly recommend mats without a latex or rubber backing since these backings can cause permanent discoloration. • All Armstrong floor care products have been specifically developed to care for Armstrong floors. You may purchase Armstrong floor care products at your local flooring retailer. PRECAUTIONS • When installing over an existing resilient floor, lay out the tile installations so the new seams are a minimum of 6" away from the original seams. • When installing over tile floors, seams should fall in the center of the tile. • When using tile from two or more cartons, check to be sure all pattern and lot numbers are the same for proper color match. • Tile products with directional arrows on the back should be installed with the arrows all pointing in the same direction. • Do not wet wash tile for at least five days after installation. This will allow the tile to become well seated in the adhesive and prevent excess moisture and cleaning agents from interfering with the adhesive bond. • Make sure tiles are butted tightly at all edges to prevent separation. STAIN REMOVAL TO REMOVE THE STAIN, FOLLOW THESE INSTRUCTIONS IN ORDER, UNTIL NO TRACE OF STAIN REMAINS. CRAYON • Rub the stain with mineral spirits** or turpentine** on a clean white cloth. • Scrub the area with Armstrong New Beginning ® Resilient Deep Cleaning Floor Stripper* and a nonabrasive white scrubbing pad, following instructions on the label. LIPSTICK • Rub the stain with rubbing alcohol (isopropyl alcohol)** on a clean white cloth. • If stain is still visible, rub the stain with mineral spirits** or turpentine** on a clean white cloth. • Scrub the area with Armstrong New Beginning Resilient Deep Cleaning Floor Stripper* and a nonabrasive white scrubbing pad, following instructions on the label. GRAPE JUICE/WINE • Scrub the area with Armstrong New Beginning Resilient Deep Cleaning Floor Stripper* and a nonabrasive white scrubbing pad, following instructions on the label. • If stain is still visible, rub the stain with rubbing alcohol (isopropyl alcohol)** on a clean white cloth. MERCUROCHROME/MERTHIOLATE • Rub the area with rubbing alcohol (isopropyl alcohol)** on a clean white cloth. • Scrub the area with Armstrong New Beginning Resilient Deep Cleaning Floor Stripper* and a nonabrasive white scrubbing pad, following instructions on the label. MUSTARD • Scrub the area with Armstrong New Beginning Resilient Deep Cleaning Floor Stripper* and a nonabrasive white scrubbing pad, following instructions on the label. PEN INK • Rub the area with rubbing alcohol (isopropyl alcohol)** on a clean white cloth. • If stain is still visible, rub the stain with mineral spirits** or turpentine** on a clean white cloth. • Scrub the area with Armstrong New Beginning Resilient Deep Cleaning Floor Stripper* and a nonabrasive white scrubbing pad, following instructions on the label. PERMANENT MARKER • Rub the stain with mineral spirits** or turpentine** on a clean white cloth. • If stain still shows, very carefully wipe with fingernail polish remover** containing acetone (follow use instructions on label) on a clean white cloth. • If stain still shows, rub the stain with rubbing alcohol (isopropyl alcohol)** on a clean white cloth. • Scrub the area with Armstrong New Beginning Resilient Deep Cleaning Floor Stripper* and a nonabrasive white scrubbing pad, following instructions on the label. ASPHALT DRIVEWAY SEALER/SHOE POLISH • Rub the stain with mineral spirits** or turpentine** on a clean white cloth. • If stain still shows, rub the stain with rubbing alcohol (isopropyl alcohol)** on a clean white cloth. • Scrub the area with Armstrong New Beginning Resilient Deep Cleaning Floor Stripper* and a nonabrasive white scrubbing pad, following instructions on the label. HAIR DYE • Rub the stain with rubbing alcohol (isopropyl alcohol)** on a clean white cloth. • If stain still shows, use mineral spirits** or turpentine** on a clean white cloth. • If stain still shows, very carefully wipe with fingernail polish remover** containing acetone (follow use instructions on label) on a clean white cloth. • Scrub the area with Armstrong New Beginning ® Resilient Deep Cleaning Floor Stripper* and a nonabrasive white scrubbing pad, following instructions on the label. PAINT/VARNISH • If paint stain is wet, wipe up the stain with water on a clean white cloth. • If pain stain is dry, carefully scrape residue with a thin spatula. • If stain still shows, rub the area with rubbing alcohol (isopropyl alcohol)** on a clean white cloth. • If stain still shows, use mineral spirits** or turpentine** on a clean white cloth. • If stain still shows, very carefully wipe with fingernail polish remover** containing acetone (follow use instructions on label) on a clean white cloth. • Scrub the area with Armstrong New Beginning Resilient Deep Cleaning Floor Stripper* and a nonabrasive white scrubbing pad, following instructions on the label. NAIL POLISH • Very carefully wipe with fingernail polish remover** containing acetone (follow use instructions on label) on a clean white cloth. RUST • Apply Armstrong New Beginning Resilient Deep Cleaning Floor Stripper* to the stain and let it stand for five minutes. Scrub vigorously with a stiffbristle brush or nonabrasive white scrubbing pad, wipe, rinse, and let dry. • If traces remain, rub with a soft cloth dipped in a solution of oxalic acid and water (one part acid to 10 parts water). NOTE: Please follow instructions and cautions on label as oxalic acid is poisonous. CIGARETTE BURNS • The procedure depends on the exact construction of your floor. Consult your retailer. BLACK HEEL MARKS • Scrub the area with Armstrong New Beginning Resilient Deep Cleaning Floor Stripper* and a nonabrasive white scrubbing pad, following instructions on the label. • If stain still shows, rub the area with a nonabrasive cleaner. • If stain still shows, rub the area with rubbing alcohol (isopropyl alcohol)** on a clean white cloth. * Eye and Skin Irritant **May be combustible/flammable; please follow instructions on label Customer Relations and Technical Services: 1 800 233 3823 • www.armstrong.com All trademarks owned by AWI Licensing Company. New Beginning®, Once ’n Done® and Shinekeeper® are registered in the United States only. NA-3501-1112 ©2012 AWI Licensing Company Printed in the United States of America.