1
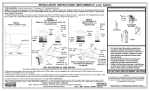
4. When right and left slides are in
place, extend fully. Next, push rear
pocket on drawer onto rear clip on
CAUTION
Pull out only one drawer at a
time to avoid sudden tipping
of product which could cause
serious personal injury or
property damage.
Figure 2. Caster Mounting Holes
5. Take one slide and insert rear clip
into rear notch, and lower front clip
into front notch (See Figure 5.).
with Whiz Nuts. Repeat this for the
remaining Casters.
Drawer Removal
Drawer Slide Removal
Figure 4. Upper Drawer Removal
3. To remove a drawer (Figure 4.),
pull the drawer out until it stops.
Notice the locking levers located
inside the track that is attached to
the drawer. Lift the left lever (A)
slide and lower front pocket onto
front clip. Close the drawer completely. The mechanism will automatically latch.
6. Reverse step 5.
Drawer Slide Installation
5/16-18 x 3/4"
Carriage Bolt
FRONT VIEW
1/4"
Pushnut
Figure 5. Drawer Slide Installation
5/16-18
Whiz Nut
Figure 3. Caster Mounting
while pressing down on the right
lever (B). Pull drawer clear on the
slides.
Drawer Installation
DRAWER
MEMBER
CABINET
MEMBER
SIDE VIEW
FRONT
REAR
CABINET MEMBER
-NOTICE-
Any modification or unintended use of this product shall immediately void all manufacturers warranties.
Manufacturer disclaims all liability for injuries to persons or property resulting from any modification to, or
unintended use of this product.
If you have any questions, please give us a call. Call Toll Free 1-800-456-7865
Knaack® products are protected by one or more of the following patents or trademarks: U.S. - 5076078, 1182980, 1182981, 1182982,
1182983, 1517767, 1560477, 1897535, 945736; Canada - 280058, 283281, 281398; U.K. - 2233036, 1390299; Aus - 754070, 754069;
N.Z. - 296048, 296050 other patents pending.
KNAACK MANUFACTURING COMPANY
420 E. TERRA COTTA AVENUE - CRYSTAL LAKE, ILLINOIS, 60014
815-459-6020
©2000 Knaack Manufacturing Company