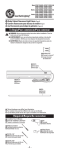
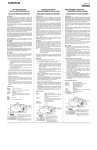
1
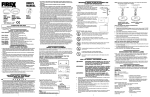
OWNER’S MANUAL & OPERATING INSTRUCTIONS
Utility Winch
Rated Pulling Capacity 2000 lb.
Rated Marine Capacity 5000 lb./Rated Rolling Capacity 6000 lb.
MODEL NUMBER
12090
save These InsTRUCTIons
Important Safety Instructions
are included in this manual.
MADE IN CHINA
REV 12090-20140108
10006 Santa Fe Springs Road
Santa Fe Springs CA 90670
USA / 1-877-338-0999
www.championpowerequipment.com
Have questions or need assistance?
Do not return this product to the store!
WE ARE HERE TO HELP!
Visit our website:
www.championpowerequipment.com
for more info:
• Product Info & Updates
• Frequently Asked Questions
• Tech Bulletins
• Product Registration
– or –
Call our Customer Care Team Toll-Free at:
1-877-338-0999
*We are always working to improve our products. Therefore, the enclosed product may differ slightly from the image on the cover.
12090
Utility Winch
Rated Pulling Capacity 2000 lb.
Rated Marine Capacity 5000 lb./Rated Rolling Capacity 6000 lb.
Table of Contents
Introduction. .
. . . .
Introduction. . . .
This Booklet . . .
Website. . . . . .
Manual Conventions .
Safety Rules . . . . .
.
.
.
.
.
.
Controls and Features .
Utility winch . . . .
Assembly . . . . . . . .
.
.
.
.
.
.
.
.
.
Contents of the Box .
. .
. .
. .
. .
. .
. .
. .
. .
. .
. .
Utility Winch Location. .
.
.
.
.
.
.
.
.
.
.
.
.
.
.
.
.
.
.
.
.
.
.
.
.
.
.
.
.
.
.
.
.
.
.
.
.
.
.
.
.
.
.
.
.
. .
. .
. .
. .
. .
. .
. .
. .
. .
. .
. .
Mounting the Winch Permanently. .
Adapter Plate. . . . . . . . . . . . .
Battery Connections. . . . . . . . .
Temporarily Wiring the Winch. . . .
Remote Control. . . . . . . . . . . .
Operation. . . . . . . . . . . . . . . . .
Inspection. . . . . . . . . . . . . . .
Connecting a Load. . . . . . . . . .
General Tips for Safe Operation. . .
Manual Operation . . . . . . . . . .
Winching Techniques. . . . . . . . .
Maintenance . . . . . . . . . . . . . . .
Cleaning. . . . . . . . . . . . . . . .
Lubrication. . . . . . . . . . . . . .
Cable Assembly Replacement. . . .
Storage . . . . . . . . . . . . . . . .
.
.
.
.
.
.
.
.
.
.
.
.
.
.
.
.
.
.
.
.
.
.
.
.
.
.
.
.
.
.
.
.
.
.
.
.
.
.
.
.
.
.
.
.
.
.
.
.
.
.
.
.
.
.
.
.
.
.
.
.
.
.
.
.
.
.
.
.
.
.
.
.
.
.
.
.
.
.
.
.
.
.
.
.
.
.
.
.
.
.
.
.
.
.
.
.
.
.
.
.
.
.
.
.
.
.
.
.
.
.
.
.
.
.
.
.
.
.
.
.
.
.
.
.
.
.
.
1
1
1
1
2
3
5
5
6
6
6
6
7
7
8
8
9
9
9
10
10
11
12
12
12
12
12
Troubleshooting. .
. . . . . . . . . .
Specifications. . . . . . . . . . . . .
Performance Specifications. . .
Parts Diagram . . . . . . . . . .
Parts List. . . . . . . . . . . . .
Warranty. . . . . . . . . . . . . . . .
Warranty Qualifications . . . . .
Repair/Replacement Warranty. .
Do Not Return The Unit
To The Place Of Purchase.
.
.
.
.
.
.
.
.
.
.
.
.
.
.
.
.
.
.
.
.
.
.
.
.
.
.
.
.
.
.
.
.
.
.
.
.
.
.
.
.
.
.
.
.
.
.
.
.
13
. . . . . . . . .
. . . . . . . .
17
Warranty Exclusions . . . . .
Limits of Implied Warranty
And Consequential Damage.
Contact Information .
.
. . . . .
Customer Service .
Technical Service .
Address. .
.
.
.
.
.
.
.
.
.
.
.
.
.
.
.
.
.
.
.
.
.
.
.
.
.
.
.
.
.
.
.
.
.
.
.
.
.
.
.
.
.
.
.
.
.
.
.
.
.
.
.
.
14
14
15
16
17
17
17
17
17
17
17
17
17
ENGLISH 12090
Introduction
Introduction
Website
Congratulations on your purchase of a Champion
Power Equipment utility winch. CPE designs
and builds winches to strict specifications. With
proper use and maintenance, this winch will bring
years of satisfying service.
Champion Power Equipment manufactures and
supports every product we sell. To find out more
about your utility winch please visit our website at:
www.championpowerequipment.com
This Booklet
Every effort has been made to ensure the accuracy
and completeness of the information in this manual.
We reserve the right to change, alter and/or improve
the product and this document at any time without
prior notice.
Record the model and serial numbers as well as date and place of purchase for future reference. Have
this information available when ordering parts and when making technical or warranty inquiries.
Champion Power Equipment Support
1-877-338-0999
Model Number
12090
Serial Number
Date of Purchase
Purchase Location
1
REV 12090-20140108
12090 ENGLISH
Manual Conventions
This manual uses the following symbols to help differentiate between different kinds of information.
The safety symbol is used with a key word to alert you to potential hazards in operating and owning
power equipment.
Follow all safety messages to avoid or reduce the risk of any damage, serious injury or death.
DANGER
DANGER indicates an imminently hazardous
situation which, if not avoided, will result in
death or serious injury.
WARNING
WARNING indicates a potentially hazardous
situation which, if not avoided, could result in
death or serious injury.
CAUTION
CAUTION used without the safety alert
symbol indicates a potentially hazardous
situation which, if not avoided, may result in
property damage.
NOTE
If you have questions regarding your winch,
we can help. Please call our help line at
1-877-338-0999
CAUTION
CAUTION indicates a potentially hazardous
situation which, if not avoided, may result in
minor or moderate injury.
REV 12090-20140108
2
ENGLISH 12090
Safety Rules
WARNING
Read this manual thoroughly before operating
your winch. Failure to follow instructions could
result in damage, serious injury or death.
WARNING
Do not exceed the rated capacities.
DANGER
Do not use this winch for lifting or moving
people or animals.
DANGER
Keep yourself and others a safe distance to
the side of the cable when under tension.
DANGER
Never step over or under a cable or near a
cable under load.
WARNING
The wire cable may break before the motor
stalls. For heavy loads at or near rated
capacity, use a pulley block/snatch block to
reduce the load on the wire cable.
WARNING
Winch is NOT waterproof and is NOT for use
underwater. DO NOT mount in a location that
could have the winch submerged in water.
DANGER
Do not use any vehicle to aid or help the
winch pull any loads.
3
REV 12090-20140108
WARNING
Do not use the winch to secure an item(s) for
transport.
WARNING
Disconnect the winch from power source
when not in use.
WARNING
Never leave an item(s) attached to the wire
cable, hook, or loaded when not in use.
WARNING
Do not use for overhead lifting.
CAUTION
Use gloves to protect hands when handling
the hook or cable. Never let the cable slide
through your hands.
CAUTION
Do not wrap the cable around any object and
hook it back onto itself.
DANGER
Do not install or have crank handle installed if
the winch is connected to a power source.
DANGER
Do not operate if cable is worn, frayed or
appears damaged. Replace cable before use.
12090 ENGLISH
WARNING
When re-spooling the cable, ensure that the
cable spools in the over-wind position with the
cable entering the drum from the top, not the
bottom.
To re-spool correctly, and while wearing
gloves, keep a slight load on the cable while
pushing the remote button to draw in the
cable. Do not let your hands get within 12 in.
(30.5 cm) of the winch while re-spooling. Turn
off the winch and repeat the procedure until
a few inches of cable are left before the stop
bracket. Keep hands clear of the winch, cable
and slight load which winch is under power.
DANGER
Do not anchor or mount winch in any overhead
position. Overhead use not recommended.
DANGER
Do not lift any loads over people, animals,
or property that cannot be damaged. Falling
loads may result in property damage, injury
or death.
WARNING
Use only supplied or manufacturer
replacement power cables. Do not connect
other cables to a power source and winch, as
this may damage the winch and power source.
WARNING
Any support structure the winch will be
mounted to must be designed to withstand
any load or forces that the load and winch
may apply to the structure. All mounting
hardware must also be able to withstand all
load weights and forces.
Safety Rules
CAUTION
Duration of winching pulls should be kept as
short as possible.
If the motor becomes uncomfortably hot to
the touch, stop winching immediately and let
it cool down for a few minutes. Do not pull for
more than one minute at or near the rated load.
CAUTION
If the motor stalls, do not maintain power to
the winch.
Utility winches are designed and made for
intermittent use and should not be used in
constant duty applications.
CAUTION
Never disengage clutch under load. Only
engage or disengage clutch before connection
of loads.
DANGER
Do not use damaged or broken equipment.
Before each use inspect the winch and
equipment for any damage to the following:
–– Winch
–– Wire cable
–– Hook
–– Battery or Remote cables
If any of the above items or any other items
appear to be damaged or broken then replace
or fix before use.
WARNING
Never operate a damaged or malfunctioning
winch. If winch appears damaged or is
malfunctioning, disconnect power source and
disconnect load.
REV 12090-20140108
4
ENGLISH 12090
Controls and Features
Read this owner’s manual before operating your winch. Familiarize yourself with the location and
function of the controls and features. Save this manual for future reference.
Utility winch
8
1
2
7
3
5
6
4
(1)
Carry Handle – Can be used to carry the
winch when not mounted or in use.
(2)
Crank Handle – Used to manually retract
or extend wire cable.
(3)
Clutch – Used to engage or disengage wire
cable.
(4)
Adapter Plate – Used to temporarily mount
winch.
5
REV 12090-20140108
(5)
Wire Cable
(6)
Hook – Used to secure wire cable to load.
(7)
Remote Control – Used to electronically
retract or extend wire cable.
(8)
Battery Cables – Used to connect the
winch to 12V automotive battery.
12090 ENGLISH
Assembly
Contents of the Box
Mounting the Winch Permanently
This CPE 2000 lb./5000 lb./6000 lb. utility
winch comes with the wire cable and hook already
attached. The box will also contain the remote
control, battery cables, adapter plate and crank
handle. Please make sure to remove all contents
from the box before assembly or operation.
This CPE 2000 lb./5000 lb./6000 lb. utility
winch can be securely mounted to a fixed anchor
point before operation. Mounting hardware is
not included. Mounting hardware must be strong
enough to withstand all loads and forces imposed
on it and the winch. Anchor point must also be
strong enough to withstand all forces imposed on
it from the loads and winch.
1. Find a secure and suitable anchor.
2. Using the holes at the bottom of the winch
frame, take a marker and mark “spot” holes
on the anchor.
3. Measure each hole on the winch frame and
choose the correct drill bit for each one.
4. Drill through all “spot” holes in the anchor.
5. Secure winch to anchor through all holes
using rated bolts, washers, and nuts able to
withstand any loads and forces imposed on
them by the loads and winch.
6. Make sure all bolts and nuts are tightened.
Utility Winch Location
When choosing an anchor (permanent or
temporary) for the utility winch location please
keep these safety points in mind.
–– The winch area must not be accessible to
children or animals. Loads may be very heavy
and property damage, injury or death may
occur if distractions are present.
–– Make sure the winch is not installed on any
support structure that is located overhead.
–– The winch should be located in an area that
has enough clearance on all sides of it, to
avoid any accidental breaking of the wire
cable.
–– Do not choose an area where the winch can
or will be submerged in water.
–– Do not winch at any angle. Winching at any
angle can damage the wire cable and winch.
CAUTION
Always double check anchor before drilling
to ensure there are no hidden compartments
or panels that may be damaged or cause
structural damage by drilling.
DANGER
Do not use the winch handle to anchor the
winch at any time.
NOTE
If a mounting channel (not included) is used,
make sure it is rated to take any load weight or
force the winch and loads may impose on it.
NOTE
The length of bolts needed for mounting will
vary based on the thickness of the anchor
used. Measure anchor accordingly.
REV 12090-20140108
6
ENGLISH 12090
Assembly
Adapter Plate
Battery Connections
The adapter plate can be used to temporarily
mount the winch to any 2 in. (5,1 cm) ball hitch
receiver.
1. Align the keyslot holes on the bottom of the
winch over the mounting bolts already on the
adapter plate. (A)
2. Place the winch onto the adapter plate,
keyslot holes over the bolts and then slide the
plate until the winch is secure on the bolts.
(B)
3. Place the adapter plate hole over any 2 in.
(5.1 cm) ball hitch, making sure it is secure.
A
Before wiring the winch to any battery powered
source, please heed these safety warnings.
DANGER
Never use or connect the battery cables or
winch to a damaged battery or one with signs
of corrosion.
WARNING
Use only a 12V automotive or equivalent
battery to supply power to the winch.
B
WARNING
When working with batteries always make sure
to use eye protection, gloves and safety gear,
and never lean directly over the battery.
WARNING
WARNING
Do not use adapter plate and/or winch to tow
any vehicle, boat or other object.
WARNING
Before attaching winch to the adapter plate,
make sure all bolts and nuts on the plate are
tightened and secure.
7
REV 12090-20140108
Do not place the battery cables near any
moving or rotating parts, heat, or water.
CAUTION
Make sure the battery cables are tied up at all
times and are not left to “dangle” or hang.
DANGER
Never use the winch if it does not have a safe
and proper ground. Any metal that is coated
or painted is not a proper ground.
12090 ENGLISH
Assembly
Temporarily Wiring the Winch
Your utility winch can be temporarily wired to a
12V battery.
1. Find a safe location for the winch so the
battery cables will not be pinched, cut or
damaged.
2. Remove the protective plastic covering on the
winch that covers the socket that houses the
male ends.
3. Plug in the female ends of the battery cable
into the socket. (A)
4. Route the battery cables from the winch
location to the battery location, securing
them along an anchor or frame.
5. Use the Red positive (+) battery clamp and
attach the clamp to the Red positive (+)
terminal of the battery.
6. Use the Black negative (-) battery clamp from
the wire and attach the clamp to a bare metal
part of the frame of the vehicle or another
bare metal part not on the battery or winch,
to create a secure and safe electrical ground.
WARNING
Never leave the battery clamps hooked up to a
live battery. Always disconnect battery clamps
from battery when not in use.
CAUTION
Battery clamps may become hot during use.
Please exercise caution when touching or
removing them after they have been hooked
up to a battery.
B
A
Remote Control
Your utility winch comes with a handheld wired
remote control. The remote control is easy to
connect. Once the winch has been connected to a
battery and properly grounded, remove the plastic
protective piece on the winch. Next take the male
ends of the remote control cord and plug them
into the female end connectors in the winch. (B)
Test the remote by using the clutch to draw out
some wire cable and then winching the wire cable
in about 1 to 2 in. (2.5 to 5.1 cm).
NOTE
The male plug end of the remote cable will only
fit into the socket one way. (B)
NOTE
The remote will only draw in the wire cable onto
the spool. It will not feed out the wire cable.
NOTE
The female plug end of the battery cables will
only fit into the socket one way. (A)
REV 12090-20140108
8
ENGLISH 12090
Operation
Inspection
Connecting a Load
Before use of the utility winch, always inspect
the winch, power connections, wire cable, load
connections, and winch area for any possible
damage or hazards. Never connect a load to or
operate a winch, if it or any of it’s parts appear to
be worn or damaged.
During connection of a load and operation of
the winch, the user should keep hands and
fingers clear of pinch points, moving parts, the
wire cable and hook. Lose clothing and jewelry
should not be worn, and long hair should be tied
back while connecting a load and operation.
Gloves and safety goggles should be worn at all
times when connecting or winching a load. The
cable should never be allowed to slide through
the users hands. The user should only grab the
hook, using a hook strap (not included) when
loading/unloading an item. Never grab the wire
cable directly. Attach the load to the hook using
only rated equipment, such as slings, chains or
winching shackles. Connection to the hook must
be completely secure to prevent any accidental
disconnection. Make sure the connection device
is properly seated in the base of the hook and
that the safety clasp closes fully.
Always check the wire cable for any wear, fraying
or damage. Only wire cable in good condition
should be used. If the wire cable appears worn,
frayed or damaged, DO NOT connect any load to or
use, replace immediately.
CAUTION
If the wire cable becomes kinked or twisted
during operation stop use immediately.
Incorrect
Incorrect
Correct
Inspect the wire cable to make sure it is spooled
correctly. The wire cable should not be overlapping
on itself, have space between the rolls or slack in
it. If the wire cable is spooled incorrectly do not
connect a load to it or use it until the wire cable
has been re-spooled correctly.
NOTE
It is highly recommended that random
inspections also be done during operation.
9
REV 12090-20140108
Once a load has been properly connected,
drape a blanket or jacket over the wire cable
approximately 5 to 6 ft. (1.5 to 1.8 m) from
the hook. In the event of a broken cable it will
dampen the snap back. Make sure and do a test.
Winch the load 1 to 2 in. (2.5 to 5.1 cm) and
pause a moment to inspect all connections and
that the equipment can handle the load.
WARNING
Do not exceed rated load capacity, even while
testing a load.
12090 ENGLISH
Operation
General Tips for Safe Operation
Manual Operation
Your 12090 utility winch is rated at a 2000 lb.
(907 kg) max standard rated pull, 5000 lb.
(2,268 kg) max rated marine pull and 6000 lb.
(2,722 kg) max rated rolling pull. Overloads
can damage the winch, motor, wire cable, and/
or create a possible hazard for property damage,
injury or death.
For loads over 1000 lb. (454 kg) standard,
2500 lb. (1,134 kg) marine, 3000 lb. (1,361 kg)
rolling, the use of a snatch block/pulley system
(not included) to double the wire cable line must
be used. This will aid in two ways:
(a) reduce the number or cable layers on the
drum, as well as,
(b) reduce the load on the wire cable by as much
as 50%.
When doubling the line back to the winch,
run the wire cable through the snatch block
and attach the hook to a suitable anchor. Make
sure the safety clasp on the hook closes before
operation.
Get to know your winch before you actually need to
use it. We recommend that you set up a few test
runs to familiarize yourself with rigging techniques,
the sounds your winch makes under various loads,
the way the cable spools on the drum, etc.
Inspect the wire cable and equipment before each
use. A frayed or damaged cable shall be replaced
immediately. Use only manufacturer’s identical
replacement cable with the exact specifications.
Inspect the winch installation and bolts to ensure
that all bolts are tight before each operation. Store
the winch indoors and in a place that it will not be
damaged.
Any winch that appears to be damaged in any way,
is found to be worn, or operates abnormally MUST
BE REMOVED FROM SERVICE UNTIL REPAIRED.
It is recommended that the necessary repairs
be made by a manufacturer’s authorized repair
facility.
Only attachments and/or adapters supplied by the
manufacturer are to be used.
If the winch is not hooked up to a battery, the
wire cable can be drawn in and out by releasing
the clutch and using the hand crank. Always keep
tension on the wire cable. Rotating the clutch
will allow the user to access the winch cable
manually. (A) Disengage the clutch by turning
it counterclockwise. This will allow the user to
draw out the wire cable. Use a hook strap (not
included) on the hook when drawing out the
cable. Once the hook has been attached to the
load, and the safety clasp fully closed, the hand
crank can be attached to the winch. Remove the
outer nut on the bolt in the center of the clutch.
(B) Only remove the outer nut, leave the inner
nut on the bolt. Place the hand crank on the bolt,
then reinsert and tighten the outer nut onto the
bolt. When manual winching is done, engage the
clutch by turning it clockwise. Once the clutch
has been engaged, remove the hand crank.
A
B
DANGER
Do not install or have hand crank installed if
the winch is connected to a power source.
WARNING
Do not use the hand crank to try and assist
the winch while it is operating electronically.
CAUTION
If hand crank is installed on the winch, do not
pull wire cable out at any time.
REV 12090-20140108
10
ENGLISH 12090
Operation
Winching Techniques
Winching Techniques Cont’d.
1. Take time to assess your winch area, and
make sure it is free of any debris and other
possible hazards and distractions.
2. Take time to assess your situation and plan
your winch.
3. Put on safety goggles to protect your eyes,
gloves to protect your hands, tie back any
long hair and remove jewelry.
4. Inspect winch, power cords and wire cable for
excessive wear or damage.
5. Double check your anchors and make sure all
connections are secure.
6. Attach the battery cables to a battery and
properly ground the connection.
7. Test the winch without a load connected.
Make sure the wire cable extends and retracts
properly without any problems.
8. Connect desired load using only properly
rated winching slings, chains or shackles.
9. Once a load has been properly connected,
drape a blanket or jacket over the wire cable
approximately 5 to 6 ft. (1.5 to 1.8 m) from
the hook. In the event of a broken cable it will
dampen the snap back.
10.Make sure hook clasp is closed fully.
11.Clear the area. Make sure all operators and
bystanders stand clear and that no one is
directly above, underneath, or to the direct
side of the load or wire cable.
12.Begin winching. Be sure that the wire cable is
winding evenly and tightly around the drum.
Avoid shock loads; keep the wire cable under
tension.
13.The winch is meant for intermittent use.
Winch for a short time and then let the motor
rest if needed before restarting.
14.If the winch must be stopped, with a load
connected to it, support anchors should be
placed until the winch is going again.
15.The winching operation is complete once the
load is on stable ground and/or has anchors
for support placed under it.
16.Disconnect the wire cable from the anchor,
11
REV 12090-20140108
but still maintain tension.
17.Rewind the wire cable. Make sure that any
wire already on the drum has spooled tightly
and neatly. If not, draw out the wire and
re-spool from the point where the cable is
tight.
18.Keep your hands clear of the winch drum,
wire cable, and hook as the cable is being
drawn in.
19.Secure the hook and hook strap.
20.Clean and inspect connections and mounting
hardware for next winching operation.
DANGER
Users and bystanders must keep a minimum
distance of 12 in. (30.5 cm) at all times from
the winch and load. If the wire cable breaks
serious injury or death could occur if the
broken cable “whips” around. More distance
is advised as the cable length increases.
WARNING
Support anchors are highly recommended if
a load can not be placed on stable ground.
Make sure the support anchors can withstand
the full weight of the load being anchored.
WARNING
Maintain at least 4 wraps (coils) of cable on
the drum during operation. Operating with
fewer than 4 warps of cable on the drum can
cause the cable to pull off the drum.
12090 ENGLISH
The owner/operator is responsible for all periodic
maintenance.
WARNING
Never operate a damaged or defective winch.
WARNING
Improper maintenance will void your warranty.
Complete all scheduled maintenance in a timely
manner. Correct any issue before operating the
winch.
NOTE
For service or parts assistance, contact our
help line at 1-877-338-0999
Maintenance
Cable Assembly Replacement
It is recommended that any wire cable or spool
modifications be performed by a manufacturer’s
authorized repair facility, and that only
manufacturer-supplied parts be used.
Storage
It is recommended the utility winch is stored
indoors, in a clean dry place, free from sunlight
and moisture.
1. Make sure the winch is properly cleaned
before storage.
2. Make sure the wire rope is drawn onto the
spool as much as it can be without damage.
3. Make sure to tie up all cords.
4. Store in a place that moisture can not
damage the winch.
5. Store in place that excess dust or debris can
not damage the winch.
Cleaning
Use a damp cloth to clean the exterior surfaces
of the winch. Use a soft bristle brush to remove
excess dirt and oil. Use an air compressor
(25 PSI) to clear dirt and small debris from the
wire cable spool and other tight places.
CAUTION
DO NOT spray water directly on the winch or
wire cable. DO NOT wipe the wire cable with
the damp cloth. Use only compressed air to
clean the wire cable.
Lubrication
All moving parts within the Utility winch having
been Lubricated using high temperature lithium
grease at the factory. No internal lubrication is
required. Lubricate cable assembly periodically
using a light penetrating oil.
REV 12090-20140108
12
ENGLISH 12090
Troubleshooting
Problem
Cause
Solution
Motor does not turn
No electrical power
Make sure battery cables are connected to a live 12V
automotive battery or equivalent and to the winch
Pinched battery cable
Check all battery cable connections and make sure
nothing is resting on top of, or pinching the battery
cables
Defective remote control
Replace remote control
Motor runs slowly or
without normal power
Insufficient current or voltage
The voltage supply is weak. Check to make sure
voltage supply is 12V
Motor overheating
Winch running time is too long
Allow winch to cool down
For further technical support:
Technical Service
Mon – Fri 8:30 AM – 5:00 PM (PST/PDT)
Toll Free: 1-877-338-0999
[email protected]
13
REV 12090-20140108
12090 ENGLISH
Specifications
Performance Specifications
–– Max Rated Standard Pull .
–– Max Rated Marine Pull. .
–– Max Rated Rolling Pull. .
–– Max Boat Size .
–– Motor .
––
––
––
––
––
––
––
. . . . .
Cable . . . . . .
Battery Cable. .
Gross Weight. .
Net Weight . . .
Height. . . . . .
Width. . . . . .
Length . . . . .
.
.
.
.
.
.
.
.
.
.
.
.
.
.
.
.
.
.
.
.
.
.
.
.
.
.
.
.
.
.
.
.
.
.
.
.
.
.
.
.
.
.
.
.
.
.
.
.
.
.
.
.
.
.
.
.
.
.
.
.
.
.
.
.
.
.
.
.
.
.
.
.
.
.
.
.
.
.
.
.
.
.
.
.
.
.
.
.
.
.
.
.
.
.
.
.
.
.
.
.
.
.
.
.
.
.
.
.
.
.
.
.
.
.
.
.
.
.
.
.
.
.
.
.
.
.
.
.
.
.
.
.
.
.
.
.
.
.
.
.
.
.
.
.
.
.
.
.
.
.
.
.
.
.
.
.
.
.
.
.
.
.
.
.
.
.
.
.
.
.
.
.
.
.
.
.
.
.
.
.
.
.
.
.
.
.
.
.
.
.
.
.
.
.
.
.
.
.
.
.
.
.
.
.
.
.
.
.
.
.
.
.
.
.
.
.
.
.
.
.
.
.
.
.
.
.
.
.
.
.
.
.
.
.
.
.
.
.
.
.
.
.
.
.
.
.
.
.
.
. . 2000 lb. (907 kg)
. 5000 lb. (2268 kg)
. 6000 lb. (2722 kg)
. . . . 18 ft. (5.5 m)
0.3 Hp/ 0.2 Kw, 12V DC
1/5 in. (D) x 30 ft. (L) [5.1 mm (D) x 9.1 m (L)]
20 ft./6 m (L) Positive Lead, 20 ft./6 m (L) Negative Lead
.
.
.
.
.
.
.
.
.
.
.
.
.
.
.
.
.
.
.
.
.
.
.
.
.
.
.
.
.
.
.
.
.
.
.
.
.
.
.
.
.
.
.
.
.
.
.
.
.
.
.
.
.
.
.
.
.
.
.
.
.
.
.
.
.
.
.
.
.
.
.
.
.
.
.
.
.
.
.
.
.
.
.
.
.
.
.
.
.
.
.
.
.
.
.
.
.
.
.
.
.
.
.
.
.
.
.
.
.
.
.
.
.
.
.
. 25 lb. (11.3 kg)
. . 22 lb. (10 kg)
. 10 in. (25.4 cm)
. 7.5 in. (19.1 cm)
. 9.5 in. (24.1 cm)
Line Speed and Motor Current (First Layer)
Line pull Max
Line speed
(DC12V)
lb.
0
500
1000
1500
2000
kg
0
227
454
680
907
FPM
4.5
3.6
2.9
2.3
1.7
MPM
1.4
1.1
2.3
0.9
0.5
Max current
A
3
6
11
17
21
Running Time*
minutes
1
1
1
1
1
Cooling Time**
minutes
5
5
5
5
5
*If the motor becomes uncomfortably hot to the touch, stop winching immediately and let it cool down for 5 minutes.
Do not pull for more than one minute at or near the rated load.
**Electric winches are designed and made for intermittent use and should not be used in constant duty applications.
Line Pull and Cable Capacity Per Layer
Line of Cable
1
2
3
4
5
Max pulling
capacity per layer
lb.
2000
1520
1226
1027
884
kg
907
689
556
466
401
Cable capacity
per layer
ft.
4.7
10.8
18.4
27.5
30
m
1.4
3.3
5.6
8.4
9.1
REV 12090-20140108
14
Specifications
Parts Diagram
15
REV 12090-20140108
ENGLISH 12090
12090 ENGLISH
Parts List
#
Part Number
Description
#
Part Number
Description
1
12090-001
Screw (M5 x 8)
4
41
12090-041
Nut (M8)
2
12090-002
Spring Washer (ø5)
9
42
12090-042
Frame Assembly
3
12090-003
Washer ( ø5)
4
12090-004
Nut (M4)
9
1
43
12090-043
Small Gear Assembly
III
5
12090-005
Washer (ø4)
1
44
12090-044
Motor
6
12090-006
Screw (ST3.9 x 15)
45
12090-045
Motor Clamp
7
12090-007
Right Shell
46
12090-046
Screw (M5 x 25)
8
12090-008
Handle
47
12090-047
Nut (M5)
9
12090-009
Nut (M16), PVC
48
12090-048
Nut (M10)
10
12090-010
Left Shell
49
12090-049
Spring Washer (ø10)
11
12090-011
Screw (M4 x 80)
50
12090-050
Washer (ø10)
12
12090-012
Socket
51
12090-051
Adapter Plate
13
12090-013
Socket Cover
52
12090-052
Plate Stud Bolt
14
12090-014
Battery Cable Plug
53
12090-053
Circlip(ø12)
15
12090-015
Battery Cable
54
12090-054
Claw Lock
16
12090-016
Battery Clamp
55
12090-055
Shaft Lock
17
12090-017
Button Switch
2
1
1
2
1
1
2
1
1
1
2
1
56
12090-056
Spring
12090-018
Remote Control Cable
Assembly
1
57
12090-057
Relay
58
12090-058
Circlip(ø35)
12090-019
Front Remote Control
Housing
1
59
12090-059
Large Gear Assembly
III
2
20
12090-020
Rear Remote Control
Housing
1
60
12090-060
Spring Washer (ø12)
2
2
1
3
1
2
2
61
12090-061
Washer (ø13 x 28
x 2)
2
18
19
21
12090-021
Screw (ST3.9 x 13)
22
12090-022
Hand Crank
23
12090-023
Thin Nut (M12)
Qty
62
12090-062
Left Plate
63
12090-063
Drum Shaft
64
12090-064
Wire Rope
65
12090-065
Right Plate
66
12090-066
Hook
67
12090-067
Screw (M5 x 10)
68
12090-068
Bearing (6202-ZN)
Qty
1
1
3
1
1
1
3
3
3
3
1
3
1
3
1
1
1
1
1
1
1
2
1
1
1
1
24
12090-024
Clutch Knob
25
12090-025
Friction plate cover
26
12090-026
Friction plate
27
12090-027
Large Gear Assembly
II
1
7
69
12090-069
Shaft
3
1
1
1
70
12090-100
Battery Cable
Assembly
1
71
12090-200
Hand Remote
Assembly
1
72
12090-300
Wire Rope Assembly
1
28
12090-028
Washer (ø13 x 23
x 1.5)
29
12090-029
Bearing
30
12090-030
Pin
31
12090-031
Washer (ø9)
32
12090-032
Shaft Assembly
33
12090-033
Large Gear Assembly
I
1
34
12090-034
Washer
4
35
12090-035
Small Gear Assembly
II
2
36
12090-036
Screw (M5 x 16)
37
12090-037
Thick Nut (M12)
38
12090-038
Screw (M5 x 10)
39
12090-039
Circuit Breaker 25A
40
12090-040
Shaft
3
3
2
1
1
REV 12090-20140108
16
ENGLISH 12090
Warranty
WARRANTY
CHAMPION POWER EQUIPMENT
2 YEAR LIMITED WARRANTY
Effective September 1, 2006. Replaces all undated
warranties and all warranties dated before September 1,
2006.
Warranty Qualifications
Champion Power Equipment (CPE) will register this
warranty upon receipt of your Warranty Registration Card
and a copy of your sales receipt from one of CPE’s retail
locations as proof of purchase.
Please submit your warranty registration and your proof of
purchase within ten (10) days of the date of purchase.
Repair/Replacement Warranty
CPE warrants to the original purchaser that the
mechanical and electrical components will be free of
defects in material and workmanship for a period of
one year (parts and labor) and two years (parts) from
the original date of purchase (90 days (parts and labor)
and 180 days (parts) for commercial & industrial
use). Transportation charges on product submitted for
repair or replacement under this warranty are the sole
responsibility of the purchaser. This warranty only applies
to the original purchaser and is not transferable.
Do Not Return The Unit
To The Place Of Purchase
Contact CPE’s Technical Service and CPE will
troubleshoot any issue via phone or e-mail. If the
problem is not corrected by this method, CPE will, at its
option, authorize evaluation, repair or replacement of the
defective part or component at a CPE Service Center.
CPE will provide you with a case number for warranty
service. Please keep it for future reference. Repairs
or replacements without prior authorization, or at an
unauthorized repair facility, will not be covered by this
warranty.
Warranty Exclusions
This warranty does not cover the following repairs and
equipment:
Normal Wear
Winches need periodic parts and service to perform well.
This warranty does not cover repair when normal use has
exhausted the life of a part or the equipment as a whole.
Installation, Use and Maintenance
This warranty will not apply to parts and/or labor if this
winch is deemed to have been misused, neglected,
involved in an accident, abused, loaded beyond the
winch’s limits, modified, installed improperly or
connected incorrectly to any electrical component.
Normal maintenance is not covered by this warranty.
Other Exclusions
This warranty excludes: The winch cable. Cosmetic
defects such as paint, decals, etc. Accessory parts such
as storage covers. Failures due to acts of God and other
force majeure events beyond the manufacturer’s control.
Problems caused by parts that are not original Champion
Power Equipment parts.
Limits of Implied Warranty and
Consequential Damage
Champion Power Equipment disclaims any obligation to
cover any loss of time, use of this product, freight, or any
incidental or consequential claim by anyone from using
this winch. THIS WARRANTY IS IN LIEU OF ALL OTHER
WARRANTIES, EXPRESS OR IMPLIED, INCLUDING
WARRANTIES OF MERCHANTABILITY OR FITNESS FOR
A PARTICULAR PURPOSE
A unit provided as an exchange will be subject to the
warranty of the original unit. The length of the warranty
governing the exchanged unit will remain calculated by
reference to the purchase date of the original unit.
This warranty gives you certain legal rights which may
change from state to state. Your state may also have other
rights you may be entitled to that are not listed within this
warranty.
Contact Information
Address
Champion Power Equipment, Inc.
Customer Service
10006 Santa Fe Springs Rd.
Santa Fe Springs, CA 90670
www.championpowerequipment.com
Customer Service
Mon – Fri 8:30 AM – 5:00 PM (PST/PDT)
Toll Free: 1-877-338-0999
[email protected]
Fax no.: 1-562-236-9429
Technical Service
Mon – Fri 8:30 AM – 5:00 PM (PST/PDT)
Toll Free: 1-877-338-0999
[email protected]
17
REV 12090-20140108