1
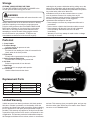
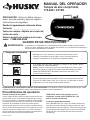
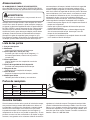
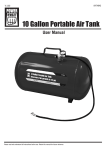
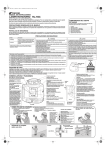
Operator’s Manual
Compressed Air Tank
773-629 / CT10H
CAUTION: Before using this product, read
this manual and follow all its safety rules and
instructions.
Record the following for future reference:
Serial #: ____________________________
Date of Purchase: Attach a copy of your
sales receipt.
Consumer Toll Free Number:
1-888-895-4549
SAVE THESE INSTRUCTIONS
WARNING
Improper operation or maintenance of this product could result in serious injury and/or property
damage. Read and understand all of the warnings and safety instructions provided before using this
equipment.
Risk of Breathing
Keep children, pets and others out of the area of operation. This air carry tank does not
provide breathable air for anyone or any auxiliary breathing device.
Risk of Bursting
If the tank develops a leak, then replace the air carry tank. Never attempt to repair a tank by
welding!
NOTE: Discard the empty tank and DO NOT use after 7 years from the original date of purchase. This tank is labeled with a “MANUFACTURING DATE” if purchase date is unknown.
Risk from Flying Objects
Compressed air can be hazardous. The air stream can cause injury to soft tissue areas such
as eyes, ears, etc. Particles or objects propelled by the air stream can cause injury.
CALIFORNIA PROPOSITION 65 WARNING: This product contains chemicals known to the State of California to cause cancer,
birth defects and/or reproductive harm.
Operating Procedures
Filling the Portable Air Tank
Take your portable air tank to any source of clean dry
compressed air. A full service gas station or truck stop is
preferable. Modern convenience mart type filling stations do
not have sufficient air pressure available to allow you to get
the most from your air tank. It is recommended that you fill
your tank with air until the pressure gauge reads between 110
to 150psi. The air tank is filled like a car tire by pressing the
chuck from the source to the filler valve.
E101593 12/22/10
PLEASE NOTE: Tank can be filled and the pressure
gauge can be read with the RED OPEN/CLOSE KNOB in
the CLOSE position.
Using the Portable Air Tank
Turn the RED OPEN/CLOSE KNOB counter-clockwise to the
OPEN position to allow air to flow from the tank into the
hose. To prevent air from leaking out of the tank between
uses, turn the RED OPEN/CLOSE KNOB clockwise to the
CLOSE position.
Storage
STORING YOUR PORTABLE AIR TANK
Turn the RED OPEN/CLOSE KNOB CLOCKWISE to the
CLOSE position when storing your air tank.
WARNING
Failure to remove condensation will cause the tank to rust
prematurely.
Always drain the tank of all air after the last use for the day
and before repairing or removing any component parts.
Point the safety pressure relief valve AWAY FROM YOUR
BODY when releasing air. Use the pull ring on the safety
relief valve to vent any pressure inside the tank before
attempting to service the tank. Safety goggles must be
worn at all times for eye protection. To disperse any
accumulated condensation inside the tank, begin by
reducing the air pressure inside the tank by pulling out on the
safety valve and holding until the tank gauge reaches 25 psi.
Invert the tank with the manifold facing downward and pull the
ring on the safety relief valve. We as the
manufacturer and you as the consumer have no control
over the moisture content of air coming from any fill
source. Premature rusting caused by condensation inside
the tank is the primary reason for the suggested
replacement date stamped on the tank.
• Never attempt to remove any components while tank is
pressurized.
• Never remove or deface the information sticker on tank.
• Never attempt to fill the tank if any air leak is detected
in the tank body. Discontinue use of the air tank
immediately.
• Warranty is void if any attempt is made to alter or change the design of the tank.
1
Parts List
1.Carry Handle
2.Pressure Gauge
Indicates internal air pressure of tank.
3.Open/Close Valve
Prevents air from leaking out of the air hose and/or tire
chuck, when in the close position.
4.Filler Valve
Fill tank with compressed air through this point.
5.Safety Pressure Relief Valve
Prevents tank from being over-pressurized.
6.Air Hose
Delivers compressed air from the tank.
7.Steel Legs
Support tank in an upright stable position.
8.Tire Chuck
Used to inflate tires and other items.
4
2
3
5
Replacement Parts
Item No(s).
Part No.
Description
Qty.
2
E103747
Pressure Gauge
1
E104701
Air Hose w/Chuck
1
3, 4, 5
6, 8
E100177
Manifold Assembly
For replacement parts call 1-888-895-4549
6
1
8
7
Limited Warranty
If within two years from date of purchase, this Husky product
fails due to a defect in materials or workmanship, return the
product to any Home Depot retail store with a receipt indicating
proof of purchase for free repair (with replacement if repair is
possible). This warranty only applies for 90 days from the date
of purchase if this product is ever used in a commercial or rental application. This warranty excludes incidental/inconsequential damages and failures due to misuse, abuse or normal wear
and tear. This warranty gives you specific rights, and you may
also have other rights, which vary from state to state. Please
see store or call 1-888-859-4549.
MANUAL DEL OPERADOR
Tanque de aire comprimido
773-629 / CT10H
PRECAUCIÓN: Antes de utilizar este producto, lea este manual y siga sus reglas e
instrucciones de seguridad.
Escriba lo siguiente para referencia futura:
# de serie: __________________________
Fecha de compra: Adjunte una copia del
recibo de venta.
Número gratuito de asistencia al consumidor: 1-888-895-4549
GUARDE ESTAS INSTRUCCIONES
ADVERTENCIA
La operación y el mantenimiento inadecuados de este producto pueden provocar lesiones
graves y/o daños materiales. Antes de utilizar este producto, lea y entienda las advertencias e
instrucciones de seguridad aquí contenidas.
Riesgo para la respiración
Mantenga a los niños, mascotas y otras personas fuera del área de
operación. Este tanque de aire portátil no provee aire que pueda ser
respirado ni empleado con un dispositivo respiratorio auxiliar.
Riesgo de estallido
Si el tanque tiene una fuga, reemplace el tanque de aire portátil. ¡Nunca
intente reparar un tanque soldándolo!
NOTA: Deseche el tanque vacío y NO lo utilice después de 7 años a partir
de la fecha original de compra. Este tanque tiene una estampa que indica
“MANUFACTURING DATE” (Deséchelo después de esta fecha), si no
conoce la fecha de compra.
Riesgo de lanzamiento de objetos
El aire comprimido puede ser peligroso. El flujo de aire puede causar lesiones
en áreas con tejido blando como ojos, orejas, etc. Las partículas u objetos
propulsados por el flujo de aire pueden causar lesiones.
ADVERTENCIA DE LA PROPUESTA DE LEY 65 DE CALIFORNIA : Este producto contiene substancias químicas que, consta
al Estado de California, producen cáncer, malformaciones congénitas o daños reproductivos.
Procedimientos de operación
Al llenar el tanque de aire portátil
Lleve el tanque de aire portátil a cualquier fuente de aire comprimido limpio y seco. Una estación de gasolina que ofrezca
un servicio completo o una parada del camión será preferible.
Las estaciones para llenar que se encuentran en las tiendas
modernas de comodidad, no tienen una presión de aire
suficiente para ofrecerle a Ud. los mejores resultados para el
tanque de aire. Recomendamos llenar el tanque con aire, hasta que el manómetro marque entre 110 y 150 psi. El tanque
de aire se llenará como llantas del automóvil, presionando el
mandril de la fuente sobre la válvula para llenar.
E101593 12/22/10
TOME NOTA: Puede llenar el tanque y leer el
manómetro, cuando el BOTÓN ROJO (On / Off)
esté en posición cerrada (Off).
Al utilizar el tanque de aire portátil
Gire el BOTÓN ROJO (On / Off) en el sentido contrario del
reloj hacia la posición abierta (On) para permitir que el aire
fluya del tanque hacia la manguera. Para prevenir que el aire
no se fugue fuera del tanque entre los usos, gire el BOTÓN
ROJO (On/ Off) en el sentido del reloj hacia la posición
cerrada (Off).
Almacenamiento
AL ALMACENAR EL TANQUE DE AIRE PORTÁTIL
Gire el BOTÓN ROJO (On / Off) EN EL SENTIDO DEL RELOJ
hacia la posición cerrada (Off), para almacenar el tanque de aire.
ADVERTENCIA
Si no se quita la condensación, esto provocará la corrosión prematura del tanque.
Siempre drene el tanque de todo el aire después del último
uso del día o antes de repararlo o quitar cualquier componente. Apunte la válvula de seguridad de alivio de presión ALEJADO DEL CUERPO, cuando descargue el aire. Utilice el anillo
de tracción que se encuentra sobre la válvula de seguridad
de alivio de presión, para descargar cualquier presión dentro
del tanque, antes de intentar dar mantenimiento al tanque.
Siempre lleve gafas de seguridad, para proteger los ojos.
Para dispersar cualquier acumulación de condensación dentro
del tanque, primero debe reducir la presión del aire que se
encuentra dentro del tanque, halando la válvula de seguridad
y manteniéndola, hasta que el manómetro alcance 25 psi.
Invierta el tanque, dirigiendo el colector hacia abajo y hale el
anillo de la válvula de seguridad de alivio de presión. Nosotros
como el fabricante y Ud. como usuario, no tenemos el control
del contenido de humedad en el aire, de cualquier fuente de
alimentación de aire. La corrosión prematura debida a la
condensación dentro del tanque, será la razón principal para la
fecha sugerida del reemplazo estampada sobre el tanque.
• Nunca intente quitar ninguno de los componentes cuando el
tanque esté comprimido.
• Nunca quite ni pinte la etiqueta de información que se en
cuentra sobre el tanque.
• Nunca intente llenar el tanque, si detecta alguna fuga de aire en la estructura del tanque. Interrumpa el uso del tanque de aire inmediatamente.
• La garantía se invalidará si hay cualquier intento de modifi
car o cambiar el diseño del tanque.
1
Lista de las partes
1.Asa para transportar
2.Manómetro
Indica la presión interna de aire del tanque.
3.Válvula para abrir / cerrar (On / Off)
Previene que el aire se fugue de la manguera y / o
del mandril para llantas, cuando esté en posición
cerrada (Off).
4.Válvula para llenar
Llene el tanque con aire comprimido a través de
esta punta.
5.Válvula de seguridad de alivio de presión
Previene una sobrepresurización del tanque.
6.Manguera de aire
Distribuye el aire comprimido del tanque.
7.Patas de acero
Soportan el tanque en posición derecha y estable.
8.Mandril para llantas
Utilizado para inflar las llantas y otros artículos.
4
2
3
5
Partes de reemplazo
# Artículo
# de
pieza
Descripción
Qty.
2
E103747
Manómetro
1
6, 8
E104701
Manguera de aire con mandril
1
3, 4, 5
E100177
Ensamble de colector
6
1
Para obtener partes de reemplazo, llame al 1-888-895-4549
8
7
Garantía limitada
Si en el transcurso de dos años a partir de la fecha de compra,
este producto Husky presenta fallas debido a un defecto en
los materiales o mano de obra, devuélvalo a cualquier tienda
minorista The Home Depot con el recibo en el que conste
la prueba de compra a fin de repararlo sin costo alguno (o
reemplazarlo en casa de no ser posible la reparación). Si este
producto se usara con fines comerciales o de alquiler en algún
momento, esta garantía sería solamente válida en los 90 días
siguientes a la fecha de compra. Esta garantía excluye fallas
y daños incidentales/inconsecuentes debido al uso incorrecto,
abuso o uso y degaste normales. Esta garantía le otorga a usted derechos específicos y es posible que tenga además, otros
derechos que varían según el estado. Consulte a la tienda los
detalles o llame al 1-888-859-4549.