Transcript
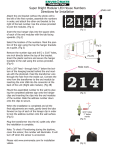
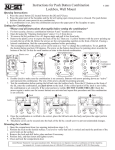
DESIGNER’S CHOICE
Roman Do-It-Yourself Plaque
Installation Instructions
Instructions for horizontal number placement
1:
The first step is to create the oval template located on the reverse side of the card included in your Roman Do-It-Yourself Plaque.
2:
Place the template in the center of your address plaque, keeping the alignment arrows in the middle of the frame and pull the two tabs out creating a rectangular window.
3: Use the lettered columns that correspond to the number of digits in your address.
Use the center column
Use the columns
Use the columns
Use the columns
4:
Remove the numbers of your address from the supplied card and peel off the adhesive backing from each digit.
B
Use the columns
D
E
C
B
C
A
A
B
B
A
for one number
for two numbers
C
D
C
for three numbers
for four numbers
E for five numbers
5: Starting from the center of the plaque and working outward, gently apply each of the address numbers to the plastic plate, keeping them centered within the columns described above. The numbers can be
removed if they are not firmly applied initially.
6: Once correctly in place, press down firmly to affix permanently. If you have five numbers on your address plaque start with the center number, the next two on either side of the center, and then align the last
two numbers on the edges of the frame. (Note: for vertical number placement the maximum is 3 numbers.)
Instructions for vertical number placement
1:
The first step is to create an oval template by popping out the die-cut vertical template (included in package) and pull the two tabs out creating an oval window.
2:
Place the template in the center of your address plaque keeping the alignment arrows in the middle of the frame.
3:
Use the lettered columns that correspond to the number of address digits.
Use the center column
Use the columns
Use the columns
4:
To complete your vertical Plaque, follow steps 4, 5 and 6 in the horizontal instructions above.
A
B
C
for one number
B
A
for two numbers
C
for three numbers
Instructions for mounting your Roman Do-It-Yourself Plaque.
1:
Hold your plaque in the desired position and use a level or an assistant to help align your plaque, and mark the position for the mounting screws.
2:
Drill two holes on the marks you made at least 1 3/4” deep with a 1/4” drill bit. Insert the plastic anchors provided and tap in until they are flush with the wall.
3:
Mount your Roman Do-It-Yourself Plaque with the black screws provided.
If you have any questions regarding the installation of this product, please call our Customer Service Department at 1-800-277-7578 or (905) 709-5772 or email us [email protected]
Warranty
This product is guaranteed against defects in workmanship or materials for a one year period from the date of purchase. It will be replaced or repaired at our discretion. This warranty does not cover damage caused
my misuse, alterations, or improper product installation. The warranty will be void if repairs are attempted by unauthorized service personnel.