Transcript
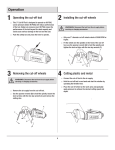
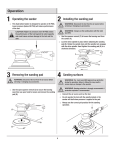
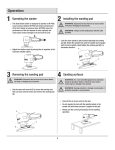
Operation
1 Operating the palm sander
□□ This Palm Sander is designed to operate on 90 PSIG.
Lower pressure (below 90 PSIG) will reduce performance
of the tool. Higher air pressure (over 90 PSIG) raises the
performance of the tool beyond its rated capacity and
could cause serious damage to the tool and the user.
the backing pad and
2 Installing
sanding disc
WARNING: Disconnect the tool from the air source before
servicing or changing any accessories.
□□ Remove the air supply from the palm sander.
□□ Fit the 6” backing pad (B) by threading it clockwise onto
the spindle of the palm sander (A) until tight.
□□ Fit the pressure-sensitive sanding disc (not included) to the
face of the backing pad (B) by pressing it firmly in place.
Only use 6” diameter pressure-sensitive sanding discs (not
Included).Disengage the spindle lock.
A
C
B
the sanding disc and
3Removing
backing pad
□□ Remove the air supply from the palm sander.
□□ To replace the sanding disc (not Included), pull it off of the
backing pad (B) by hand, starting from one edge of the
sanding disc.
□□ To remove the backing pad (B), hold the spindle with the
wrench (C) and turn the backing pad (B) counterclockwise.
A
C
B
6
4 Sanding wood, plastic and metal
□□ Hold the palm sander with one hand. Place the sanding
disc on the work area. Start rotation by operating the
throttle lever.
□□ The palm sander is fitted with a regulator to control speed.
This can be adjusted before or during operation of the palm
sander.
□□ Place the sanding disc on the work area and gradually
apply pressure to achieve the desired material removal.