1
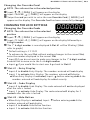
© 2013 MESA SAFE COMPANY
CATEGORY
PAGE
CHECK LIST
2
OPENING YOUR SAFE
3
LOCK-OUT PENALTY
3
USING THE OVERRIDE FUNCTIONS
4
CHANGING THE OVERRIDE
4
CHANGING THE LOCK SETTTINGS
5
SETTING THE DATE & TIME
7
VIEW LOCK OPENING RECORDS
8
THE ANCHOR KIT
9
CHANGING THE BATTERIES
9
TROUBLESHOOTING
10
HOW TO ORDER KEYS
11
IMPORTANT INFORMATION ON SAFE USAGE
11
REGISTER YOUR SAFE
11
LIMITED 1 YEAR SAFE WARRANTY
12
PG.2 | MH-SERIES ELECTRONIC LOCK INSTRUCTIONS
DEAR VALUED CUSTOMER:
Congratulations on choosing your new M ESA S AFE to secure and protect your
valuables! You have made an excellent choice in your security measures.
M ESA S AFE C OMPANY has built a solid reputation on integrity and quality
craftsmanship.
We pride ourselves on delivering the best products in the industry and
consistently exceed customer expectations.
Before using your unit, thoroughly read and understand the Operating Instructions
of the unit. This will ensure maximum efficiency and usability.
! IMPORTANT : DO NOT RETURN SAFE TO STORE
If you are missing parts, have difficulty programming the lock or opening your
safe, or any additional questions regarding the use and care of your safe, DO
NOT RETURN your safe to the store. Please contact M ESA S AFE C OMPANY Technical
Support : 800.490.5624 [Monday thru Friday 7AM - 4PM/PST ] for assistance.
r
AA
AA
000000
mesa
1
2
3
4
5
6
7
8
9
AA
r
r
AA
r
TM
0
SAFE COMPANY
I
CHECK LIST
n 4AA Batteries
m 2 Override Keys [do NOT store keys in your safe]
G 1 Allen Wrench
o 2 Anchor Bolts
NOTE : The lock is factory set to Hotel Function. [See Changing the Lock
Setting to change to Standard Function]
MH-SERIES ELECTRONIC LOCK INSTRUCTIONS | PG.3
OPENING YOUR SAFE [For the first time]
Using Personal Code
1 To unlock the safe: Enter your 3-6 digit code; [[ OPENED ]] will appear on
the display & the safe will unlock
2 To lock the safe: Enter your 3-6 digit code then input # ; [[ CLOSED ]] will
appear on the display & the safe will be locked
This is a standard hotel room configuration lock. User sets new code
every time the safe is used [ The code you use to unlock the safe is the code
you use to lock the safe. Once the safe is in the unlocked position, the safe
will reset itself ready for any code]
Use to delete numbers that appear on the display. If is entered
before your code, a [[ - ]] will appear rather than the number as a security
feature
*
*
Using a Credit Card [Any card with a magnetic stip]
1 To unlock the safe: Slide your credit card firmly from right to left with the
magnetic stip down; [[ OPENED ]] will appear on the display & the safe will be
locked
2 To lock the safe: Slide your credit card firmly from right to left with the
magnetic stip down; [[ CLOSED ]] will appear on the display & the safe will be
locked
This is a standard hotel room configuration lock. User sets new card every
time the safe is used. [ The card you use to unlock the safe is the card you
use to lock the safe. Once the safe is in the unlocked position, the safe will
reset itself ready for any card]
IMPORTANT : Swipe your card firmly & evenly from right to left. If an
incorrect direction or swiping speed too fast or too slow, [[ ERROR ]] or
[[ AGAIN ]] will appear on the display. You will need to swipe your card
again. The card to unlock the safe should be the same as the card to lock
the safe. If not, [[ E-CARD ]] (error card) will appear on the display.
LOCK-OUT PENALTY
When the safe is in the locked position [[ E-Code ]] or [[ E-Card ]] will appear
on the display after an invalid entry.
If an incorrect code or card is used 4 consecutive times & [[ E-Code ]] or [[
E-Card ]] appeared on the display after every incorrect entry, the safe will
go into a lock-out period of 15 minutes. During the period, when pressing
a button on the keypad, [[ HOLD## ]] will appear on the display. The ##
represent the time that is remaining in the lock-out period
PG.4 | MH-SERIES ELECTRONIC LOCK INSTRUCTIONS
USING THE OVERRIDE FUNCTIONS
If [[ E-Code ]], [[ E-Card ]] or [[ ERROR ]] appear on the display after entering
your code or swiping your card to unlock the safe, you will need to use the
Override Code, Override Card or Override Keys
If [[ E-BAR ]] appears on the display, you will need to use the Override Keys
Using the Override Code
1 Input : #- # ; [[ SUPER ]] will appear on the display [do not pause between
#- # entries]
2 Input : Override Code; the safe will unlock
The default Override Code is: 0 0 0 0 0 0
IMPORTANT : Because the codes are factory set, we highly recommened
changing the codes to your own unique codes immediately!
Using the Override Card
1 Swipe the Override Card, the safe will unlock
[See Changing the Override Card to set your card]
mesa
mes
a
Using the Override Keys
1 Locate the small round cap just below the right side of
the keypad [Override Key Hole; refer to graph]
2 Using the allen wrench (included), remove the cover
[for MH101 Model, simply remove the cap with your
finger tips]
3 Insert the Override Key & turn clockwise, a ¼ turn &
open door
4 To remove the key, turn the key counter-clockwise, a ¼
turn, back to the inserted position
IMPORTANT : Do NOT store the Override Keys in the safe!
CHANGING THE OVERRIDE
Changing the Override Code
NOTE : The safe must be in the unlocked position
1 Input: * - *; [[ PROG ]] will appear on the display
2 Input: 8 4 2 6 2 7 - # ; [[ OLD ]] will appear on the display
3 Input: Override Code - # ; [[ NEW ]] will appear on the display
The default Override Code is: 0 0 0 0 0 0
4 Input a new 6-digit code - # ; [[ AGAIN ]] will appear on the display
5 Re-Input the new Override Code - # ; [[ GOOD ]] will appear on the display.
The Override Code has been successfully changed
MH-SERIES ELECTRONIC LOCK INSTRUCTIONS | PG.5
Changing the Override Card
NOTE : The safe must be in the unlocked position
1 Input: * - *; [[ PROG ]] will appear on the display
2 Input: 7 2 6 2 4 8 - # ; [[ CARD ]] will appear on the display
3 Swipe the card you wish to set as the new Override Card; [[ GOOD ]] will
appear on the display. The Override Card has been successfully changed
CHANGING THE LOCK SETTINGS
000000
Changing the Override Code
NOTE : The safe must be in the unlocked
position
1 Input: * - *; [[ PROG ]] will appear on the display
2 Input: 7 1 1 4 6 9 - # ; [[ CODE ]] will appear on the display followed by a
6-digit number
4 The 1 st 6-digit number is now displayed & Slot #1 will be ‘Blinking’ [Slots:
refer to graph]
Default setting is: 1 1 1 1 2 1
To advance to the next Slot without making changes to the current Slot,
enter the number displayed in the current Slot
Input # if you do not want to make any changes to the 1 st 6-digit number
& would like to move on to the 2 nd 6-digit number
Input: if you would like to start over & go back to Slot #1
5
*
Slot #1 : Entry Display
Input: 0 to disable Entry Display. The numbers entered will not display
Input: 1 to activate Entry Display. The numbers entered will display
When Entry Display is activated, Input : before entering code & the
numbers entered will not display for added security
*
6 Slot #2 : Code Display
Input: 0 to disable Code Display. The code entered will not be displayed
after the safe is locked
Input: 1 to activate Code Display. The code entered will display for 2
seconds after the safe is locked
7 Slot #3 : Hide Button
*
When Entry Display is activated, Input : before entering code & the
numbers entered will not display
Input: 0 to disable Hide Button function
Input: 1 to activate Hide Button function
PG.6 | MH-SERIES ELECTRONIC LOCK INSTRUCTIONS
8 Slot #4 : Audit Function
Input: 0 to disable Audit Function
Input: 1 to activate Audit Function
9 Slot #5 : Locking Function
Input: 1 to place the lock into Standard Lock Mode
If Standard Lock Mode is selected:
! The 1 st code/card you use to lock the safe will be the set code/card
@ Once the code/card is set, you only need to input # to lock the safe
# You will need to input your set code/card to unlock the safe
$ To change your set code/card, you will need to go back into the Lock
Settings [Refer back to Changing the Lock Settings]
% Place the lock function into Hotel Lock Mode
^ Go back into the Lock Settings
& Place the lock into Standard Lock Mode
* Repeat Steps 1-8
Input: 2 to place the lock into Hotel Lock Mode
[ This is the default mode]
0 Slot #6 : Unused Slot
Input: 1 if not already entered. This slot does not disable or activate any
functions
Input: # to confirm the 1 st set of Lock Settings & move forward to the 2 nd
set of Lock Settings
If you do not want to make any changes to the 2 nd set of Lock Settings,
input # again
The 2 nd set of Lock Settings
The 2 nd 6-digit number [default setting: 4 7 1 5 4 0 ] is now displayed & Slot
#1 is ‘Blinking’
Slot #1 : Invalid Entry
Input a number from 1-9 digits to set the number of times allowed for
entering an invalid code or card before placing the lock into the Lock-Out
Penalty
Slot #2 : Code Length
Input 3 to set the code length
Input 4 to set the code length
Input 5 to set the code length
Input 6 to set the code length
Input 7 to set the code length
to
to
to
to
to
a
a
a
a
a
3-digit code
4-digit code
5-digit code
6-digit code
3-6 digit code
MH-SERIES ELECTRONIC LOCK INSTRUCTIONS | PG.7
Slot #3 & #4 Lock-Out Period
Input a number 00-99 to set the length of the Lock-Out Period
Example : For 5 mintues enter 0 in Slot #3 & 5 in Slot #4
Slot #5 Override Function [Code & Card]
Input 0 to disable the Override Function
Input 1 to use the Override Code entry only, disables the Override Card
Input 2 to use the Override Card entry only, disables the Override Code
Input 3 to use the Override Code & Card together. Input the Override Code
then swipe Override Card
Input 4 to use either the Override Code or the Override Card
Slot #6 Unused Slot
Input 0 if not already entered. This slot does not disable or activate any
functions
Input: # to confirm the 1 st set of Lock Settings & [[ GOOD ]] will appear on
the display
SETTING THE DATE & TIME
NOTE : You will only need to set the date & time to use the Lock Opening
Records function. The safe must be in the unlocked postion.
1 Input: * - *; [[ PROG ]] will appear on the display
2 Input: 0 5 5 2 6 1 - # ; [[ DATE ]] will appear on the display followed by a
6-digit number
The 6-digit number represents the year - month - day
Example: December 1, 2013 = 131201
3 Slot #1 & #2 :
131201
Enter the Year
Slot
#3 & #4 :
4
Enter the Month
Slot
#5 & #6 :
5
Enter the Day
7 Input: # to confirm the date setting & move on to the clock
The 6-digit number represents the hour - minute - second
When adjusting the hour, you will need to use military time
[24-hr rotation]
!
"
#
$
%
&
'
(
Example: 7:25:59am = 072559
8 Slot #1 & #2 :
Enter the Hour
072559
)
*
+
,
-
.
/
+
0
1
2
3
1
4
*
/
5
2
PG.8 | MH-SERIES ELECTRONIC LOCK INSTRUCTIONS
9 Slot #3 & #4 :
6
0
6
7
Enter the Minutes
Slot #5 & #6 :
Enter the Seconds
Input: # to confirm the clock setting, [[ GOOD ]] will appear on the display
VIEW LOCK OPENING RECORDS [Audit Trail]
7
NOTE : The safe must be in the unlocked postion.
1 Input: * - *; [[ PROG ]] will appear on the display
2 Input: 1 6 2 5 5 0 - # ; [[ GOOD ]] will appear on the display followed by a
6-digit number
6
One opening record uses two screens:
! The 1 st screen displays the date that the safe was opened
@ The 2 nd screen displays the time & method used to open the safe
[Method: user code, card, override code, etc.]
Method Reference [ What Opened the Safe?]
User Code: 1 is displayed
Override Code: 2 is displayed
User Card: 5 is displayed
Override Card: 6 is displayed
8
153002
8
8
8
9
:
;
<
=
>
?
;
@
A
B
=
A
@
C
:
D
E
6
Example: Safe was open at 3:30:00pm by the
Override Code = 153502
3 Navigating through the Open Records
6
6
6
6
6
Press
Press
Press
Press
Press
2
8
6
4
5
to
to
to
to
to
go back to the previous record
go forward to the next record
show the next screen of a specific record
show the previous screen of a specific record
go to the latest Lock-Opening record
4 Input: * ; [[ GOOD ]] will appear on the display & the Lock-Opening Records
will close
MH-SERIES ELECTRONIC LOCK INSTRUCTIONS | PG.9
THE ANCHOR KIT
To maximize the security of your safe, M ESA recommends using the anchor kit
[provided] to bolt down your safe. The safe can be anchored to a wall, floor,
etc., or a M ESA Model MP-Pedestal [see M ESA S AFE . COM for more info].
1 Choose a suitable & convenient location for you safe. Set the safe in place
& locate the anchor holes provided on the safe to mark the area to be
drilled on the wall, floor, desk, etc.
F
If bolting your safe to a wall, please ensure that the safe is resting on a
supporting surface; i.e., floor, table, shelf.
2 After marking the drill spots, move the safe aside and drill holes of the
3
appropriate diameter & depth for the type of hardware being used & the
mounting surface. [Anchor Kit: refer to Checklist for all items included]
Place safe back, aligning the anchor holes over the holes drilled, & install
the fasteners as required.
G
IMPORTANT : If bolting down your safe from the bottom, be sure to
remove the feet pads.
CHANGING THE BATTERIES
1 With the door open, remove the battery compartment cover located on the
2
3
inside of the door by sliding the cover in the direction of the arrow
Install 4AA alkaline batteries [included], note the polarity markings (-/+) in
the battery compartment to ensure proper installation
Slide the battery compartment cover back into place
G
IMPORTANT : Do not use rechargeable batteries, mix alkaline with nonalkaline batteries, or mix old and new batteries.
PG.10 | MH-SERIES ELECTRONIC LOCK INSTRUCTIONS
TROUBLESHOOTING
THE ISSUE
WHAT’S GOING ON
THE SOLUTION
[[ LO-BAT T ]]
The batteries are low
Change your batteries
[[ E-BAR ]]
The door is not closed properly / The
bolts are not locking
Use Override Keys to unlock
the safe then attempt to
re-lock it
[[ HOLD## ]]
4 repeated incorrect user attempts.
Lock-Out Penalty was initiated.
Wait 15 minutes then input
correct user code/card
[[ E-CODE ]]
Incorrect user code entry
Verify user code & re-enter
[[ E-CARD ]]
Incorrect card used/not swiping
the same card originally used to
open safe
Swipe original card used to
open safe
Card was swiped incorrectly from
left to right / Card was swiped too
fast or too slow
Evenly re-swipe card from left
to right
[[ ERROR ]]
or
[[ AGAIN ]]
To view Battery Levels, input [#] when safe is in the locked position
[[ BAT T-H ]]
Battery level is high
[[ BAT T-L ]]
Battery level is low
MH-SERIES ELECTRONIC LOCK INSTRUCTIONS | PG.11
HOW TO ORDER KEYS
1 Contact Mesa Safe’s Sales Department for availability & prices :
2
800.490.5624
You will need to provide your Proof of Purchase [receipt/invoice]. If you
can’t provide a Proof of Purchase, please send a notarized document
stating that you are the owner of the safe [must send the original notartized
document by mail, copies will NOT be accepted]
2 Make sure these items are on your notarized document: Name, Safe
Number, Key Number [stamped on the key lock], Mailing Address
H
H
H
H
H
H
H
H
u IMPORTANT INFORMATION ON SAFE USAGE
Hold on to your Proof of Purchase [receipt/invoice].
You will need this to order keys or use the Warranty Service
Do not open your safe if it is lying on its side, back or top.
Only open your safe when it is in the upright position
Do not slam the door. Extreme shock can damage the lock or jam the
bolt work system
Do not shut the door with the locking bolts in the locked position.
This may damage the locking bolts & create problems unlocking &
locking the safe
Do not stack contents of the safe so that the door must be forced shut.
Bolt works may jam as a result
Keep liquids away from the keypad. Liquids can damage the keypad
The safe door is removeable. To remove door, unlock the safe, open the door
& lift the door up. Do not lose the hinge pins - they may slide out of the
hinge when removing the door. If they happen to slide out, you can easily
insert them back into the hinge.
If you experience a difference in the feel of the operation, inconsistency
or difficulty opening or operating the safe, DO NOT LOCK THE SAFE.
Immediately contact our Professional Tech Assistants at M ESA S AFE
C OMPANY Customer Care : 800.490.5624 [Monday thru Friday 7AM - 4PM/PST ]
REGISTER YOUR SAFE
To aid with warranty coverage, please register your product online or
complete the enclosed registration card.
Register your safe online at M ESA S AFE . COM /register --or-Fill out the Registration Card included with your safe & mail to:
Customer Service P.O Box 52282 Irvine, CA 92619
PG.12 | MH-SERIES ELECTRONIC LOCK INSTRUCTIONS
~ MESA SAFE COMPANY LIMITED 1 YEAR WARRANTY
Mesa Safe Company will gurarantee your Mesa Safe free from defects for a
period of one year from original purchase date on maufacture defects only.
This warranty is non-transferable and only applies to original owner with
proof of purchase from an authorized dealer.
Mesa Safe Company will not, under any circumstances, be liable to the initial
consumer for any incidental, consequential, special, exemplary, or punitived
damages arising out of the purchase or use of any Mesa Safe Company
product(s). Mesa Safe Company’s liability for any breach of this warranty shall
be limited exclusively to repair or replacement of the defective product(s),
as described above or a refund of the product(s). In no event shall Mesa Safe
Company’s obligation under this warranty exceed the price of the original
product(s). Under no circumstances will Mesa Safe Company be held liable for
contents stored inside the Safe(s).
This warranty is limited to the terms stated herin. All expressed and implied
warranties including the warranties of merchantability and fitness for a
particular purpose are excluded, except as stated above. Mesa Safe Company
disclaims all liabilities for incidental or consequential damages resulting from
the use of this product, or arising out of any breach of this warranty. Some
states do not allow the exclusion or limitation of incidental or consequential
damages, so the above limitation may not apply to you. This warranty gives
you specific legal rights, and you may have other rights as well, which will
vary from state to state.
© 2013 MESA SAFE COMPANY