1
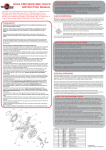
NOVA G3 CHUCK
INSTRUCTION MANUAL
Thank you for purchasing your Nova G3 Chuck - the latest addition to our Woodturning Chuck
range. We are confident that it will be a great aid towards fast workholding and enhance your
woodturning capablity. The Nova G3 is designed for a range of woodholding modes while being
quick and easy to use.
FOR YOUR SAFETY
FITTING CHUCK TO LATHE
Check that the chuck thread specification matches the lathe spindle thread you
have. This is important for accuracy. The chuck body must contact an accurate
register on lathe, either a shoulder on spindle or bearing face etc to ensure chuck
will run true. If further modifications are needed (e.g. spacer) these are the
responsibility of the user. A good check is to see whether it screws home the same
as a faceplate or similar spindle fitting.
DO NOT USE UNLESS CHUCK IS PROPERLY FITTED TO SPINDLE.
NB: SOME FORM OF LOCKING MUST BE USED IF THE LATHE IS
CAPABLE OF REVERSE MODE.
PLEASE READ & UNDERSTAND THIS INFORMATION BEFORE USING YOUR NOVA G3 CHUCK
DANGER: THIS CHUCK IS CAPABLE OF CONTRIBUTING TO SERIOUS INJURY, AS WITH
ANY OTHER POWERTOOL ACCESSORY, IF USED IMPROPERLY ON THE LATHE.
Before using the Nova G3, read and understand this instruction manual and the lathe
owner’s manual. If you do not have a manual, contact the supplier of your lathe to obtain
one before using the lathe and Chuck.
User must be professionally trained to use this chuck. Vocational school courses
recommended. As with other chucking methods, an extremely cautious and sensible
approach is necessary. With the Nova G3 Chuck it is not possible to give exact directions as
to the amount of tightening pressure required for workholding. Follow closely strict
guidelines in this manual for different jaw types on wood blank diameters and length, plus
turning speed.
BEFORE USING THE NOVA G3 CHUCK MAKE SURE THAT • EYE PROTECTION WHICH COMPLIES WITH CURRENT ANSI STANDARD Z87.1 (USA) IS
WORN. WE RECOMMEND THAT A FULL FACE SHIELD BE USED AT ALL TIMES.
• Chuck is properly secured on lathe spindle. Follow mounting instructions for your lathe for
faceplates and other spindle fixtures.
• For safety, DO NOT ROTATE CHUCK UNDER POWER WITHOUT WOOD BEING GRIPPED.
• WARNING: EXCESSIVE SPEED IS A SERIOUS LATHE HAZARD. ALWAYS TURN AT THE
SLOWEST SPEED POSSIBLE.
• Speed will vary with wood blank size. The larger the blank the slower the speed. Consult
your lathe manual or lathe information plate for speed guidelines.
• DO NOT ATTEMPT TO USE THE CHUCK UNLESS THE LATHE SPEEDS ARE KNOWN,
YOU MUST STRICTLY FOLLOW THE MAXIMUM SPEED LIMITS SET OUT IN THE
OPERATING SECTION OF THIS MANUAL.
DO NOT EXCEED THEM UNDER ANY CIRCUMSTANCES.
• EXAMINE WOOD CAREFULLY. ONLY MOUNT WOOD THAT IS SOUND, If any cracks, splits,
or weakness is found in wood - DO NOT MOUNT ON CHUCK. DO NOT MOUNT ANY
WOOD THAT IS LIKELY TO BREAK UP DURING TURNING (E.G. ROTTEN OR SPONGY
WOOD). DO NOT USE POORLY JOINTED or LAMINATED WOOD.
• Make sure wood is clamped firmly. Follow mounting instructions for different gripping
modes and jaw types. In the expansion mode do not use undue force or jaws may split
the wood.
• Do not exceed maximum guidelines in this manual for wood blank diameters or lengths
set out in this manual for different modes and jaw types.
DO NOT USE WITH ANY COPYTURNER OPERATIONS.
• Check wood is securely held in chuck, before operation. Check grip by vigorously
wrenching wood blank back and forth. If any loosening occurs, re-examine holding area
for adequate grip (Following mounting guidelines) and any damage to holding area.
Rotate manually to make sure of clearance before switching power on.
• WARNING: FOR SAFE OPERATION
IT IS RECOMMENDED THAT TURNING BE CARRIED OUT WITH JAW SLIDES
NOT EXTENDING BEYONG THE CHUCK BODY. HOWEVER THE JAW SLIDES
CAN EXTEND ABOUT 6.35MM (1/4”) BEYOND THE BODY OF THE CHUCK TO
GIVE A WIDER RANGE OF EXPANSION, IF REQUIRED. EXTRA CAUTION MUST
BE EXERCISED WHEN TURNING WITH JAW SLIDES EXTENDING BEYOND
THE BODY OF THE CHUCK.
• Irregular or out of balance stock needs to be turned at the slowest possible speed until it
is in balance. For use on outboard/left-hand rotation - MAKE SURE INSERT IS SECURELY
LOCKED WITH GRUBSCREW BEFORE USE. Use only hand held woodturning chisels to
shape wood being held in chuck.
• USE THE RIGHT CHISEL FOR THE JOB AND DO NOT FORCE TOOLS. Use safe and
commonly approved chisel techniques. Wherever possible stand to one side of the
revolving wood.
• WEAR PROPER CLOTHING. Do not wear any loose clothing, neck ties, gloves, bracelets,
rings or other jewellery that could get caught in moving parts. Wear protective hair covering
to contain long hair.
• Do NOT operate chuck or lathe while under the influence of DRUGS, ALCOHOL or any
MEDICATION.
• KEEP CHILDREN AND VISITORS AWAY. All children and visitors should be kept safe
distance from the work area.
CHUCK OPERATION
Adjustment: The Nova G3 chuck features a chuck key, which locates easily and quickly
into the gearing mechanism. The high powered gearing delivers outstanding grip at little
effort. Moving in a clockwise direction will expand
the jaws outwards (expansion), and moving the key
in an anti-clockwise direction will contract the jaws
inwards (contraction). For example, move the handle
in an anti-clockwise direction to move the jaws to
clamp a work piece inside the jaws, and then move
the handle in a clockwise direction to release the
work.
AUTO STOP FEATURE
The Nova G3 has an in built safety feature which
prevents the jaws slides from becoming disloged
from the chuck. The auto stop feature is first in the
industry doing away with shearing screws.
MOUNTING & DISMOUNTING OF JAWS
The Nova G3 chuck comes with no jaws attached. With the many jaws available it is
very easy to use your single chuck for a very wide range of applications. All jaws in
the Teknatool range for the Nova G3 are secured and attached the same way.
Attaching Jaws - To mount the jaws to the Nova G3 chuck is another easy
process. Firstly wipe clean all jaw slides, especially the contact surfaces. Repeat
this with all four jaws you wish to attach. Jaw slides are numbered one to four and
have a corresponding jaw - of the same number. This may be represented by dots if
numbers are not present, i.e. 3 dots = #3. Place a jaw on its correct jaw slide and
position into the groove (location ring out from the jaw into the groove of the jaw
slide). The first few times, you may need to GENTLY tap the jaws into the locater
slot with a block of wood or plastic mallet. Place M6X10 counter sunk screws in
jaws and screw them to finger tightness. When both screws are in nip them up and
back off half a turn. Repeat this to the remaining three jaws. Now using the Chuck
key, scroll all jaws towards middle until they all come together. Now with all jaws
touching and equal pressure on each, tighten all screws up. This will eliminate any
run out. Ensure that there are no gaps between the jaws. If a gap does appear, it will
probably be due to a jaw being placed on its wrong number (e.g. a #2 jaw on a
#3 jaw slide).
To Remove Jaws - Simply using the 4mm Allen key supplied, unscrew all M6
counter sunk screws (there are eight of them). The jaws will come away once their
screws are released. Sometimes due to dust particle build up (after heavy turning)
the jaws may need a very light tap with a plastic hammer to dislodge them. It is
important to keep them in their set so not to mix them up with other jaws of the
same type.
IMPORTANT NOTE:
Accessory Jaws: Although the Nova G3 is compatible with all the Teknatool Accessory Jaws, it is not
recommended that the larger accessory jaws be used, as they will hold work to larger capacities than is
recommended with the Nova G3. For instance, we do not recommend that the following accessory jaws
are used with the Nova G3: 130mm Jaw (JS130N),PowerGrips (PJSN), Titan PowerGrips (13029)
Moreover, it is not recommended that work exceed a diameter of 14” and a depth of 5” with this chuck.
Make workshop childproof with padlocks, master switches, or by removing starter keys.
DOVETAIL OPERATION
PARTS LIST & EXPLODED DRAWING
Expansion of the jaws into a recess - This function is for bowl and platter turning where
the projection (depth) of the wood blank is not too great i.e. up to 100mm (4 inches).
Characteristically these items have a parallel wood grain. IT MUST NOT BE USED FOR
ANY LONG WORK (OVER 100mm or 4 inches) AS THERE WOULD BE GREAT DANGER
OF WOOD TEARING OUT AND DISLODGING FROM CHUCK.
Instructions below apply to the standard 50mm (2 inches) jaws but the general technique is
the same with other accessory jaws. However, the maximum size of wood blank that can
be mounted, the maximum turning speed and recess size varies with the different
accessory jaws. Consult specific instructions included for each jaw set.
This strong holding method, using the standard 50mm (2 inches) jaws, you can turn bowls
up to 350mm (14 inches) in diameter. DO NOT EXCEED 600RPM WITH THIS OPERATION.
OUT OF BALANCE STOCK MUST BE TURNED AT THE SLOWEST SPEED POSSIBLE.
CM5010181
10006
10029
Jaw set 50mm
50mm jaws - Any recess can be turned between 50mm (2 inches) and 70mm (2 3/4” inches)
diameter. For smaller lids and thin platters (not exceeding 150mm or 6 inches diameter) only
a shallow recess of around 3mm (1/8 inch) is necessary. It will be matter of gaining
experience as to what combinations and sizes will best suit.
USING THE WOODWORM SCREW
The woodworm screw supplied with the Nova G3 chuck is purpose designed for screw
chucking. It is a cylindrical screw which maintains its full holding power along the
whole length, unlike normal tapered screws. The thin thread form is specially designed
to cause minimum damage to wood fibers. They grip better than screws because there
is a larger volume of undamaged wood retained within the screw.
NB: Direct threaded chucks #9 & #10 not used
(with the exception of the 4-threaded direct chuck)
Copyright 2007
Publication Number: 110-0706-001
The woodworm screw is made complete with the boss section in one piece. The
woodworm screw is to be used with the jaws remaining on the chuck. This facility is
very convinent for remounting work directly onto the jaws after the screw is removed.
(see more, page over)
USING THE WOODWORM SCREW (contd.)
To convert to this operation , place the boss section into the centre of the chuck and close
jaws into the slots. BEFORE FINAL TIGHTENING MAKE SURE THAT THE FRONT OF THE
BOSS SECTION OF THE SCREW IS SEATED BEHIND AND AGAINST THE 50mm (2
INCHES) JAWS. This will prevent any tendency for the boss section to creep forward when
the screw is being used. NB: Recommended pre-drill size is 9/32” (7mm) for soft woods
and 5/16” (8mm) for hard woods.
The front face of the jaws have been machined to provide an accurate backing surface.
This is quite an advantage, providing a much tighter fit and wider tolerance for irregularly
faced stock. This feature is also quite an advantage when using the screw to mount a bowl
for first stage bowl turning - forming the outside of the bowl to be put straight onto the jaws
(the screw is first removed) after the recess has been formed.
The woodworm screws provides 15mm -1/2mm OR 39/64” (0.609”) of thread beyond the
jaws. Irregular, rough tree blanks (e.g. small sections of tree limbs) not exceeding the
above sizes can be held quite firmly BUT caution must be exercised. Check for adequate
contact. DO NOT USE THE SCREW FOR VERY LARGE WOOD BLANKS. Its intended for
small bowl and screw chucking work. The maximum capacity which should be mounted
on the screw is 250mm (10 inches) diamter X100mm (4 inches). DO NOT EXCEED 600
RPM FOR THIS OPERATION, and use tailstock with a live centre for support.
FORMING RECESS
The jaw dovetail has been designed for use with a standard skew scraper. This chisel will make
a recess to the angle required. FOR SAFETY REASONS WE STRONGLY ADVISE AGAINST USING
ANY OTHER TOOL. A profile of this chisel is shown below. It is best to work with a tool, which is
already ground, to the correct angle. All that is necessary then is to keep the leading edge of the
chisel flat on the wood, moving forward and out to form the recess to the required diameter and
depth. Mount bowl blank on screw as described in previous section. It
may be convenient to first mark out with a pencil, a circle on the bowl
blank. To mark out the recess diameter with pencil, hold pencil point to
desired radius, supported on the toolrest. Then revolve blank by hand
thus creating a pencilled circle. However, as specified above, any recess
diameter can be made between 50mm (2 inches) - 75mm (3 inches) so
exact sizing of the recess is unnecessary.
WARNING: MAKE SURE THE JAWS ARE SEATED PROPERLY IN THE RECESS AND THAT THE
BOWL IS NOT INCORRECTLY RIDING ON THE FLAT SHOULDER SECTION OF THE JAWS BEHIND
THE DOVETAIL. THIS COULD LEAD TO THE BOWL DISLODGING FROM CHUCK. LOOSEN JAWS
AND REMOUNT CORRECTLY.
Now give a few gentle raps with the end of a chisel handle or wooden mallet around centre of bowl.
Use pinion handle to give an give an extra nip up. Refer to Chuck Operation. Refer again to safety
before operation.
SPIGOT OPERATION
This is where the jaws contact around a wooden spigot for grip. This function is mainly for box,
goblet and vase turning, that is, end grain items with a fair degree of overhang. This situation is
one of the most difficult to provide secure holding no matter what fixing method is used.
EXTREME CAUTION WITH THIS OPERATION MUST BE EXERCISED. DO NOT EXCEED 850 RPM
FOR THIS OPERATION. If used properly, the Nova G3 Chuck provides a very powerful and secure
grip in this mode.
Instructions below apply to the standard 50mm (2 inches) jaws but the general spigot technique
is the same for other jaw types. However, maximum turning speed and recess size varies with
different jaw types. Consult accessory jaw manual or instruction sheets. With the standard set of
50mm (2 inches) jaws a maximum size woodblank of 100mm (4 inches) diameter (NOT spigot
size) by 150mm (6 inches) length can be turned. Square timber of same length and between
40mm (1.5 inches) to 50mm (2 inches) and grip of all four jaws into wood. MAKE SURE YOU HAVE
AN ADEQUATE GRIP BEFORE OPERATION by vigorously wrenching the limb mounted on chuck.
If any loosening occurs DO NOT PROCEED with operation. Repeat tightening procedure and retest grip.
SPIGOT SIZE:
Standard Jaws will grip a round spigot between 45mm (1 49/64inches) to 65mm (2 5/16 inches)
approx. Square timber between 40mm (1 37/64inches) to 50mm (2 inches) square approx.
Jaw slides only - With the 50mm (2 inches) add-on jaws removed, the jaw slides will grip either
round or square timber down to 8mm (5/16inch). Length limits are the same for spigot work.
Small work not greater than this diameter can be turned at a speed NOT EXCEEDING 1800 RPM.
Larger work held in the jaw slides should NOT EXCEED 850 RPM.
FORMING SPIGOT:
Before scraping out the recess, slightly hollow out the centre of the bowl blank with a bowl gouge
or round nose scraper. The purpose is to relieve the centre so that when the recess is scraped out
only half the chisel edge needs to be used. We recommend this to reduce
tearing of the wood by scraping action; and to make the recess a little more
finished to give a better effect to the overall bowl. extra embellishments can also
be made to the recess to enhance the bowl. After the recess is finished and the
outside of the bowl is turned to shape, wind bowl back off screw. Bowl blank is
now ready to be reversed into the jaws. Expand the jaws into the recess. When
the jaws are expanded out into the recess, screw the wood blank gently back
and forth to make sure it is seated properly on the bottom face of the jaws.
WARRANTY
When selecting wood make sure it is sound without splits or weakness - especially around the
area where the spigot is to be formed. REMEMBER WITH FREE END TURNING, THIS IS THE
ONLY AREA FOR GRIP. IF ANY WEAKNESS IS FOUND, DO NOT PROCEED. Mount wood between
centres and turn the spigot area. Make the spigot as parallel as possible to maximise the
efficiency of the clamping action. Only approximate sizing of the spigot is necessary, as the jaws
will accommodate a wide range of spigot diameters within the spigot limits stated above. The
50mm (2 inches) standard jaw has a thin lip (or shoulder at the front face) which is designed to
bite into the timber as the jaws are tightened. DO NOT CUT A RECESS FOR THE LIP TO FIT INTO,
AS THIS WILL REDUCE GRIPPING POWER.
Serial Number:
IDEAL LATHE SIZE
WOODWORM SCREW
Screw chucking
function, using the
Nova Woodworm
Screw (included with
chuck) For the first
stage mounting of
wooden bowl blanks.
It’s not recommended to
use the larger Teknatool
Accessory Jaws with
this chuck.
See manual for more.
VERSATILE
Teknatool International Ltd, PO Box 305378 Triton Plaza, North Shore 0757,
Auckland, New Zealand
PH: +649 477 5600 FAX: +649 477 5601
Email: [email protected] Website: www.teknatool.com
www.teknatool.com
Free Project Ideas
Videos
Manuals
Frequently Asked
Questions
Register Warranty
Ideal for mini, midi
and all lathes up to
7” centre height (14”
diameter over bed)
Can also be used for
small work on larger
lathes. SuperNova
and Titan chucks are
recommended for
larger work. See
website or reseller for
more information.
Learn More
Visit our website
See back of this sheet
for the instruction
manual.
FITS MOST LATHES
NOVA G3 CHUCK
versatile
easy to use
TEKNATOOL
INTERNATIONAL Ltd.
www.teknatool.com
Fully compatible with
all Nova, SuperNova
and SuperNova2
accessories. Widest
accessory range of
any chucking system
on the market means
you can tackle a
wide range of
projects.
Fits Nova &
SuperNova
Accessories
Screws directly
into your lathe
spindle (same as
a faceplate)
Available in
popular 1”8TPI
RH and
3/4”16TPI threads
as well as insert
versions.
Ideal for your
Woodturning
Fast, strong
geared grip
Ideal for Mini,
Midi and all
lathes up to 14”
swing over bed
Teknatool International Ltd, PO Box 305378 Triton Plaza, North Shore 0757,
Auckland, New Zealand
PH: +649 477 5600 FAX: +649 477 5601
Email: [email protected] Website: www.teknatool.com
SPECIFICATIONS
Thread Sizes: 1”8
tpi, 3/4”16 tpi and
insert version.
Warranty: 2 Year
Comprehensive see details
Weight: 1.53kgs/
3.373lbs on spindle.
Body Diameter:
88,mm/3.48”
Standard Equipment: Chuck body,
50mm jaws, chuck
key, fastenings,
instruction manual.
You can register your warranty online by visiting www.teknatool.com
This Teknatool warranty is backed by a period of twenty-four months from the date of purchase. Teknatool International Ltd hereby agrees to make repairs or replace components without
charge for any defects due to faulty material or workmanship, provided that - a) The warranty period has not elapsed. Proof of purchase date (sales slip, registration of warranty etc) would
need to be forwarded to Teknatool International. b) If, in our opinion, the unit has not already been altered, repaired or modified in any way that would affect it’s operation; has not been
subjected to misuse, negligence, accident or not used strictly in accordance with instructions. c) Where necessary, transportation is prepaid by the customer to the Factory Service Centre
(or other uthorised Teknatool Service Centre)
Warranty does not cover costs or damages arising directly or indirectly from the operation of this Teknatool product. No other guarantee, written or verbal is authorised by Teknatool
International Ltd. Our Teknatool Distributors can issue their own warranty to cover this product. Their terms may vary from what is stated above - please check with your dealer if you have any
questions. Email our service contact: [email protected]. Our policy is one of continuous improvement. We therefore reserve the right to change specifications/designs without notice.