1
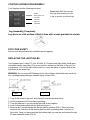
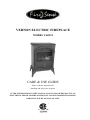
VERNON ELECTRIC FIREPLACE
MODEL # 60351
CARE & USE GUIDE
Please read this manual before
installing and using your fireplace.
IF THE INFORMATION IN THIS MANUAL IS NOT FOLLOWED EXACTLY, AN
ELECTRICAL SHOCK OR FIRE MAY RESULT CAUSING PROPERTY DAMAGE,
PERSONAL INJURY OR LOSS OF LIFE.
Thank you for purchasing a Fire Sense Electric Fireplace.
Important: Read all instructions and warnings carefully before starting installation.
Failure to follow these instructions may result in a possible electric shock, fire hazard and
will void the warranty. This unit comes with an internal over-heating safety shut-off switch
that will cut off power to the unit if the internal temperature exceeds 115 degrees Celsius
(239 degrees Farenheit.)
INSTALLATION INSTRUCTIONS – GENERAL
1. Read all instructions before using this appliance.
2. This fireplace is hot when in use. To avoid burns, do not let bare skin touch hot
surfaces. If provided, use handles when moving this appliance. Keep combustible
materials, such as furniture, pillows, bedding, papers, clothes and curtains at least 3
feet from the front and sides of this appliance.
3. Caution: Extreme caution is necessary when any heater is used near children or
disabled persons. Never leave any heater unattended.
4. Always unplug this appliance when not in use.
5. Do not operate any heater with a damaged cord or plug or after the appliance
malfunctions, or has been dropped or damaged in any manner.
6. Any repairs to this appliance must be carried out by a qualified service person.
7. Under no circumstances should this appliance be modified. Parts having to be
removed for servicing must be replaced prior to operating this appliance again.
8. Do not use outdoors.
9. This appliance is not intended for use in bathrooms, laundry areas and similar indoor
locations. Never locate this appliance where it may fall into a bathtub or otherwise
become exposed to water.
10. Do not run cord under carpeting. Do not cover cord with throw rugs, runners or the like.
Arrange cord away from traffic areas and where it will not be tripped over.
11. To disconnect this appliance, turn controls to the off position, them remove the plug
from the outlet.
12. Connect to properly grounded outlets only.
13. This appliance, when installed must be electrically grounded in accordance with local
codes, and the National Electrical Code, ANSI/NFPA No. 70.
14. Do not insert or allow foreign objects to enter any ventilation or exhaust opening as this
may cause an electric shock, fire or damage the appliance.
15. To prevent possible fire, do not block air intakes or exhaust in any manner. Do not use
on soft surfaces, like a bed, where openings may become blocked.
16. This appliance has hot and arching or sparking parts inside. Do not use it in areas
where gasoline, paint or flammable liquids are used or stored. This appliance should
not be used as a drying rack for clothing, nor should Christmas stockings or
decorations be hung on or near it.
17. Use this appliance only as described in this manual. Any other use not recommended
by the manufacturer may cause fire, electric shock or injury to persons.
18. Avoid the use of an extension cord because the extension cord may overheat and
cause a risk of fire. However, if you have to use an extension cord, the cord shall be
14 gauge minimum size and rated not less that 2025 watts. The extension cord must
be a three wire cord with grounding type plug and cord connector. The extension
cord shall not be more than 20 feet in length.
SPECIFICATIONS
Dimensions LxWxH
16.13"x10.75"x21.55"
Net Weight
27.2 lbs
Voltage
110-120V
Frequency
60 Hz
Watts
1350 W
Heater Rating
4600 BTU
ELECTRICAL CONNECTION
A 15 Amp, 110 Volt, 60 Hz circuit with a properly grounded outlet is required to operate this
appliance. The fireplace must be on a dedicated circuit as other appliances on the same
circuit may cause the circuit breaker to trip or the fuse to blow when the heater is in operation. The unit comes standard with a 6 ft long 3 wire cord, exiting out the back of the
fireplace. Plan the installation to avoid the use of an extension cord. If an extension cord
must be used, it must be a minimum 14 gauge, 3 wire with grounding type plug and
connector and rated not less than 2025 watts. The extension cord shall not be more than
20 ft in length.
WARNING: Electrical outlet wiring must comply with local building codes and other
applicable regulations to reduce the risk of fire, electrical shock and injury to persons.
WARNING: Do not use this fireplace if any part of it has become wet. Immediately call a
qualified service technician to inspect the fireplace and replace any part of the electrical
system which has been wet.
CONTROLS/OPERATION/ASSEMBLY
Your fireplace has the following functions:
On/Off
Power to the unit
Please note: Both the low heat
and high heat switches must be
in the on position to achieve high
Low heat
700 watts
High heat
1350 watts
Leg Assembly (if required):
Lay stove on a flat surface. Attach 4 legs with screws provided as shown:
FOR YOUR SAFETY
Service must be performed by a qualified service agency.
REPLACING THE LIGHT BULBS
This fireplace uses 2 clear 110 Volt, 40 Watt, E-12 socket base light bulbs (small base,
chandelier candle type bulbs). The access plate is located on the back of the unit. For
convenience, if one of the light bulbs burns out, it may be easier to replace both of the
light bulbs at the same time.
WARNING: Do not exceed 40 Watts per bulb. Use of higher rated bulbs may result in a
fire, causing property damage, personal injury or loss of life.
FIG 1
FIG 2
1. Turn off the power to the unit, and unplug it from the electrical outlet.
2. Let the fireplace cool if it has been operating.
3. Turn the fireplace so you are facing the back of the fireplace.
4. Look for the access plate with the gold printing on it.
5. Remove the 2 screws holding the access plate in position (FIG1). Once you have
removed the 2 screws, lift the access plate so the 2 positioning tabs come free of
their slots. Once you have removed the access plate you can see and access the two
40 watt chandelier bulbs (FIG 2).
6. Remove each light bulb by unscrewing them out of the bases, turning them
counterclockwise. You can use one hand to hold the light socket in place, if required.
7. Install the new light bulbs by turning each light bulb into the base clockwise. You can
use one hand to hold the light socket in place, if required.
8. Replace the access plate by inserting the 2 tabs, pushing the plate up against the
fireplace back, and inserting the 2 screws.
9. Turn the fireplace back so you are facing the front of the fireplace.
10. Plug the fireplace back into the electrical outlet and turn the power on and enjoy the
flame effect.
CLEANING
Turn heater OFF and unplug from outlet. Use a vacuum or duster to keep heat and vent
area clean from dust and dirt. The exterior of the fireplace should be cleaned with a
damp cloth or duster. Do not use abrasive cleaners, liquid sprays, or any other cleaner
that may scratch the surface.