Transcript
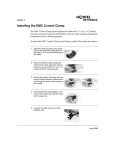
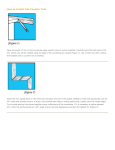
Lock-Top Energy-Saving Fireplace Damper
TM
with Chimney Fire Safety Device
To install the Lock-Top Damper, you will need
these tools: drill, hammer, wire pliers, 1⁄4"
masonry bit, 1⁄2" open end or adjustable
wrench.
Installation Instr uctions
Dome nut
Safety
device
wire,
positioned
corner-tocorner
Bracket
Leg connector
wire with
fusible link
1. Find the safety device wire located under the damper
lid. Find the spring-loaded connecting tube with jam
nut, cable, and handle in the hardware bag. Find the
leg connector wire with fusible link in the bag, also.
Remove dome nut from the end of connecting tube,
and assemble chimney fire safety device as shown at
right. The chimney fire safety device must be installed
for the warranty to be in effect.
2. Insert threaded end of conduit tube into underside of
damper lid. Position safety device wire corner-to-corner and re-tighten dome nut onto end of bolt. Turn jam
nut an additional 1⁄4 turn with wrench to secure.
Safety
device
wire
Jam nut
Black tube
Leg connector wire
with fusible link
Chimney fire safety device
3. Spread 1⁄4" bead of furnished adhesive around top of chimney opening. Insert cable and
handle down chimney making sure they extend into fireplace. Center damper on top of
chimney and press down firmly on frame. Fill any gaps with adhesive to ensure a proper seal. Allow adhesive to set 24 hours before using damper. (If using a Sweep’s Ring,
sold separately, apply the ring to the adhesive and screw damper to ring.)
4. Bracket installation: Drill 1⁄4" hole in firebrick toward front of fireplace, approximately
20" off firebox floor. Insert nail anchor through top hole of bracket and into hole in brick.
Fasten. Be sure bracket is straight and then use second hole in bracket as guide to drill
a second hole in brick. Fasten with second anchor nail.
Adjustment
clamp
5. Thread handle, chain, and cable through bracket hole until all slack is out of cable.
Loosen brass adjustment clamp with Allen wrench and slide it up cable to bracket. Pull
the cable to close damper, and adjust clamp position for the tightest seal. Tighten screw
in clamp with Allen wrench. Cut and discard excess cable.
© 2004 Gelco Lyemance Lock-Top
Lock-Top Energy-Saving Fireplace Damper
TM
with Chimney Fire Safety Device
To install the Lock-Top Damper, you will need
these tools: drill, hammer, wire pliers, 1⁄4"
masonry bit, 1⁄2" open end or adjustable
wrench.
Installation Instr uctions
Dome nut
Safety
device
wire,
positioned
corner-tocorner
Bracket
Leg connector
wire with
fusible link
Adjustment
clamp
© 2004 Gelco Lyemance Lock-Top
1. Find the safety device wire located under the damper
lid. Find the spring-loaded connecting tube with jam
nut, cable, and handle in the hardware bag. Find the
leg connector wire with fusible link in the bag, also.
Remove dome nut from the end of connecting tube,
and assemble chimney fire safety device as shown at
right. The chimney fire safety device must be installed
for the warranty to be in effect.
2. Insert threaded end of conduit tube into underside of
damper lid. Position safety device wire corner-to-corner and re-tighten dome nut onto end of bolt. Turn jam
nut an additional 1⁄4 turn with wrench to secure.
Safety
device
wire
Jam nut
Black tube
Leg connector wire
with fusible link
Chimney fire safety device
3. Spread 1⁄4" bead of furnished adhesive around top of chimney opening. Insert cable and
handle down chimney making sure they extend into fireplace. Center damper on top of
chimney and press down firmly on frame. Fill any gaps with adhesive to ensure a proper seal. Allow adhesive to set 24 hours before using damper. (If using a Sweep’s Ring,
sold separately, apply the ring to the adhesive and screw damper to ring.)
4. Bracket installation: Drill 1⁄4" hole in firebrick toward front of fireplace, approximately
20" off firebox floor. Insert nail anchor through top hole of bracket and into hole in brick.
Fasten. Be sure bracket is straight and then use second hole in bracket as guide to drill
a second hole in brick. Fasten with second anchor nail.
5. Thread handle, chain, and cable through bracket hole until all slack is out of cable.
Loosen brass adjustment clamp with Allen wrench and slide it up cable to bracket. Pull
the cable to close damper, and adjust clamp position for the tightest seal. Tighten screw
in clamp with Allen wrench. Cut and discard excess cable.