1
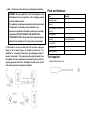
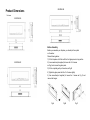
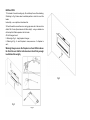
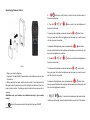
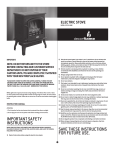
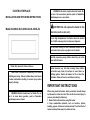
ELECTRIC FIREPLACE INSTALLATION AND OPERATING INSTRUCTIONS Model:80-2000A-36,80-2000A-42,80-2000A-54 WARNING: All electric heaters have hot inside. Do not use it in areas where gasoline, paint or flammable liquids/vapors are or are stored. CAUTION: Do not expose the heater to the elements (such as rain, etc). Due to high temperatures, CAUTION: The fireplace the in heater should be located out of traffic and away from furniture and draperies. Do not place clothing or other flammable material on or near heater. Never place any objects on the heater. Carefully supervise young children when they are in the room with the heater. Retain this manual for future reference Read these instructions completely first before installing and using . Failure to follow them could cause a heater malfunction resulting in serious injury and/or property damage. Heater becomes very hot when running. Keep children and adults away from hot surfaces to avoid burns or clothing ignition. Heater will remain hot for a time after shutdown. Allow surfaces to cool before touching. IMPORTANT INSTRUCTIONS WARNING: Electric heaters are hot inside. Do not use it in areas where gasoline, paint or flammable liquids/vapors are or stored. When using electrical heaters, basic precautions should always be followed to reduce the risk of fire, electric shock and injury to persons, including the following: 1. Read all instructions before using this heater. 2. Keep combustible materials, such as furniture, pillows, bedding, papers, clothes and curtains at least 3 feet from front of heater and keep them away from sides and rear. 3. Always unplug heater when not in use. 4. Do not operate any heater with a damaged cord or plug or after heater malfunctions, has been dropped or damaged in any way. 5. Do not use outdoors. 6. This heater is not intended for use in bathrooms, laundry areas and similar indoor locations. Never locate heater where it may fall into a bathtub or other water container. 7. Do not run cord under carpeting. Do not cover cord with throw rugs, runners or the like. Arrange cord away from traffic area and where it will not be tripped over. 8. To disconnect heater, turn controls to "OFF" before removing plug from outlet. 9. Do not insert or allow foreign objects to enter any ventilation or exhaust opening as this may cause an electric shock or fire or damage the heater. 10. To prevent possible fire, do not block air intakes in any manner. 11. Use this heater only as described in this manual. Any other use is not recommended by the manufacturer which may cause fire, electric shock or injury to people and/or animals. 12. Always use properly grounded fused and polarized outlets. 13.Always use ground fault protection where required by electrical codes. 14. Always disconnect power before performing any cleaning, maintenance or relocation of heater. 15. Always plug heaters directly into a wall outlet/receptacle. Never use with an extension cord or relocatable power tap (outlet/power strip). 16. To prevent a possible fire, do not burn wood or other materials in this heater. 17. To prevent electric shock or fire, always use a certified electrician should new circuits or outlets be required. 18. When transporting or storing heater, keep in a dry place free from excessive vibration and damage. 19. The heater must not cover up an electrical socket; the socket must always be accessible in order to disconnect the heater from the electrical supply for maintenance and cleaning. 20. This heater must be grounded. The main supply must be Safely routed from the heater to an electrical socket. Note: When the heater is turned on for the first time, it may release a slight, harmless odor or smoke. This odor or smoke is a normal occurrence caused by the initial heating of the internal heating elements and should not occur again. SAVE THESE INSTRUCTIONS Technical Specification Description of product ELECTRIC FIREPLACE Model 80-2000A-36,80-2000A-42,80-2000A-54 Rated Voltage 120V~ Rated Frequency 60 Hz Rated Power 1500W Lamp LED Unpacking and Testing 1. Carefully remove the unit from the box. Prior to using the unit, test to make sure the unit operates properly. Plug the unit's power supply cord into a conveniently located 120volt grounded outlet. Check to see the unit turns on and produces function. WARNING: Do not operate the unit if it is damaged or has malfunctioned. If you suspect the unit is damaged, please contact customer service. The appliance is employed a manually reset thermal cut-out for safeguard, if it operates, please inspect for any objects,on or adjacent to the heater ,which may cause high temperatures.DO NOT OPERATE THE HEATER UNTIL TROUBLESHOOTING . Reset switch by turning main power switch off and waiting 5 to 10 minutes then turning it back on. 2. This heater is for use on 120 volts. The cord has a plug as shown at A in below Figure. An adapter as shown at C is available for connecting three-blade grounding-type plugs to two-slot receptacles. The green grounding lug extending from the adapter must be connected to a permanent ground such as a properly grounded outlet box. The adapter should not be used if a three-slot grounded receptacle is available. Parts and hardware Part Quantity Remote Control 1 Manual 1 Fixing Hanger(In the back of the fire) 1 Fixing Bracket 1 Crystals 1or 2(80-2000A-54) Screw ST4*8 1 Screw ST4*40 5 Plastic expansion 5 Tool required Magnetic Phillips Screw Driver 80-2000A-54 Product Dimensions Unit:mm 80-2000A-36 Before Assembly 80-2000A-42 Before you assemble your fireplace, you should put the crystals on the ember. Please following below : 1) Put the fireplace on flat floor with the front glass panel on top position. 2) Use screwdriver(not supplied) to loosen the 7or 9 screws as Fig A, and remove the glass panel. 3) Put the craystals gently on the ember,as Fig B. 4) Tighten the glass panel with the 7 or 9 screws tightly. 5) Use screwdriver(not supplied) to loosen the 2 screws as Fig C, and remove the hanger. Fig A Fig B Fig C INSTALLATION 1.This heater is for wall mounting only. Do not attempt to use it free standing. 2.Referring to Fig. 3 below select a suitable position in which to mount the heater horizontally – use a spirit level to achieve this. 3.Check the wall to ensure there is no wiring, pipe wires etc in the area to be drilled. Drill 4 holes (8mm diameter & 40mm depth) using a suitable size drill and put the Plastic expansion into the holes. 4.First fix hanger to wall 5. Referring to Fig. 4,hang fireplace to hanger;. 6. Referring to Fig. 5,avoid fireplace to move,use screw fix fireplace to wall ; Warning! Always ensure the fireplace is at least 200mm above the floor! Be sure that the bolts have been fixed firmly enough to withstand the weight! Fig 5 Fig 3 Fig 4 OPERATION Remove all packaging before use. Control Panel (See also ‘Operating Instructions’ below) As shown in the photo below you will see the control panel in the right side of the heater. Plug the heater in to a suitable main outlet (see rating label on unit for power requirements). 1) “Power Switch ON/OFF” Set this switch to position “I“ to turn the product ON. Setting it to “O” to turn the product OFF. Turn on the fireplace the Power LED will be lighten. 2) “Heat control button” Push the “HEAT” button to cycle through as bellow HIGH heater work with 1500W “HEATER” LED for RED LOW heater work with 750W “HEATER” LED for Blue TEMP “HEATER” LED for Purple Adjusting to auto control by room temperature , the heater turns on and work with 1500W when room temperature is below 22°C, the heater turns on and work with 750W when room temperature is below 25°C and above22°C , the heater will turn off when the room temperature is above 25°C. Fig 6 1 Power switch 2. Heat control button 3. Flame control button 4. Heater LED 5. Power LED Operating by manual 3) “Flame control button” Push the FLAME control button to adjust the flame height and ember bed brightness. Press and release the FLAME control button to cycle through LO,MED, HI and OFF. Operating by Remote Control 4. “ ”buttons is on/off button; to control the red and blue lamp of flame and ember bed. 5. The Red buttons control the red brightness of flame and ember bed. To increase the brightness, press and release the button. Each time you press this button the brightness will increase by a small amount, until the maximum is reached. To decrease the brightness, press and release the button. Each time you press this button the brightness will decrease by small amount, until the minimum brightness is reached. 6. The BLUE buttons control the blue brightness of flame and ember bed. Fig 6 1. Plug in your electric fireplace. Important! The Main ON/OFF power switch on the fireplace must be in the ON position. 2. When operating the heater with the remote control, it must be pointed at the logset inside the electric stove and the red light must blink each time you press a function button. The blinking red light confirms the remote control is working. Note:Make sure your batteries are installed correctly in your remote control. 3. “ “button of the remote control at the top left is the main ON/OFF power button. To increase the brightness, press and release the button. Each time you press this button the brightness will increase by a small amount, until the maximum is reached. To decrease the brightness, press and release the button. Each time you press this button the brightness will decrease by small amount, until the minimum brightness is reached. 7. Button: To activate the heater,press the heater button, Heater work at the high ; press the Heater Button once,to turn off the heater. . PROBLEM Stove turns off and will not turn on HIGH heater work with 1500W “HEATER” LED for RED LOW heater work with 750W “HEATER” LED for Blue TEMP “HEATER” LED for Purple Adjusting to auto control by room temperature , the heater turns on and work with 1500W when roomemperature is below 22°C, the heater turns on and work with 750W when roomemperature is below 25°C and above22°C , the heater will turn off when the room temperature is above 25°C. 8. To turn the stove off, press the button once. Notice:This remote control must remain within 6 metres of the fireplace and not too far off to either side to be effective. Flame is not moving CAUSE CHECK Stove has Reset switch by overheated and turning main power safety device has switch off and caused thermal waiting 5 minutes switch to then turning it back disconnect or on. home circuit breaker has opened. Flame motor Call a qualified defective service technician to replace flame motor Flame sputters Flame motor is defective Call a qualified service technician to replace flame motor Log set and/or Flame is not glowing Ember LED PCB are burnt out Inspect LED PCB and replace it if necessary TROBULESHOOTING GUIDE Inspect wiring for loose Wiring is loose or replace if necessary CAUTION: Turn off the appliance and let it cool before servicing it. Only a qualified service person should service and repair the heater. CAUTION: The fireplace in connections and repair Remote control does not work Low batteries Replace new batteries in remote control