1
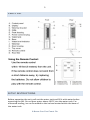
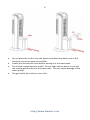
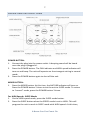
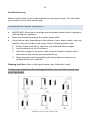
AF-310 Evaporative Cooling Fan OWNERS MANUAL Read and save these instructions. . 2 A Name You Can Trust Trust has to be earned and we will earn yours. Customer happiness is the focus of our business. From the factory to the warehouse, from the sales floor to your home, the whole NewAir family promises to provide you with innovative products, exceptional service, and support when you need it the most. Count on NewAir. As a proud NewAir owner, welcome to our family. There are no robots here, real people shipped your product and real people are here to help you. Thank you for your purchase and remember NewAir, A Name You Can Trust. Call us today at 855-963-9247 Or email [email protected] For future reference, we recommend you attach a copy of your sales receipt here and record the following information. You will need this information if it becomes necessary to contact the manufacturer for service inquiries. Date of Purchase: ___________________________________ Serial Number: ___________________________________ Model Number: ___________________________________ Connect with us online. http://www.NewAir.com 3 READ AND SAVE THESE INSTRUCTIONS. TABLE OF CONTENTS Safety Information & Warnings ........................................................................... 3 Parts List ............................................................................................................... 5 Setup Instructions ................................................................................................ 5 Operating Instructions ......................................................................................... 7 Cleaning & Maintenance .................................................................................... 11 Troubleshooting ................................................................................................. 12 Limited Manufacturer’s Warranty ..................................................................... 13 SPECIFICATIONS MODEL NO. VOLTAGE: CURRENT: FREQUENCY: POWER CONSUMPTION: WATER TANK CAPACITY: AVERAGE FULL TANK RUN TIME: AF-310 120V 0.67A 60Hz 80W 1 Gallon 16-20 Hours SAFETY INFORMATION & WARNINGS When using any electrical appliance, basic safety precautions must be followed in order to reduce the risk of fire, electrical shock and/or injury to persons or property. Be sure to read all instructions before using this appliance and observe the following safety tips: Make sure the power source conforms to the electrical requirements of this unit (AC120V/60Hz). A Name You Can Count On 4 Do not operate this appliance if it has a damaged cord or plug. If the power cord or plug is damaged, it must be replaced by the manufacturer or an authorized service facility in order to reduce the risk of fire. When not in use, disconnect the plug from the power outlet. When disconnecting the plug from the outlet, grasp the plug and not the main power cord. Be sure to drain the water out of the tank when not in use for a prolonged period of time. Do not disassemble or alter the unit. Do not use the unit in areas with extremely high or low temperatures (exceeding 120°F or below 32°F), or where it may be exposed to direct sunlight. To prevent water from splashing out of the tank, use care when moving the unit if it is full. Do not operate the unit near flammable liquids or in potentially dangerous locations. Do not put heavy objects on the unit as this may cause damage or unit malfunction. This appliance is not intended for use by people (including children) with reduced physical, sensory or mental capabilities, or lack of experience and knowledge, unless they have been given supervision or instruction concerning its use by a person responsible for their safety. Children should be supervised to ensure they do not play with the appliance. Before filling the unit with water, make sure the unit is switched off and unplugged from the power outlet. Also make sure the water level is below the MAX line indicator. Switch the unit off and unplug it before cleaning it or performing any maintenance. Because this appliance adds moisture to the air, to avoid excessive humidity, do not use it for an extended period of time in small, enclosed areas. Change the water frequently in order to keep it clean. This unit must be operated in an upright position and on a flat, level surface. Do not operate the unit in wet or damp locations. Do not install the unit in a small, confined space such as a closet or cabinet. http://www.NewAir.com 5 PARTS LIST SETUP INSTRUCTIONS Before operating the unit, pull out the water tank and fill it with water before operating the fan. Do not pour water above 100°F into the water tank. For enhanced cooling, ice can be added to the ice box located within the base of the water tank A Name You Can Count On 6 Please Note: Do not place the ice box into the water tank when the water tank is full. Doing so can cause water to overflow. Freeze the ice box each time before placing it in the water tank. The ice box is permanently sealed. Do not open the ice box or try to put the cooling gel directly into the water tank. This can cause damage to the water pump. The gel within the ice box is non-toxic. http://www.NewAir.com 7 OPERATING INSTRUCTIONS POWER BUTTON: 1. Connect the plug into the power outlet. A beeping sound will be heard once the plug is plugged in. 2. Press the POWER button. The FAN indicator and HIGH speed indicator will turn on and beep. The unit will operate on the strongest setting in normal mode. 3. Press the POWER button again to shut off the unit. MODE BUTTON: 1. Press the MODE button. At this time, the NATURE indicator will turn on. Press the POWER button 2 times to set the unit to SLEEP mode. To return to “normal” mode, press the POWER button 3 times. For HIGH Speed + SLEEP Mode: 1. On the HIGH speed mode, press the SLEEP mode button. 2. Press the SLEEP button when the SPEED mode is set to HIGH. This will program the unit to work in SLEEP mode with HIGH speed. At this time, A Name You Can Count On 8 both the HIGH and SLEEP indicators will turn on. The speed will automatically change as follows: First 0.5 Hour: The unit will alternate on HIGH and MED speed every 10 seconds. Second 0.5 Hour: The unit will switch to the MED speed setting. After 1 Hour Until Shut-Off: The unit will switch to the LOW speed setting. For MED Speed + SLEEP Mode: 1. Press the SLEEP button when the SPEED mode is set to MED. This will program the unit to work in SLEEP mode with MED speed. At this time, both the MED and SLEEP indicators will turn on. The speed will automatically change as follows: First 0.5 Hour: The unit will alternate on MED and LOW speeds every 10 seconds. After 0.5 Hour Until Shut-Off: The unit will operate on LOW speed. LOW Speed + SLEEP Mode: 1. Press the SLEEP button when the SPEED mode is set to LOW. This will program the unit to work in SLEEP mode with LOW speed. At this time, both the LOW and SLEEP indicators will turn on. The unit will operate on LOW speed every 10 seconds and stop 5 seconds while alternating every 15 seconds until the power turns off. HIGH Speed+ NATURE Mode: 1. Press the NATURE button when the SPEED mode is set to HIGH. This will program the unit to work in NATURE mode with HIGH speed. At this time, both the HIGH and NATURE indicators will turn on. The speed will automatically change according to this schedule: HIGH speed 5 sec. -> LOW speed 5 sec. -> MED speed 5 sec. -> stop 5 sec. -> MED speed 10 sec. -> HIGH speed 10 sec. -> MED speed 5 sec. -> LOW speed 5 sec. -> stop 5 sec. -> MED speed 5 sec. -> HIGH speed 5 sec. -> LOW speed 5 sec. -> stop 5 sec. The unit will operate in this cycle until the power is turned off. http://www.NewAir.com 9 MED Speed + NATURE Mode: 1. Press the NATURE button when the SPEED mode is set to MED speed. This will program the unit to work in NATURE mode with MED speed. At this time, both the MED and NATURE indicators will turn on. The speed will automatically change according to this schedule: MED speed 5 sec. -> LOW speed 5 sec. -> MED speed 5 sec. -> LOW 5 sec. -> stop 5 sec. -> MED speed 10 sec. -> LOW speed 10 sec. -> MED speed 5 sec. -> LOW 5 sec. -> stop 5 sec. -> MED speed 5 sec. -> LOW speed 5 sec. -> stop 5 sec. The unit will operate in this cycle until the power is turned off. LOW Speed + NATURE Mode: 1. Press the NATURE button when the SPEED mode is set to LOW speed. This will program the unit to work in NATURE mode with LOW speed. At this time, both the LOW and NATURE indicators will turn on. The speed will automatically change according to this schedule: MED speed 5 sec. -> LOW speed 15 sec. -> MED speed 5 sec. -> LOW 15 sec. -> stop 5 sec. -> MED speed 5 sec. -> LOW speed 10 sec. -> MED speed 5 sec. -> LOW 10 sec. -> stop 5 sec. -> MED speed 5 sec. -> LOW speed 20 sec. -> stop 5 sec. The unit will operate in this cycle until the power is turned off. SPEED Button 1. 2. When the POWER button is pressed, the HIGH speed indicator will turn on and the unit will operate on the highest setting. Press the SPEED button once again. At this time, the MED speed indicator will turn on and the unit will operate on the medium setting. A Name You Can Count On 10 3. Press the SPEED button once more. The LOW speed indicator will turn on and the unit will operate on the lowest setting. SWING Button 1. 2. Press the SWING button. At this time, the indicators will turn on and the louvers will swing (covers 60 degrees horizontally). Press the SWING button again to stop the unit at a desired position. The indicator will turn off at this time. TIMER Button 1. 2. Press the TIMER button to set the timer. Every press will add another 30 minutes of operating time with a maximum of 7.5 hours. The programmed time will be indicated on the display. To stop the timer, press the TIMER button a total of 16 times (one more press after reaching 7.5 hours). The TIMER indicator will turn off. COOL Button 1. 2. 3. Press the COOL button. If the tank is filled to a sufficient level, the COOL indicator will turn on and the pump will begin to work. After about 3 minutes, the unit will provide cool, humidified air. Press the COOL button again to shut off the pump. The COOL indicator will turn off, and the unit will produce fresh, dry air. Please Note: 1. If the COOL button is pressed when there is insufficient water in the tank, an alarm will sound after 90 seconds. The COOL indicator will continue to flash for 10 seconds. After 10 seconds, the alarm will stop and the COOL indicator will also turn off. 2. The unit can also be used without water. In this case, it will operate as a normal electric fan. If this is desired, make sure the COOL button is in OFF mode. http://www.NewAir.com 11 Air Direction Lever Adjust the direction of the inside wind bar by turning the lever. This will allow you to adjust the air flow horizontally. CLEANING & MAINTENANCE IMPORTANT: Disconnect the plug from the power outlet before cleaning or maintaining this appliance. Clean the outside housing with a moist, damp cloth. From time to time, depending on the nature of your water supply, you may need to clean the inside of the water tank by following these steps: 1. Fill the water tank with 1 cup (8 oz.) of undiluted white vinegar. 2. Let the solution sit for 20 minutes. 3. With the vinegar in the water tank, clean all interior surfaces with a soft cloth or use a brush to remove build-up. 4. Rinse the water tank thoroughly with clean water to remove any residual build-up or solution. Cleaning the Filter (refer to the figure below, then follow the steps) To keep your evaporative fan working efficiently, clean the filter system once every two weeks. A Name You Can Count On 12 1. 2. 3. 4. Remove the back cover and dust filter from the unit. Remove the cooling pad from the unit. Rinse the filter net and cooling pad with water, and then dry them in direct sunlight. Replace the filter and cooling pad. TROUBLESHOOTING Problem Possible Causes Solution The unit produces no air. Some parts are damaged. The unit cannot be turned off. Some parts may be damaged. Take the unit to an authorized service agency or technician for repairs. Take the unit to an authorized service agency or technician for repairs. The unit makes a lot of noise. Foreign objects are stuck inside the unit. Take off the side cover board and net and remove any foreign objects. The motor Is defective or the air wheel is loose. Take the unit to an authorized service agency or technician for repairs. There is insufficient water. Add water to the tank. The pump is defective or the water pipe has come off. Take the unit to an authorized service agency or technician for repairs. The swing motor is defective. Take the unit to an authorized service agency or technician for repairs. The fan doesn’t humidify. There is no swing. http://www.NewAir.com 13 LIMITED MANUFACTURER’S WARRANTY This appliance is covered by a limited manufacturer’s warranty. For one year from the original date of purchase, the manufacturer will repair or replace any parts of this appliance that prove to be defective in materials and workmanship, provided the appliance has been used under normal operating conditions as intended by the manufacturer. Warranty Terms: During the first year, any components of this appliance found to be defective due to materials or workmanship will be repaired or replaced, at the manufacturer’s discretion, at no charge to the original purchaser. The purchaser will be responsible for any removal or transportation costs. Warranty Exclusions: The warranty will not apply if damage is caused by any of the following: Power failure Damage in transit or when moving the appliance Improper power supply such as low voltage, defective household wiring or inadequate fuses Accident, alteration, misuse or abuse of the appliance such as using nonapproved accessories, inadequate air circulation in the room or abnormal operating conditions (extreme temperatures) Use in commercial or industrial applications Fire, water damage, theft, war, riot, hostility or acts of God such as hurricanes, floods, etc. Use of force or damage caused by external influences Adjustments to temperature by removal of sticker and/or screw Partially or completely dismantled appliances Obtaining Service: When making a warranty claim, please have the original bill of purchase with purchase date available. Once confirmed that your appliance is eligible for warranty service, all repairs will be performed by a NewAir™ authorized repair facility. The purchaser will be responsible for any removal or transportation costs. Replacement parts and/or units will be new, re-manufactured or refurbished and is subject to the manufacturer’s discretion. For technical support and warranty service, please email [email protected]. A Name You Can Count On