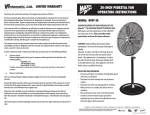
1
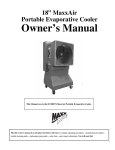
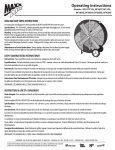
36” MaxxAir
Portable Evaporative Cooler
Owner’s Manual
This Manual covers all of the following MaxxAir Portable Evaporative Coolers.
EC36D1 – MaxxAir 36” Direct Drive 1 Speed
File this owner’s manual in a safe place for future reference. It contains operating procedures – maintenance procedures –
trouble shooting guide – replacement parts guide – order form – and contact information. You will need this!
1
Warnings and Cautions
Read before operating your MaxxAir Portable Evaporative Cooler
ELECTRICAL
WARNING
Do not use a 3 prong to 2 prong adapter on the electrical power cord. Use 12 gauge extension cord only.
WARNING
Do not remove the grounding lug from the electrical power cord plug.
Use only 3 prong, grounded receptacles.
WARNING
Disconnect the MaxxAir Portable Evaporative Cooler from your electrical power source before performing
any service action.
WARNING
Your MaxxAir unit must be plugged into a fused or circuit breaker protected 20 Amp, 120 Volt, 60 Hz circuit
– unless specifically manufactured for another voltage / frequency configuration. See manufacturer’s label on
cooler. A ground fault circuit interrupter protected circuit is strongly recommended.
WARNING
Check your units electric power cord for insulation breaks, cracks or fraying. If any of these conditions are
found DO NOT USE. See your distributor for immediate service replacement parts.
WARNING
Some electric motors require periodic oiling. Check your model for oil fill holes. A couple drops of light oil
per year normally will be sufficient. Heavy usage may require additional oil.
WARNING
To reduce the risk of fire or electrical shock, DO NOT USE with any solid-state speed control device.
WARNING
To reduce the risk of electrical shock or injury to persons, DO NOT USE cooler in a window.
WATER
WARNING
Do not connect your MaxxAir Portable Evaporative Cooler to any water source where water pressure exceeds
60 p.s.i. If your water source is above 60 p.s.i. you must use a pressure regulator (which can be found
at your local hardware store).
WARNING
ALWAYS TURN-OFF WATER AT THE SOURCE EVERY NIGHT.
2
MaxxAir Portable Evaporative Cooler
Table of Contents
1.0
Introduction
1.1 Quick Start
1.2 Operate unit for 2 weeks before adding Evap-O-Matic Tablets
2.0
How Evaporative Cooling Works
3.0
Unpacking your new MaxxAir unit
4.0
Set-up your MaxxAir unit
4.1 Connecting the electrical supply
4.2 Connecting the water supply
5.0
Operating procedures
5.1 Filling the units reservoir with water
5.2 Turn-on pump
5.3 Adjust water flow
5.4 Turn-on Fan
6.0
Daily Operating procedures
6.1 Turn-on pump
6.2 Adjust water flow
6.3 Turn-on fan
6.4 Turn-off unit
7.0
Maintenance
7.1 Access inside of unit
7.2 Removing the cooling media
7.3 Daily maintenance
7.4 Periodic maintenance
7.5 MaxxAir Trouble Shooting Guide
8.0
Storage
9.0
Wiring Diagrams for all 36” units
10.0
Warranty
File this owner’s manual in a safe place for future reference. It contains operating procedures – maintenance procedures –
trouble shooting guide – replacement parts guide – order form – and contact information. You will need this!
3
MaxxAir Portable Evaporative Cooler
1.0 Introduction
•
Your MaxxAir was tested 3 ways. Your unit was tested for 1. Maximum air flow at operating static pressure.
Only MaxxAir is tested in operating conditions with 2. Water and 3. Electricity before it is shipped.
•
MaxxAir is easy to operate – needs only tap water and electricity to operate.
•
MaxxAir is easy to move – roll your MaxxAir to the area you
want to cool. MaxxAir comes standard with straight and swivel /
lock casters which make moving your MaxxAir a breeze.
How the MaxxAir portable
evaporative cooler works
1.1 Quick Start – Your Quick Start Information is located inside the
information packet shipped with your unit.
Look on the front of your MaxxAir in a plastic sleeve.
1.2 Evap-O-Matic – Chemical Water Treatment. Operate your unit 2
weeks – flush out old water – add clean water – then add Chemical Water
Treatment tablet. Note; Tablet makes water foam which can cause unit to
spit droplets of water temporarily. Foam subsides in 1 – 2 working days.
You can order more tablets by calling 1.800.433.1626
2.0 How Evaporative Cooling Works
Keeping in mind that regular fans only circulate same temperature air - same humidity – your MaxxAir portable evaporative
cooler takes that same existing air, combines it with evaporating water (which dramatically lowers the temperature)
immediately relieving hot, dry areas, similar to the conditions when a natural rain storm approaches, the temperature drops
noticeably cooler, because the air is saturated with water. Because your air is now saturated with water it becomes
noticeably cooler. In high humidity areas the temperature will not be as cool – however, the MaxxAir was engineered
efficient to evaporate perspiration and sweat from employees to keep them cooler.
3.0 Unpacking your new MaxxAir unit
Note: Carefully examine your MaxxAir shipping carton for damage before
opening. If your carton is damaged – notify the shipper immediately!
Your EC36D1 unit was shipped on a wooden skid covered with a cardboard cover
and lid – strapped. First remove the straps then you may lift the whole cardboard
box off the unit and skid. Your MaxxAir must now be lifted off the wooden skid.
4.0 Set-up your MaxxAir unit.
Roll your MaxxAir unit to a level surface and lock the swivel casters to prevent
accidental movement.
Electrical cord for 120V, 20Amp connection.
Note: Standard ¾” water connection for
utility water source under 60 p.s.i.
4
4.1 Connecting the electrical supply
All MaxxAir models require regular 3 prongs, ground with 120 volt power supply. Plug electrical cord into receptacle. If
using an extension cord be sure it is rated for at least 20 amps for the distance your cord is running. To be safe – make sure
no other equipment is plugged into the same circuit. The MaxxAir should run smoothly on 20 amp, 120 volt, and 60 Hz
circuit.
4.2 Connecting the water supply
Connect standard water hose to female fitting on the right side of your MaxxAir (looking at the fan blade side). If your water
pressure is above 60 pounds per square inch (p.s.i). you must use a pressure regulator (which can be found at your local
hardware store). Note: Do not connect to water source exceeding 60 p.s.i. – this can cause damage to your MaxxAir.
5.0 Operating procedures
Back your MaxxAir unit up to a fresh air source such
as an open door or window so the unit can pull in
fresh air from the outside. Next, make sure you have
a natural exhaust at the opposite end of the room, bay
or building such as a window, door or bay door. This
will ensure maximum efficiency from your unit.
Finally make sure there are no obstructions between
your MaxxAir and the people / area you need to cool.
5.1 Filling the units reservoir with water
Once your water hose is connected – open the water
flow valve (located on the front of your unit) only
NOTE: EXTENDED COOLING ZONE: 40’ TO 50’ FROM MAXXAIR UNIT.
AIR MOVEMENT INCLUDES WARM AIR MIXING WITH COOLED AIR.
one and quarter (1 1/4) turns. This water flow valve
adjusts the amount of water to the unit. Next, turn water on and fill the reservoir with water. Listen carefully. You can hear
water filling the reservoir. Check your water connection – make sure there is no dripping. Once the reservoir is filled with
water the float valve will automatically shut off the water source. When you no longer
hear the water running – you know that the float valve is fully operational
(the water turns off automatically) and you are now ready to turn on the water pump.
Warning! Do not run water pump without water in the reservoir.
5.2 Turn-on pump
To turn-on the water pump - flip the toggle switch for the water pump to on. Switch is
located on front side of unit. Warning! Do not run water pump without water in the
reservoir. The water pump will now begin pumping water to the top of the unit so that
gravity will allow the water to run down the backside of unit inside and on the cooling
pads. (If the water is dripping off of the pads on to the floor – turn your fan on low –
close the flow valve a little to slow the water flow. After the pads are wet – you can
Top: Water control valve – controls water to
units water reservoir. Open 1 ¼ turns.
Bottom: Water hook-up for cleaning and
flushing water reservoir.
5
open the valve to 1 ¼ turn. Allow water to run for 10 – 15 minutes on new cooling pads to totally saturate them with water.
Once your units cooling pads are saturated – then, you are ready to turn on fan and begin to feel the cooling effect from your
new MaxxAir. Note: After your cooling pads are broken in (typically takes 1 -2 weeks in operation) it will take less time to
saturate pads for start-up.
5.4 Turn-on Fan
Once your cooling pads are wet – you may turn on your MaxxAir unit. Now you can begin to feel the MaxxAir difference in
temperature. After your MaxxAir has run for 5 minutes or so, visually inspect the pads – if water is dripping outside the unit
– you have too much water, simply turn the water flow valve to the right ½ turn and inspect water flow in another 5 minutes.
If there are dry streaks in the cel deck pads open the water flow valve handle ½ turn to increase water – check water flow in
another 5 minutes and adjust accordingly. Most MaxxAir operations work effectively with valve opened at 1 ¼ turns. This
water valve is efficient – it requires minimal turning.
6.0 Daily Operating procedures
6.1 Turn-on water supply to MaxxAir unit. Then, turn on water pump.
Turn on water pump to unit – then, turn on fan to low – let cooling pads get saturated – then turn fan on high for cooling.
Adjust the water flow – Your MaxxAir operates most efficiently – and maintains uniform cooling pad wetness with the
water control valve turned on at 1 ¼ turns. You must determine what works best for you and your specific environment.
6.2 Adjust water flow
Your MaxxAir operates most efficiently – and maintains uniform cooling pad wetness with the water control valve turned
on at 1 ¼ turns. You must determine what works best for you and your specific environment.
6.2 Turn on fan
When you can see that the cooling pads are saturated with water – turn fan on high and feel the cooler air coming from your
MaxxAir unit. Adjust the fan speed for your comfort.
6.4 Turn-off MaxxAir unit at end of day.
15 minutes before closing for the day – turn off water pump with toggle switch – leave fan running – this action will shut-off
water to the cooling pads while keeping the fan running. The fan will dry out the cooling pads. When the cooling pads are
thoroughly dry – turn off fan. Drying your cooling pads thoroughly - everyday will help prevent mold and mildew growth,
plus it will prolong the life of your cooling pads. Turn off water supply to unit.
7.0 Maintenance
7.1 Access inside of unit
Turn-off water pump and let the fan continue to run until the cooling pads are thoroughly dry (about 10 – 15 minutes). Once
your cooling pads are completely dry you may turn-off fan. Now unplug electricity to unit to avoid unnecessary shock. Next,
using a 7/16” wrench – remove the two retaining bolts from the backside and topside (cooling pad side) of the unit. These
6
two bolts hold the metal angle retaining bar and the cooling pads in place. Next, remove the angle retaining bar and set to
side. Now you are ready to remove your unit’s cooling pads.
7.2 Removing the cooling pads
Before your start, make a note of the direction of the angle of the pads flutes (see side
of pads). You must put pads back in correct order for your unit to function
effectively. (Note: Install steep side 45° angle flute to the back of unit.)
Once the retaining angle bar is removed from the top of your MaxxAir unit, reach to the
top of the dry cooling pad to the left and gently take hold of the top of the pad and gently
pull back and slightly down – this action will loosen the pad from the unit. Look at the
direction of the angle of the pad flutes (side of pads). Remove the cooling pad and proceed
to the next pad. Then, remove all five cooling pads and gently set in a safe place.
Note: this is a good time to take the cooling pads outside and run clean water over the pads to remove any accumulated dirt
and debris. Do not use high pressure hose – this will damage pads and their ability to function effectively. Make sure the
pads are thoroughly dry before placing back inside the unit. Full exposure to the sunlight is a good way to dry the pads
while helping remove mold and mildew.
7.3 Daily maintenance
15 minutes before quitting time – turn off the water pump and let the fan run 10 – 15 minutes – to dry out the cooling pads
before leaving. Inspect the cooling pads to make sure they are thoroughly dry (this action helps to reduce mold and mildew)
when pads are completely dry then turn-off fan.
7.4 Periodic maintenance
Depending upon your environment and how often you operate your MaxxAir will depend on how dirty your water gets in
the reservoir and how often you will need to clean it. If you begin to detect an algae smell coming from your unit – it’s time
to flush your MaxxAir reservoir with fresh water. Refer to and follow the steps above in 7.2 and you will only need to
remove 1 or 2 of the cooling pads from the left side of the unit to gain access to your water reservoir. Take a small sponge
and clean out your water reservoir with a light cleaner and wipe it down completely and let the unit dry. (You may want to
use a wet / dry shop vacuum to clean out unit). When unit is clean add an Evap-O-Matic tablet – then replace your cooling
pads (make sure flutes are facing correct direction) retaining bar and bolts and add fresh, clean water back to the units’ water
reservoir. Note: Adding Evap-O-Matic helps to reduce algae, mold and mildew. You can order more tablets by calling
1.800.433.1626.
Note: You may want to remove most of water from water reservoir by attaching a garden hose to the drain valve and place
the end of the garden hose into a drain then, running pump until sump is dry – shutting off pump immediately.
Warning! Do not run pump without water in the reservoir. This action will burn up your MaxxAir’s water pump.
7
7.5 MaxxAir Trouble Shooting Guide
Problem
Cause
Solution
1. Water on the Floor
A. Front of unit . . .
Too much water.
Reduce the water flow with the water control
valve located on the front of the unit. Note:
Close the valve all the way – then open 1 ¼
turns. (MaxxAir units usually operate at peak
performance at 1 ¼ turns).
Damage to polyethylene housing. Note:
Check for possible cracks in the blue
polyethylene.
Repair as necessary.
Excess water at top or bottom of pads.
Reduce the water flow with the water control
valve located on the front of the unit.
Damage to blue polyethylene housing.
Search for leaks and repair as necessary.
Leaking from bottom of pads.
Push bottom of cooling pads gently inside to
stop leaking.
Excessive water pressure.
Check you pressure. Max water pressure is 413
KPA (60 p.s.i.), adjust water supply valve to
1 ¼ turns or install a water pressure regulator
found at local hardware store.
Float valve maybe stuck in open position.
Contaminants in water; drain cooler, sump and
refill. If float remains stuck remove pads and
examine float for debris or damage. Wash out
debris and replace float. Continue.
New pad may have a temporary odor (this
is normal) – you may be smelling the
thermosetting resin on the new pads
– it will pass.
Drain and refill several times in first week to
remove thermosetting resin smell.
Add QC Tablets to reduce smell – and algae.
B. Back of unit
2. Found water on floor after
overnight shut off.
3. Foul odor from fan
A. New Unit . . .
Water should be drained about once a month or
sooner depending on your specific working
environment – the water quality and conditions.
B. After normal use . . .
Water quality – check your immediate
environment.
4. No water running over the
pads . . .
Check your water flow valve first.
Make sure your water flow valve is open.
MaxxAir units usually operate at peak
performance at 1 ¼ turns.
Water supply off at main valve source.
Open water valve at supply. You may wish to
keep this valve open at all times.
Pump switch is off.
Turn pump switch on.
Water filter may be clogged.
Remove the cooling pads see section 6.2. Open
back of unit – open water filter – pull out filter
screen and clean. Replace and try again.
8
Problem (continued)
Cause (continued)
Solution (continued)
5. Scale build-up on cooling pads.
Hard water with excessive mineral content.
Use Evapo-O-Matic Tablets or add a Water
Stabilizer at the discharge side of the pump.
Flush water from unit’s water reservoir more
frequently. See section 7.4.
8.0 Storage
Remove pads as described above in 7.2 and rinse pads clean with fresh water. Dry cooling pads in sunlight. Drain water
reservoir completely and wipe dry. Replace dry cooling pads. Replace top angle bar to hold pads in place. Store MaxxAir
in dry, clean area and cover to prevent dust build up to have unit ready for the next hot season.
9.0 Wiring Diagrams for all 36” units
9
10.0 Warranty
LIMITED WARRANTY
Ventamatic, Ltd. extends this warranty to the original retail purchaser of this fan against defects in materials and
workmanship for a period of one (1) year from the date of purchase. There is no warranty for defects caused by abuse. Repairs
or replacement parts supplied under this warranty are warranted only for the period of this warranty: that is one year from the
date of the original retail purchase of this fan.
In the event of a defect or malfunction, we will replace or repair the defective part or component only and return the new
repaired part to you freight prepaid. You must bear all other expenses incurred in obtaining repairs, including labor required for
field repair or replacement and the cost of shipping the defective part or component to us. You must also bear the cost of repair
to or replacement of any part or component and the shipping charges incurred for the repair or replacement and return to you of
any part or component not covered by this warranty, including parts or components damaged by you.
The company reserves the right to demand and receive written evidence of the date of purchase before undertaking to
perform it obligations under this warranty. You should, therefore, retain you sales slip and attach it to the warranty claim.
CALL OUR FACTORY FOR REPAIR OR REPLACEMENT PARTS
In order to obtain the repair or replacement parts or components, you must call our factory at 1.800.433.1626. Customer
service will provide detail instructions on how to proceed. DO NOT return to the retailer dealer.
There is no informal dispute settling mechanism available in the event of a controversy involving this warranty.
Any and all implied warranties which may exist terminate upon the termination of this written warranty, one year from the
date of original retail purchase. Some states do not allow limitations on how long an implied warranty lasts, so these limitations
may not apply to you.
Ventamatic, Ltd. is not liable to you for incidental or consequential damages arising out of a defect or malfunction of this
fan or out of any alleged breach of this warranty. Some states do not allow the exclusion or limitation of incidental or
consequential damages, so this limitation or exclusion may not apply to you.
This warranty gives you specific legal rights and you may also have other rights which may vary from state to state.
Ventamatic, LTD.
100 WASHINGTON STREET
MINERAL WELLS, TEXAS 76067
TELEPHONE: 940.325.7887
TOLL FREE: 1.800.433.1626
FAX: 940.325.9311
Visit us online at: www.bvc.com
10