1
 INTERIOR/EXTERIOR ROLL UP SHADE
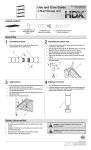
INSTALLATION INSTRUCTIONS
TOOLS NEEDED HARDWARE
1. Tape Measure A. Eyehook
2. Drill & 1/16 in bit B. Cord cleat
3. Pliers C. Wood screws (for cleat)
4. Pencil D. Mounting eyelets
E. Cord lock
VALANCE (ONLY CERTAIN STYLES)
Fold the valance over to the front of the blind. To be in the
correct position for hanging, the valance should cover the
cord lock and front of the headrail.
1. HOW TO INSTALL
Before releasing cord lock, make sure that cords are placed
under shade. Place cords under shade by taking one cord in
each hand and pulling out far enough so that cords can fit
under blind.
2. POSITION SHADE
Hold shade up to the window. Mark where the shade will
hang by drawing X’s through the mounting eyelets.
Make sure your marks for the screw holes are level or at least
the same distance from the top of the window. For bes
accuracy, measure the distance with a tape measure.
3. INSTALL EYEHOOKS
Drill 1/16 in holes at the X marks, insert eye hooks and
tighten. If necessary, use pliers to tighten. Make sure the
a > eye hooks are facing upwards once tightened.
4. HANG THE SHADE
To hang the shade, simply hook the mounting eyelets over
the eye hooks which you just tightened into the wall.
With the pulleys and cord lock facing the room, pull the cord
to one side to release the cord lock. You can now raise and
lower the shade.
INSTALL CORD CLEAT (Optional)
Find a convenient place several centimeters out from the
right hand side of the shade and about 1/4 of the way up
from the bottom. Hold the cord cleat up parallel with the
window frame. Mark dots through the holes. Make pilot
holes and put the cord cleat up with two small screws.
Cord can be wound in figure eights around the cord cleat
to hold shade at desired height.
kn
[
CORD RELEASE CLIP OPERATION
Figure A
Figure B
Figure C
This product is shipped with the cord release clip in the
downward safety release position as shown in Figure A.
This feature is designed to release the lift cord when a certain
amount of force is exerted on the cord. The purpose of this
release clip is to reduce the risk of accident, including child
strangulation in the loop of cords that run through the blind.
See Figure B.
If you want to prevent the clip from releasing, insert the clip
from the top of tube. This places it in the locked position to
be able to operate and lift the blind. This is not
recommended for use around children! See Figure C.
Note: In Figure C the safety release clip is LOCKED! The
safety feature is not in effect, and the clip WILL NOT release.
THIS IS NOT RECOMMENDED FOR USE AROUND
CHILDREN!
HOMEDEPOT.COM
THIS IS NOT RECOMMENDED FOR USE AROUND
CHILDREN!
CLEANING
May be cleaned with vacuum attachment
or duster.
Please contact 1-877-527-0313 for further assistance. 2