1
INS972D - 12/13
Please Contact Moen First
For Installation Help, Missing or
Replacement Parts
(USA)
1-800-BUY-MOEN (1-800-289-6636)
Mon - Fri 8:00 AM to 7:00 PM, Eastern
Sat. 9:00 AM to 3:00 PM Eastern
WWW.MOEN.COM
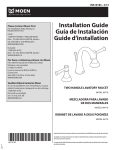
Installation Guide
Guía de Instalación
Guide d’installation
(Canada)
1-800-465-6130
Mon - Fri 7:30 AM to 7:00 PM, Eastern
WWW.MOEN.CA
Por favor, contacte primero con Moen
Para la ayuda de Instalación, los
Desaparecidos o las Piezas de Recambio
01-800-718-4345
Lunes a viernes de 8:00 a 20:00 hs.
(Costa Este)
Sáb. 8:00 a 18:30 hs. (Costa Este)
WWW.MOEN.MX
Veuillez d’abord contacter Moen
en cas de problèmes avec l’installation, ou pour
obtenir toute pièce manquante ou de rechange
1-800-465-6130
Du lundi au vendredi :
de 7 h 30 à 19 h, HE
WWW.MOEN.CA
TWO HANDLE TUB/SHOWER
MODEL 82009, 82402, 82402EP
MEZCLADORA PARA TINA/
REGADERA DE DOS MANERALES
MODELO 82009, 82402, 82402EP
ROBINET À DEUX POIGNÉES
POUR DOUCHE/BAIGNOIRE
MODÈLE 82009, 82402, 82402EP
HELPFUL TOOLS
For safety and ease of faucet replacement, Moen
recommends the use of these helpful tools.
HERRAMIENTAS ÚTILES
Para que el cambio de la llave sea fácil y seguro, Moen le
recomienda usar estas útiles herramientas.
A
B
C
OUTILS UTILES
Par mesure de sécurité et pour faciliter l’installation, Moen
suggère l’utilisation des outils suivants.
D
E
F X2
Thread seal tape
Cinta para sellar roscas
Ruban pour joints filetés
G
Sealant
Sellante
Mastic
H X2
I
CAUTION — TIPS FOR REMOVAL OF OLD FAUCET:
Always turn water supply OFF before removing
existing faucet or disassembling the valve. Open faucet
handle to relieve water pressure and ensure that complete
water shut-off has been accomplished.
X2
J
K
Option/Opción/Option
115034 =
CARE INSTRUCTIONS
To preserve the finish on the metallic parts of your Moen faucet, apply non-abrasive wax, such as car wax. Any cleaners
should be rinsed off immediately. Mild abrasives are acceptable on Platinum and LifeShine® finishes.
L
+
M
+
I
+
I
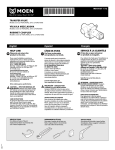
Parts List
A. Shower Arm Flange
B. Shower Arm
C. Shower Head
D. Flow Director
E. Valve Body
F. Wall Tube Escutcheon
PRECAUCIÓN — CONSEJOS PARA CAMBIAR LA LLAVE MEZCLADORA Siempre CIERRE la toma de
agua antes de quitar la llave existente o demontar la válvula.
Abra la llave para liberar la presión, y asegúrese de que esté
bien cerrada el agua.
Lista de piezas
INSTRUCCIONES DE CUIDADO
Para conservar el acabado que cubre las partes metálicas de
su llave mezcladora Moen, aplique cera que no sea abrasiva,
como una cera para autos. Si usa algún tipo de limpiador,
deberá enjuagarlo inmediatamente. Los abrasivos suaves
son aceptables en acabados Platinum y LifeShine®.
A. Shower Arm Flange
B. Shower Arm
C. Shower Head
D. Flow Director
E. Valve Body
F. Wall Tube Escutcheon
ATTENTION — SUGGESTIONS POUR ENLEVER
L’ANCIEN ROBINET : Toujours couper l’alimentation
en eau avant d’enlever ou de démonter le robinet. Ouvrir le
robinet pour libérer la pression d’eau et pour s’assurer que
l’alimentation en eau a bien été coupée.
Red
Rojo
Rouge
L
M
Blue
Azul
Bleu
97274
G. Cold Handle
H. Handle Screw
I. Handle Cap
J. Hot Handle
K.Tub Spout
L. Hot Temp Indicator (red)
M. Cold Temp Indicator (blue)
G. Cold Handle
H. Handle Screw
I. Handle Cap
J. Hot Handle
K.Tub Spout
L. Hot Temp Indicator (red)
M. Cold Temp Indicator
(blue)
Liste des pièces
A. Shower Arm Flange
B. Shower Arm
C. Shower Head
D. Flow Director
E. Valve Body
F. Wall Tube Escutcheon
G. Cold Handle
DIRECTIVES D’ENTRETIEN
Pour préserver le fini des pièces métalliques du robinet
Moen, appliquer une cire non abrasive comme une cire à voiture. Rincer immédiatement le robinet après l’avoir nettoyé
avec un agent nettoyant. Les finis Platinum et LifeShine®
peuvent être nettoyés à l’aide de produits abrasifs doux.
2
H. Handle Screw
I. Handle Cap
J. Hot Handle
K.Tub Spout
L. Hot Temp Indicator (red)
M. Cold Temp Indicator
(blue)
INS972D - 12/13
Use 1/2” Copper or
IPS Pipe Only
Use tubo de cobre de 1.27 cm
o tubería IPS solamente
Utiliser un tuyau en cuivre ou
IPS de 1/2 po seulement
2"-2 7/8"
(50-73mm)
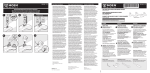
For ease of operation and best performance, install the valve body 32” above the
floor and the shower arm at 78” above the floor. The tub spout can be installed between 6” and 11” below the valve body using ½” copper tubing or the equivalent to
½” iron pipe size material. No more than one elbow is recommended.
If your supply lines are coming up to the valve from below, follow Step 1, then skip
to step 5. If your supply lines are coming down to the valve from above, follow Step
1 Optional, then step 1A – 4A
For ease of operation and best performance, install the valve body 32” above the
floor and the shower arm at 78” above the floor. The tub spout can be installed between 6” and 11” below the valve body using ½” copper tubing or the equivalent to
½” iron pipe size material. No more than one elbow is recommended.
If your supply lines are coming up to the valve from below, follow Step 1, then skip
to step 5. If your supply lines are coming down to the valve from above, follow Step
1 Optional, then step 1A – 4A
78"
(1420mm)
32"
For ease of operation and best performance, install the valve body 32” above the
floor and the shower arm at 78” above the floor. The tub spout can be installed between 6” and 11” below the valve body using ½” copper tubing or the equivalent to
½” iron pipe size material. No more than one elbow is recommended.
If your supply lines are coming up to the valve from below, follow Step 1, then skip
to step 5. If your supply lines are coming down to the valve from above, follow Step
1 Optional, then step 1A – 4A
(970mm)
6"min-11"max
(153-279mm)
3-3
/4"
(95
mm
)
1
K
1
Thread seal tape
Cinta para sellar roscas
Ruban pour joints filetés
1
IPS
Optional/Optionnel/Opcional
CC
E
GO TO
VAYA AL PASO
ALLER À L'ÉTAPE
5
or
o
ou
E
GO TO
VAYA AL PASO
ALLER À L'ÉTAPE
5
This valve (E) can be plumbed using threaded connections (IPS). The water
inlets, the outlets to the tub spout and to the showerhead are ½” male pipe
thread. Use thread seal tape when making these connections. Wrap the tape
onto the threads in the same direction the adapter will thread on. Go to step 5.
This valve (E) can be plumbed using threaded connections (IPS). The water
inlets, the outlets to the tub spout and to the showerhead are ½” male pipe
thread. Use thread seal tape when making these connections. Wrap the tape
onto the threads in the same direction the adapter will thread on. Go to step 5.
This valve (E) can be plumbed using threaded connections (IPS). The water
inlets, the outlets to the tub spout and to the showerhead are ½” male pipe
thread. Use thread seal tape when making these connections. Wrap the tape
onto the threads in the same direction the adapter will thread on. Go to step 5.
3
If soldering copper tubing (CC) into valve (E) insert ½” copper tubing into
the hot and cold water inlets and the shower riser and tub drop outlets.
Then, go to step 5
If soldering copper tubing (CC) into valve (E) insert ½” copper tubing into
the hot and cold water inlets and the shower riser and tub drop outlets.
Then, go to step 5
If soldering copper tubing (CC) into valve (E) insert ½” copper tubing into
the hot and cold water inlets and the shower riser and tub drop outlets.
Then, go to step 5
Supply Lines From Above Valve / Supply Lines From Above Valve / Supply Lines From Above Valve
1A
SUPPLY LINES FROM ABOVE VALVE
SUPPLY LINES FROM ABOVE VALVE
SUPPLY LINES FROM ABOVE VALVE
1
2A
E
E
D
2
Position the valve as seen in 1b. Locate and remove the Flow Director (D)
in the top outlet of the valve using a flat head screwdriver.
Position the valve as seen in 1b. Locate and remove the Flow Director (D)
in the top outlet of the valve using a flat head screwdriver.
Position the valve as seen in 1b. Locate and remove the Flow Director (D)
in the top outlet of the valve using a flat head screwdriver.
Rotate the valve over as seen in 2b.
Rotate the valve over as seen in 2b.
Rotate the valve over as seen in 2b.
3A
D
1
2
Install the Flow Director (D) into the valve as shown.
Install the Flow Director (D) into the valve as shown.
Install the Flow Director (D) into the valve as shown.
4
INS972D
INS1970 - 12/13
12/11
4A
4A
Optional/Optionnel/Opcional
IPS
CC
or
o
ou
E
E
Thread seal tape
Cinta para sellar roscas
Ruban pour joints filetés
GO TO
VAYA AL PASO
ALLER À L'ÉTAPE
GO TO
VAYA AL PASO
ALLER À L'ÉTAPE
5
5
This valve (E) can be plumbed using threaded connections (IPS). The water
inlets, the outlets to the tub spout and to the showerhead are ½” male pipe
thread. Use thread seal tape when making these connections. Wrap the tape
onto the threads in the same direction the adapter will thread on.
This valve (E) can be plumbed using threaded connections (IPS). The water
inlets, the outlets to the tub spout and to the showerhead are ½” male pipe
thread. Use thread seal tape when making these connections. Wrap the tape
onto the threads in the same direction the adapter will thread on.
This valve (E) can be plumbed using threaded connections (IPS). The water
inlets, the outlets to the tub spout and to the showerhead are ½” male pipe
thread. Use thread seal tape when making these connections. Wrap the tape
onto the threads in the same direction the adapter will thread on.
If soldering copper tubing (CC) into valve (E) insert ½” copper tubing into
the hot and cold water inlets and the shower riser and tub drop outlets.
If soldering copper tubing (CC) into valve (E) insert ½” copper tubing into
the hot and cold water inlets and the shower riser and tub drop outlets.
If soldering copper tubing (CC) into valve (E) insert ½” copper tubing into
the hot and cold water inlets and the shower riser and tub drop outlets.
6
5
G
C
F
G
G
H
J
Apply plumbers putty or other sealant to the area surrounding the wall tubes.
Apply plumbers putty or other sealant to the area surrounding the wall tubes.
Apply plumbers putty or other sealant to the area surrounding the wall tubes.
5
Slide wall tube escutcheons (F) over wall tubes. The cold handle (G) has a
“C” stamped inside as shown and is to be installed on the right side. The hot
handle (J) has a “H” stamped inside and is to be installed on the left side.
Thread screws (H) into handles.
Slide wall tube escutcheons (F) over wall tubes. The cold handle (G) has a
“C” stamped inside as shown and is to be installed on the right side. The hot
handle (J) has a “H” stamped inside and is to be installed on the left side.
Thread screws (H) into handles.
Slide wall tube escutcheons (F) over wall tubes. The cold handle (G) has a
“C” stamped inside as shown and is to be installed on the right side. The hot
handle (J) has a “H” stamped inside and is to be installed on the left side.
Thread screws (H) into handles.
7
Option/Opción/Option
M
Blue
Azul
Bleu
8
1
2
B
I
Thread seal tape
Cinta para sellar roscas
Ruban pour joints filetés
I
Option/Opción/Option
L
Red
Rojo
Rouge
If desired, the blue cold temperature indicator (M) and the red hot temperature indicator (L) can be installed onto the handles and are held in place by the
handle caps (I). If no temperature indicators are wanted, install the caps (I) into
the handles as shown.
If desired, the blue cold temperature indicator (M) and the red hot temperature indicator (L) can be installed onto the handles and are held in place by the
handle caps (I). If no temperature indicators are wanted, install the caps (I) into
the handles as shown.
If desired, the blue cold temperature indicator (M) and the red hot temperature indicator (L) can be installed onto the handles and are held in place by the
handle caps (I). If no temperature indicators are wanted, install the caps (I) into
the handles as shown.
A
1
9
Wrap thread seal tape onto the shower arm (B) threads clockwise. Thread
shower arm (B) clockwise into shower arm elbow in wall. Apply plumbers
putty or other sealant to the area surrounding the wall area and pipe.
Wrap thread seal tape onto the shower arm (B) threads clockwise. Thread
shower arm (B) clockwise into shower arm elbow in wall. Apply plumbers
putty or other sealant to the area surrounding the wall area and pipe.
Wrap thread seal tape onto the shower arm (B) threads clockwise. Thread
shower arm (B) clockwise into shower arm elbow in wall. Apply plumbers
putty or other sealant to the area surrounding the wall area and pipe.
10
B
3
2
Thread seal tape
Cinta para sellar roscas
Ruban pour joints filetés
3-3
/4"
C
Slide the shower arm escutcheon (A) onto shower arm (B).
Slide the shower arm escutcheon (A) onto shower arm (B).
Slide the shower arm escutcheon (A) onto shower arm (B).
(95
mm
)
The threaded pipe for the tub spout should protrude 4-1/16” out from the
finished wall. Apply a sealant between the wall opening and the pipe.
The threaded pipe for the tub spout should protrude 4-1/16” out from the
finished wall. Apply a sealant between the wall opening and the pipe.
The threaded pipe for the tub spout should protrude 4-1/16” out from the
finished wall. Apply a sealant between the wall opening and the pipe.
6
INS972D
INS1970 - 12/13
12/11
11
Thread seal tape
Cinta para sellar roscas
Ruban pour joints filetés
12
Handle Adapter
Handle Adapter
Handle Adapter
3-3
/4"
(95
mm
)
2
1
G
2
2
K
1
H
1
Wrap thread seal tape clockwise on the pipe threads. Thread the tub spout
(K) onto the pipe.
Wrap thread seal tape clockwise on the pipe threads. Thread the tub spout
(K) onto the pipe.
Wrap thread seal tape clockwise on the pipe threads. Thread the tub spout
(K) onto the pipe.
Installation complete.
Installation complete.
Installation complete.
7
IF HANDLE ROTATION IS REVERSED: To adjust handle orientation, note handle
position, remove handle, pull out the handle adapter, replace the handle
without screw and turn to the desired postition. Push in on handle to reengage the handle adapter and replace handle screw and other handle parts.
IF HANDLE ROTATION IS REVERSED: To adjust handle orientation, note handle
position, remove handle, pull out the handle adapter, replace the handle
without screw and turn to the desired postition. Push in on handle to reengage the handle adapter and replace handle screw and other handle parts.
IF HANDLE ROTATION IS REVERSED: To adjust handle orientation, note handle
position, remove handle, pull out the handle adapter, replace the handle
without screw and turn to the desired postition. Push in on handle to reengage the handle adapter and replace handle screw and other handle parts.
Moen Limited Lifetime Warranty
Moen products have been manufactured under the highest standards of quality
and workmanship. Moen warrants to the original consumer purchaser for as long
as the original consumer purchaser owns their home (the “Warranty Period” for
homeowners), that this faucet will be leak- and drip-free during normal use and
all parts and finishes of this faucet will be free from defects in material and manufacturing workmanship. All other purchasers (including purchasers for industrial,
commercial and business use) are warranted for a period of 5 years from the
original date of purchase (the “Warranty Period” for non-homeowners).
If this faucet should ever develop a leak or drip during the Warranty Period,
Moen will FREE OF CHARGE provide the parts necessary to put the faucet back
in good working condition and will replace FREE OF CHARGE any part or finish
that proves defective in material and manufacturing workmanship, under normal
installation, use and service. Replacement parts may be obtained by calling
1-800-289-6636 (Canada 1-800-465-6130), or by writing to the address shown.
Proof of purchase (original sales receipt) from the original consumer purchaser
must accompany all warranty claims. Defects or damage caused by the use of
other than genuine Moen parts is not covered by this warranty. This warranty is
applicable only to faucets purchased after December, 1995 and shall be effective
from the date of purchase as shown on purchaser’s receipt.
This warranty is extensive in that it covers replacement of all defective parts
and finishes. However, damage due to installation error, product abuse, product
misuse, or use of cleaners containing abrasives, alcohol or other organic solvents,
whether performed by a contractor, service company, or yourself, are excluded
from this warranty. Moen will not be responsible for labor charges and/or damage incurred in installation, repair or replacement, nor for any indirect, incidental
or consequential damages, losses, injury or costs of any nature relating to this
faucet. Except as provided by law, this warranty is in lieu of and excludes all other
warranties, conditions and guarantees, whether expressed or implied, statutory
or otherwise, including without restriction those of merchantability or of fitness
for use.
Some states, provinces and nations do not allow the exclusion or limitation of
incidental or consequential damages, so the above limitations or exclusions may
not apply to you. This warranty gives you specific legal rights and you may also
have other rights which vary from state to state, province to province, nation
to nation. Moen will advise you of the procedure to follow in making warranty
claims. Simply write to Moen Incorporated using the address below. Explain the
defect and include proof of purchase and your name, address, area code and
telephone number.
Moen Incorporated, 25300 Al Moen Drive, North Olmsted, Ohio 44070-8022
U.S.A.
Moen le otorga Garantía limitada de por vida
Los productos Moen son fabricados bajo las más estrictas normas de calidad y
mano de obra. Moen le garantiza al comprador original que durante el tiempo
que la tenga su casa (el “periodo de garantía”, para los propietarios), esta llave
no tendrá ni goteras ni fugas durante el uso normal, y que todas las piezas y
acabados estarán libres de defectos en material y mano de obra. Asimismo, a
todos nuestros otros consumidores (industriales, comerciales y empresariales), les
otorgamos 5 años de garantía a partir de la fecha original de compra (el “periodo
de garantía” para usos no domésticos).
Si en esta llave mezcladora se llegara a producir alguna fuga o gotera durante
el periodo de garantía, Moen le proporcionará SIN COSTO ALGUNO las piezas
necesarias para que vuelva a funcionar en perfectas condiciones y reemplazará
también SIN COSTO para usted, cualquier pieza o acabado que pudiera tener
algún defecto en la fabricación o mano de obra, bajo condiciones normales de
instalación, uso y servicio. Las piezas de repuesto se pueden obtener llamando
en la República Mexicana al 01-800-718-4345 o si escribe en la dirección que
aparece aquí. Para que el comprador original pueda hacer efectiva la garantía,
cualquier reclamación deberá ir acompañada por el comprobante de compra
(nota de venta original). La garantía no cubre los defectos o daños causados
por el uso de otras partes que no sean piezas originales Moen. Esta garantía es
aplicable sólo para las llaves compradas después de diciembre de 1995, y entrará
en vigencia a partir de la fecha que aparece en la nota de compra.
Esta garantía es amplia en el sentido que cubreel reemplazo de todas las partes
y acabados defectuosos. Sin embargo, se excluyen de esta garantía los daños
Moen Inc.
2816 Bristol Circle
Oakville, Ontario L6H 5S7
INS972D - 12/13
©2013 Moen Incorporated
causados por un error de instalación, abuso del producto, mal uso del mismo,
o uso de limpiadores que contengan abrasivos, alcohol u otros solventes
orgánicos, ya sea por parte del contratista, compañía de servicio o usted mismo.
Moen no se hace tampoco responsable por los gastos de mano de obra ni por los
daños incurridos en la instalación, reparación o sustitución, ni por ningún daño
indirecto, directo o consecuente, ni por pérdidas, lesiones o costos de alguna
otra índole relacionados con esta llave. A menos que lo estipule la ley, esta garantía reemplaza y excluye cualquier otra garantía y condiciones, ya sea expresas
o implícitas, establecidas por la ley o de otra manera, incluyendo sin restricción
aquellas en que el producto se encuentra en condiciones aptas para la venta o se
adecúa al uso específico para el cual fue adquirido.
Algunos estados, provincias y naciones no permiten la exclusión o limitación
de los daños incidentales o consecuentes, de modo que las limitaciones o
exclusiones mencionadas pueden no ser aplicables a usted. Esta garantía le
otorga derechos legales específicos y usted puede también tener otros derechos
que cambian de un estado a otro o de una provincia o nación a otra. Moen lo
asesorará en el procedimiento a seguir para hacer válida esta garantía. Sencillamente escriba a Moen Incorporated utilizando la dirección que aparece a
continuación. Explique el tipo de defecto e incluya comprobantes de compra, su
nombre, dirección, código de área y número de teléfono.
Moen de Mexico, S.A. de C.V., Carretera Saltillo-Monterrey KM 14.7, Ramos Arizpe,
Coahuila, Mexico 25900
Garantie à vie limitée de Moen
Les produits Moen sont fabriqués selon les normes les plus élevées de qualité et
de main-d’œuvre. Moen garantit à l’acheteur original, tant qu’il sera propriétaire
de la maison (la «période de garantie» des propriétaires), que ce robinet sera libre
de toute fuite pendant son usage normal et qu’aucune pièce et qu’aucun fini de
ce robinet ne présenteront de défaut de matériel et de main-d’œuvre en usine.
Tous les autres achats (y compris les achats à des fins industrielles, commerciales
et d’affaires) sont garantis pendant cinq (5) ans à compter de la date d’achat
originale (période de garantie commerciale).
Si ce robinet fuit ou dégoutte durant la période de garantie, Moen s’engage à
fournir GRATUITEMENT les pièces de rechange requises pour remettre le robinet
en étatde fonctionnement ainsi qu’à remplacer GRATUITEMENT toute pièce ou
tout fini dont le matériel, la fabrication ou la main-d’œuvre, lors de l’installation,
de l’usage et du service habituels, s’avèrent défectueux. On peut obtenir les
pièces de rechange en composant le 1 800 465-6130 ou en écrivant à l’adresse
indiquée ci-dessous. Le reçu de vente original de l’acheteur initial du robinet
doit accompagner toute réclamation. Les défauts ou les dommages causés par
l’utilisation de pièces non fournies par Moen ne sont pas couverts par cette
garantie. Cette garantie s’applique uniquement aux robinets achetés après
décembre 1995 et entre en vigueur à compter de la date d’achat indiquée sur le
reçu de caisse du client.
Cette garantie s’étend aussi au remplacement de toute pièce ou de tout fini
défectueux. Cependant, sont exclus de cette garantie, les dommages causés
par une erreur d’installation, un abus du produit, une mauvaise utilisation du
produit, l’utilisation de produits de nettoyage contenant des agents abrasifs, de
l’alcool ou des solvants organiques, qu’ils soient utilisés par un entrepreneur, une
entreprise de service ou le consommateur. Moen décline toute responsabilité
quant aux frais de main-d’œuvre et aux dommages causés durant l’installation,
la réparation ou le remplacement, et aux dommages, pertes, blessures ou coûts,
indirects ou consécutifs, connexes à ce robinet. Sauf lorsque la loi le stipule, cette
garantie remplace et exclut toutes les autres garanties et conditions, qu’elles
soient indiquées expressément ou non, obligatoires ou autres, y compris, sans
restriction, celles qui visent la commercialisation ou l’aptitude d’utilisation.
Certains pays, états ou provinces ne permettent aucune exclusion, ni limitation
suite aux dommages indirects ou consécutifs. Les limitations ou les exclusions
précitées ne s’appliqueraient pas dans ces cas. Cette garantie accorde des droits
juridiques et il est possible que d’autres droits soient applicables selon l’état, la
province ou le pays. Moen avisera le consommateur de la procédure à suivre
pour soumettre une réclamation. Il suffit d’écrire à Moen inc. à l’adresse indiquée
ci-dessous, pour expliquer le défaut, d’inclure une preuve d’achat, d’inscrire son
nom, son adresse ainsi que son indicatif régional et son numéro de téléphone.
Moen Inc., 2816 Bristol Circle, Oakville, Ontario L6H 5S7
Moen Incorporated
25300 Al Moen Drive
North Olmsted, Ohio 44070-8022
U.S.A.
Moen de Mexico, S.A. de C.V.
Carretera Saltillo-Monterrey KM 14.7
Ramos Arizpe, Coahuila
Mexico 25900