1
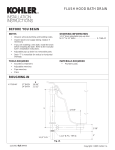
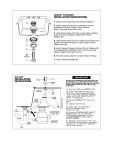
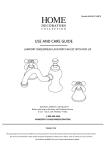
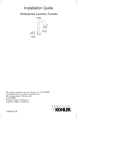
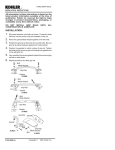
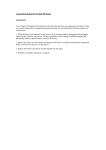
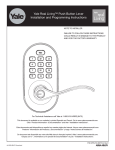
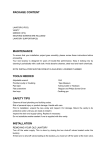
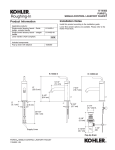
INSTALLATION
INSTRUCTIONS
WIDESPREAD
LAVATORY
FAUCETS
BEFORE YOU BEGIN
NOTES
Shut off the main water supply.
Inspect the supply tubing for damage. Replace
as necessary.
Observe local plumbing codes.
If possible, install this faucet before installing the
lavatory.
Kohler Co. reserves the right to make
revisions in the design of faucets
without notice, as specified in the Price
Book.
Hacksaw or tubing cutter
Pipe wrench
Channel lock pliers
TOOLS AND MATERIALS RECOMMENDED
Adjustable wrench
Thread sealant
Plumbers putty
INSTALLATION
FAUCET
Apply a ring of plumbers putty or other sealant to
the underside of the spout according to the putty
manufacturer’s instructions. Fit the spout
through the center lavatory hole.
Install the metal washer and nut, and securely
wrench tighten the nut.
Remove any excess putty or sealant.
Thread the shank nut about halfway up the spout
shank.
Remove and retain the guide tube nut and
O-ring from the supply tee.
Insert the plastic gasket and rubber washer into
the supply tee. Slide the metal washer on the
spout shank, and thread the supply tee to the
spout shank until hand tight.
Align the supply arms to the sides, and carefully
wrench tighten the hex end of the supply tee.
Thread the shank nut down against the supply
tee, and securely wrench tighten.
Slide a compression nut and ferrule onto each
supply arm.
Slip the O-ring over the guide tube, and wrench
tighten the guide tube nut to the supply tee.
Apply Plumbers
Putty
Metal
Washer
Nut
Shank Nut
Shank Nut
Spout Shank
Rubber Washer
Plastic Gasket
Tee Hex-End
Guide
Tube Nut
Metal Washer
Guide Tube
Supply Tee
Supply Inlet
Compression
Nut
Ferrule
O-Ring
116570-2-AA (B)
1999 Kohler Co.
Thread a locknut all the way onto each end body
so the flat surface of the locknut faces the top of the
end body.
Slide a fiber washer on each end body, and insert
the end bodies into the side lavatory holes from the
bottom of the lavatory. Make sure you install the
end body marked with blue tape (cold) in the
right-hand hole (as viewed from the front of the
lavatory).
Apply a ring of plumbers putty or other sealant
around the underside of each escutcheon according
to the putty manufacturer’s instructions. Thread the
escutcheons to the end bodies until hand tight.
Align the end bodies so the supply arms fit evenly
into the end body supply outlets.
Hold the end bodies firmly in place, and securely
wrench tighten the locknuts.
Remove any excess putty or sealant.
Turn the end body valve stems fully clockwise to
close the valves.
Install a spline adapter and handle to each valve
stem. Secure each handle with either a standard
screw and cap, or a vandal-resistant screw with a
color-coded cap.
Escutcheon
Apply Plumbers
Putty
Fiber Washer
Locknut
End Body
Spline
Adapter
Handle
DETERMINE YOUR DRAIN STYLE AND FOLLOW THE APPROPRIATE INSTALLATION
STEPS.
DRAIN (CP AND PB FINISHES)
Remove the protective seal from the flange.
Apply a 1/2” diameter ring of plumbers putty or
other sealant around the underside of the flange
according to the putty manufacturer’s instructions.
Insert the flange into the lavatory drain hole.
Assemble the gasket (tapered side up) and
washer to the flange, and partially thread the nut
to the flange. Do not fully tighten the nut at this
time.
Install the body washer and body to the flange,
and wrench tighten.
Position the body so the seal hole is facing
toward the back of the lavatory.
Handtighten the nut.
Remove any excess putty or sealant.
116570-2-AA (B)
2
Flange
Apply Plumbers
Putty
Gasket
Seal Hole
Washer
Nut
Body Washer
Body
Kohler Co., Kohler, WI
DRAIN (OTHER FINISHES)
Remove the flange from the body.
Thread the nut completely onto the body.
Apply a 1/2” diameter ring of plumbers putty or
other sealant to the underside of the drain flange
according to the putty manufacturer’s instructions.
Insert the drain body up into the underside of the
lavatory drain hole.
Position the body so the seal hole is facing toward
the back of the lavatory.
Thread the flange onto the drain body from the
topside of the lavatory.
Securely handtighten the nut from the underside of
the lavatory.
Remove any excess putty or sealant.
Assemble the nylon washer, metal washer, and
nut onto the long end of the rod.
Assemble the nylon washer and rubber washer
onto the short end of the rod.
Flange
Apply Plumbers
Putty
Seal
Hole
Body
Lavatory
Underside
Nut
Metal Washer
Nylon Washer
Rod
Nut
Nylon Washer
Rubber Washer
ALL DRAINS
Insert the stopper into the flange.
Remove the body nut from the seal hole.
Fit the short end of the rod into the body seal hole
and under the stopper for regular installations;
through the hole for vandal-resistant installations.
Loosely secure in place with the body nut.
Remove and adjust the stopper so the stopper lifts
about 3/8” when opened. To adjust, loosen the
stopper nut and shorten or lengthen the stopper as
needed. Re-tighten the stopper nut.
Handtighten the body nut.
Apply thread sealant to the tailpiece. Thread the
tailpiece into the body and securely handtighten.
Slide the clip and the link onto the rod with the
thumb screw facing toward the back of the
lavatory.
To move the link to the proper position, squeeze
the clip and slide it along the rod.
Push the rod down (open position).
Stopper
Stopper
Nut
Body
Nut
Rod
Body
Seal Hole
Apply Thread
Sealant
Tailpiece
Thumb Screw
Link
Clip
Rod
Kohler Co., Kohler, WI
3
116570-2-AA (B)
Lift Rod
Slide the faucet lift rod through the hole in the
spout and through the hole in the link.
Tighten the thumb screw on the link so the lift
rod knob is 1/2” above the lift rod hole.
1/2”
IF THE LAVATORY IS NOT INSTALLED, INSTALL IT AT THIS TIME. BE SURE TO
FOLLOW ALL INSTRUCTIONS PACKED WITH THE LAVATORY.
SUPPLIES AND STOPS
Connect the supply tubes to the faucet end
bodies and supply stops. (Left is hot – right is
cold.)
Tighten all connections.
Compression
Union
Nut
COLD
HOT
INSTALLATION CHECKOUT
Connect the tailpiece and P-trap.
Ensure that all connections are tight.
Remove the aerator.
Open the drain.
su ly and check for
Turn on the main water supply
leaks.
Open both hot and cold valves and run water
through the spout to remove any debris. Turn the
valves off.
Reinstall the aerator.
Spout
Aerator
CALL US FOR HELP – 1-800-4-KOHLER
REQUESTING SERVICE
Here’s what you need to do if you require service:
First review the installation instructions to ensure correct installation. If you are still unable to correct
the problem, call our Customer Service Department for direct help. Dial 1-800-4-KOHLER.
116570-2-AA (B)
4
Kohler Co., Kohler, WI