1
R
R
HOW TO INSTALL
MOLDED STONE
SHOWER BASES
R
NOTE: DO NOT STORE UNITS OUT OF
DOORS - KEEP OUT OF SUNLIGHT.
An opening in the slab or sub floor must be provided
to permit the molded in drain boss to extend below
the floor surface. The opening should be 5” x 5”
minimum in size.
Keep the unit cartoned all the way to the bathroom
site for added protection. Unit should be handled with
care.
When installing unit, lay cardboard or a drop cloth on
the unit floor to protect it from damage.
See the applicable PRODUCT DIAGRAM for the
dimensional information of the product you are installing
when planning the framed pocket.
Preparation for Installation
Space studs on fitting
wall to provide room
to install control valves
and water supply
pipes.
Study all job prints, specifications, and instructions.
Check the level and quality of sub floor.
PRODUCT DIAGRAMS
ROUGHING-IN DIMENSIONS SHOWN IN CIRCLES
D
D
D
B
A
B
A
A
C
A
C
A
A
MODEL
NO.
32WL
34WL
36WL
42WL
48WL
54WL
60WL
34WLD
36WLD
36WLC
38WLC
4242WL
4832WL
A
C
A
A
A
NOMINAL SIZE
_ 1/16
ACTUAL SIZE +
A
B
A
B
A
B
C
D
32
34
36
42
48
54
60
34
36
36
38
42
48
32
34
36
34
34
54
34
34
36
36
38
42
32
32
34-1/4
36
42
48
54-3/8
60
34-1/4
36-1/4
36
38-1/4
42
48-3/16
32
34-1/4
36
34
34
34-1/4
34
34-1/4
36-1/4
36
38-1/4
42
32-1/8
32-3/8
34-5/8
36-3/8
42-3/8
48-3/8
54-11/16
60-3/8
34-7/16
36-7/16
36-3/16
38-7/16
42-1/4
48-1/2
32-3/16
34-7/16
36-3/16
34-3/16
34-3/16
34-9/16
34-3/16
34-7/16
36-7/16
36-3/16
38-7/16
42-1/4
32-1/4
16-3/16
17-5/16
18-3/16
21-3/16
24-3/16
27-3/8
30-3/16
17-1/4
18-1/4
12-3/16
12-5/16
21-1/8
24-1/4
16-1/8
17-1/4
18-1/8
17-1/8
17-1/8
17-5/16
17-1/8
17-1/4
18-1/4
12-3/16
12-5/16
21-1/8
16-1/8
ROUGHING - IN DIMENSIONS
APPROX.
SHIPPING
WT. lbs.
29
31
34
36
42
47
51
34
36
36
39
48
41
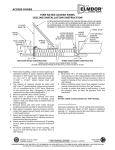
Place shower floor in studded alcove. To level
shower floor, place level across dam and along
side. Shim if required using durable material.
Space unit in alcove as indicated in Note “A”.
Shower floor is not fastened to the studs.
If using drywall for shower walls, be sure to
waterproof wall surface. Use waterproof adhesive
when installing ceramic tile.
Install drywall onto studs:
1/2” recommended.
Studding
Install shower drain fitting. Slip 2” diameter pipe
(supplied by installer) through shower drain hole
in receptor.
Install Rubber Gasket over the drain pipe. Use
a screw driver to make sure the gasket is seated
to the bottom of the drain receptor.
Complete installation by snapping Strainer into
place.
NOTE: Watertight installation of the drain is
installers responsibility. Drain leakage is excluded
from the limited warranty.
Use approved waterproof
ceramic tile adhesive.
Strainer
Rubber
Gasket
Ceramic Tile
NOTE “A”
Clearance between
studding and shower
floor.
1/4” to 5/16” for
models 32WL, 36 WL,
48WL and 54WL.
1/8” to 3/16” for all
other models.
Sealant
Shower
Floor
Shower Base Care and Cleaning
This shower base has been specifically designed and
engineered to exceed demanding strength and stress
factors required for use. It is stain resistant, semi gloss
finish. Like any fine finish, it requires reasonable care to
maintain its beauty and luster.
2” Dia.
Waste Pipe
NOTE: We recommend URC Fiberglass Tub
and Shower Cleaner. Ask for it where you
purchased your new unit.
Day-to-day cleaning:
Wash with warm water,
a soft cloth, and mild liquid detergent.
For stubborn stains: U s e a N o n - A b r a s i v e ,
liquid detergent cleaner, applied using a soft cloth.
More persistent stains, tar,or paint can be removed with
naptha or mineral spirits. Remove excess plaster by
scraping with a sharpened soft wood stick. Avoid wire
brushes, metal scrapers, or tools.
Drain
Receptor
Packing List
Description
Qty.
1
1
Shower Floor
Drain Gasket ( Qic-2 Rubber Gasket)
1
Strainer
NEVER USE ABRASIVE SCOURING POWDERS, SOLVENT
BASED CLEANSERS,OR SCOURING PADS AS THEY
TEND TO DULL THE FINISH.
LIMITED WARRANTY
CR/PL warrants its plumbing products against defects in material and workmanship for the following periods following installation:
Three Years: Fiberglass Bathing Fixtures (but not the fixtures thereto).
CR/PL, at its discretion, will repair, replace, or make an appropriate adjustment when an inspection by a manufacturer representative reveals that such
defects have occurred under normal usage within the warranty period. The party making the warranty claim will provide evidence of either date of purchase
or installation at the time of inspection. CR/PL shall be responsible for no other damages or liability whatsoever, consequential or otherwise, nor for labor,
transportation or other expenses.
Since local code requirements vary greatly throughout the country, distributors, dealers, installation contractors, and users of plumbing products should
determine whether there are any code restrictions on the use of a specific product. CR/PL makes no representation or warranty regarding, and shall not be
responsible for, any code compliance.
THIS WARRANTY, AND THE EXPRESSED REMEDIES THEREUNDER, IS THE ONLY WARRANTY MADE WITH RESPECT TO THE PRODUCTS SOLD
BY CR/PL, AND CR/PL MAKES NO OTHER WARRANTY,EXPRESSED OR IMPLIED WITH RESPECT TO SUCH PRODUCTS, INCLUDING (WITHOUT
LIMITATION) WARRANTIES OF MERCHANTABILITY AND WARRANTIES OF FITNESS OR SUITABILITY FOR ANY PARTICULAR PURPOSE.
Some states do not allow limitations on how long an implied warranty lasts, or the exclusion or limitation of incidental or consequential damages, so this
limitation and exclusion may not apply to you. This warranty gives you specific legal rights. You may also have other rights which vary from state to state.
FIAT Products R Form:9011 Revised:9/03.
www.craneplumbing.com
PRINTED IN U.S.A.