1
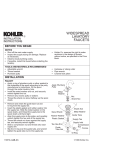
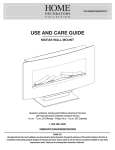
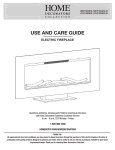
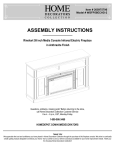
Model #DHGKS7168TX
USE AND CARE GUIDE LAMPORT WIDESPREAD LAVATORY FAUCET WITH POP‐UP
Questions, problems, missing parts? Before returning to the store, call Customer Service
8 a.m. ‐ 6 p.m., EST, Monday ‐ Friday
1‐800‐986‐3460
HOMEDEPOT.COM/HOMEDECORATORS
THANK YOU
We appreciate the trust and confidence you have placed in Home Decorators Collection through the purchase of this faucet.
We strive to continually create quality products designed to enhance your home. Visit us online to see our full line
of products available for your home improvement needs.
Table of Contents
Table of Contents . . . . . . . . . . . . . . . . . . . . . . . . . . . . . . . . . . 1
Warranty . . . . . . . . . . . . . . . . . . . . . . . . . . . . . . . . . . . . . . . . . 1
Limited Lifetime Warranty . . . . . . . . . . . . . . . . . . . . . . 1
Care and Cleaning . . . . . . . . . . . . . . . . . . . . . . . . . . . . .. . . . . 1
Pre‐Installation . . . .. . . . . . . . . . . . . . . . . . . . . . . . . . . . . . . . 1
Planning Installation . . .. . . . .. . . . . .. . . . . . . . . . . . . . 1
Tools needed for installation. . . . . . . . . . . . . . . . . . . . . . 1
Package Contents . . . . . . . . . . . . . . . . . . . . . . . . . . . . . 2
Service Parts . . . . . . . . . . . . . . . . . . . . . . . . . . . . . . . . . . . 3
Installation Preparation . . . . . . . . . . . . . . . . . . . . . . . . . . 4
Operation. . . . . .. . . . . . . . . . . . . . . . . . . . . . . . . . . . . . . . . 6
Warranty
LIMITED LIFETIME WARRANTY
This product been manufactured under the highest standards of quality and workmanship. The manufacturer warrants to the
original consumer purchaser that this faucet will be leak and drip free during normal domestic use for as long as you own it. If this
faucet should ever develop a leak or drip during this time, the manufacturer will, free of charge, provide the parts necessary to put
the faucet back in good working condition. The manufacturer warrants to the original consumer purchaser, for the spray to be free
from defects in material and workmanship for one (1) year from date of purchase. A replacement for any defective part will be
supplied free of charge for installation by the consumer. Defects or damage caused by the use of other than genuine parts are not
covered by this warranty. This warranty shall be effective from the date of purchase as shown on the purchaser’s receipt. Some states
do not allow limitations on how long an implied warranty lasts, so the above limitations may not apply to you. This warranty is valid
for the original consumer purchaser only and excludes industrial, commercial, or business use of the product, product damage due
to installation error, product abuse, or product misuse, whether performed by a contractor, service company, or yourself. The
manufacturer will not be responsible for labor charges and /or damage incurred in installation, repair or replacement, not for
incidental or consequential damages, so the above limitation or exclusions may not apply to you. This warranty gives you specific
legal rights and you may also have other rights which may vary from state, province to province, and nation to nation. The
manufacturer will advise you of the procedure to follow in making warranty claims.
Contact the Customer Service Team at 1‐800‐986‐3460 or visit www.HomeDepot.com/Homedecorators
Care and Cleaning
□
Never use harsh abrasives or cleaners with alcohol or acids to clean the faucet.
□
To clean, use a soft, damp cloth and warm soap and water and dry with a soft towel.
Pre‐Installation
PLANNING INSTALLATION
Before you begin to install this product, ensure that all parts are present. Compare parts with the package contents list. If any part is
missing or damaged, do not attempt to install the product. Contact customer service for replacement parts.
TOOLS NEEDED FOR INSTALLATION
Paper
towels
Teflon tape
1
Allen wrench
Pre‐Installation (continued)
PACKAGE CONTENTS
I
2
HOMEDEPOT.COM/HOMEDECORATORS
Please contact 1‐800‐986‐3460 for further assistance
Service Parts
MODEL TYPES: DHGKS7168TX
41
3
Installation Preparation
1
3
2
□
Shut off hot and cold water supply under sink. □
Plug sink drain with cloth to avoid losing small parts. □
If replacing an old faucet remove the old faucet and drain assembly. Clean any old caulking or putty from the mounting holes and drain opening in the sink. Inspect the drainage slip joint nuts and washers (not included with faucet) on drain connection for damage and replace if required.
□
Apply Teflon tape to threads on spout shank.
□
Attach spout tee on the spout shank
□
Install new faucet shank through the center hole of sink.
□
Place mounting washer on spout shank and attach with spout shank locknut.
4
□
Hold the handles in proper position. □
Make sure that the top of the faucet handle is 5/8" above
the top of the sink. Mount the metal washer and locknut from underneath the sink.
□
Then reposition escutcheons as necessary to a desired
height.
□
Attach the handle to the base and evenly tighten the set screws with the provided Allen Wrench. Apply Teflon Tape
4
HOMEDEPOT.COM/HOMEDECORATORS
Please contact 1‐800‐986‐3460 for further assistance
Installation Preparation
5
6
□
Apply Teflon tape to all male threads. □
Connect the flexible tubes from the supply shank side port to the spout tee.
□
Attach the supply lines.
□
Apply Teflon tape to inlet shanks and connect supply lines.
Apply Teflon Tape
7
□
Thread mounting nut and bottom gasket onto drain body. □
Wrap top threaded end of the drain body with Teflon tape.
8
□
Apply silicone to bottom side of flange. □
Install flange body up through the drain opening, hold the drain flange body in position with pivot rod opening
facing the back of sink and hand tighten mounting nut.
□
Be sure to clean excess silicone.
Drain Plug
Sink Drain Opening
Teflon Tape
Flange
Mounting Nut
Pivot Rod
Opening
5
Installation Preparation
9
□
Place pivot rod into pivot rod opening.
□
Slide pivot nut over pivot rod and thread it on the drain
body.
□
10
□
With lift rod in position on the faucet, insert lift rod through lift rod strap and secure with the clevis screw.
□
Guide the pivot rod through one of the holes on the lift
rod strap and secure it with the spring clip.
□
Then adjust the height of the lift rod by resetting the clevis screw.
Tighten firmly.
Pivot Rod
11
□
Operation
Turn on water supply valves and check for leaks, especially all supply line connections.
1
□
6
Remove aerator and turn on both hot and cold valves,
let water run for at least one minute, this will clear
any debris left in the line, reinstall aerator.
HOMEDEPOT.COM/HOMEDECORATORS
Please contact 1‐800‐986‐3460 for further assistance
Questions, problems, missing parts? Before returning to the store, call Customer Service
8 a.m. ‐ 6 p.m., EST, Monday ‐ Friday
1‐800‐986‐3460
HOMEDEPOT.COM/HOMEDECORATORS
Retain this manual for future use.