1
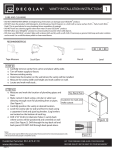
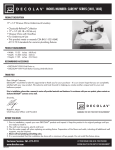
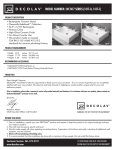
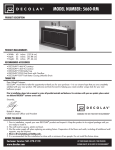
JORDAN MODULAR SERIES
1
ATTACHING UNITS
5361 Vanity
with 1666 Top
5235 Drawer Console
with 1669 Top
5332 Vanity with
1667 Top
5233 Vanity with
1668 Top
5336 Vanity Drawer
with 1670 Top
5246 Suppport Leg
Note: Tops are to be purchased separately, the are not included with base unit. Tops Shown on items for illustration purposes only
TABLE OF CONTENTS
Installation Instructions
o
Product Configurations
o
Installing the Vanity
o
Installing the Drawer Console with the Vanity and Support leg
o
Installing the Vanity Drawer with the Vanity and the Support Leg
o
Installing the Sink to the Vanity Top
o
Installing the top to the Vanity
o
Hinge Adjustment and Care and Cleaning
o
Limited Lifetime Warranty
Customer Service: 561-274-2110
www.decolav.com
Page
2
4
5&6
6&7
8
9
10
11
LET YOUR DREAMS COME ALIVE, YOUR PASSIONS
BECOME REALITY, BE THE ENVY OF YOUR NEIGHBORS®
JORDAN MODULAR SERIES
2
PRODUCT CONFIGURATIONS
Note: Products shown above with optional accessories: Mirrors, Sinks, Vanity Tops and Vanity Stools avalible
separately
Customer Service: 561-274-2110
www.decolav.com
LET YOUR DREAMS COME ALIVE, YOUR PASSIONS
BECOME REALITY, BE THE ENVY OF YOUR NEIGHBORS®
3
RUSTIC MODULAR SERIES
JORDAN
THANK YOU
Dear Valued Customer,
DECOLAV® would like to take this opportunity to thank you for your purchase – It is our sincere hope that you are completely
satisfied with your new product. We welcome and look forward to helping you create another unique look for your next
bathroom project.
Prior to installation, please take a moment to review all provided materials and hardware. For assistance with your new product,
please contact our dedicated DECOLAV® customer service staff.
Sincerely,
Robert H. Mayer
Chief Executive Officer and President
CHANGING THE WAY Y OU VIEW THE BATHROOM ®
BEFORE YOU BEGIN
1. Prior to installation, unpack your new DECOLAV® product and inspect it. Keep the product in its original package until you
are ready to install it.
2. The wall must be square, plumb and level.
3. Shut the water supply off when replacing an existing fixture. Preparation of the floors and walls, including all additional wall
supports, may be required.
4. Observe all local plumbing and building codes.
5. It is recommended that a professional contractor be retained for the installation of this product.
6. Anchors and wall screws are not provided.
RECOMMENDED TOOLS
Tape Measure
Phillips
Screwdriver
Pencil
Adjustable Wrench
Pipe Wrench
Square
Pipe Clamp
Plumber’s Putty
or Caulking
Channel Locks
Drill
Putty Knife
Flathead
Screwdriver
Hack saw
Scroll Saw
Level
Pipe Cutter
Ruler
Customer Service: 561-274-2110
www.decolav.com
LET YOUR DREAMS COME ALIVE, YOUR PASSIONS
BECOME REALITY, BE THE ENVY OF YOUR NEIGHBORS®
4
JORDAN MODULAR SERIES
Hookup Hardware Included with the Vanity Drawer and the Drawer Console
Item
A
B
C
D
E
F
Desription
Connecting Bolt (Included with Drawer Console and Vanity Drawer)
Flat Washer (Included with Drawer Console and Vanity Drawer)
Connecting Wood Screw (Included with Drawer console and Vanity
Drawer
T-nut (Included with Drawer Console and Vanity Drawer)
Small T nut screw (included with Drawer console and Vanity Drawer)
Insert Nut, Factory installed on Support Leg
A
QTY
4
4
6
4
12
2
D
B
C
E
F
Note: Hookup Hardware is Only Provided with the Vanity Drawer and the Drawer Console. No Hookup
Hardware is Provided with the Vanities.
INSTALLING THE VANITY
STEP #1
o If a Vanity drawer or a Drawer console is to be hooked to the vanity skip to the hook up sections on
Page 5 and 6. Follow hook up steps. Once Vanity hookup is complete follow Vanity installation
instructions.
o Carefully remove vanity from carton and place safely aside.
o Turn off water supply to faucet.
o Remove existing vanity.
o Determine the location on the wall where the vanity will be installed.
o Measure the vanity width and height and mark outline on wall.
STEP #2
o Measure and mark the locations of the plumbing pipes and lines
o Make a cutout in the back panel of the vanity using a circular saw or saber saw, allow enough room for
the plumbing lines and pipes to pass through.
o Drill 2, 3/16” diameter holes in the vanity back rail. These holes will be used to connect the vanity to the
wall using wall anchors or screws (not included).
o Carefully Position the vanity in the desired location.
o Level the vanity side to side and front to back using a carpenter’s level and adjust the leg levelers. The leg
levelers are located at the bottom of each leg.
o Attach vanity to wall using wall anchors or screws (not included).
Figure A
Customer to bore holes in
the back rail for attching the
vanity to the wall.
Figure B
Notes:
o We recommend two people to install this vanity
Customer Service: 561-274-2110
www.decolav.com
Customer to make cutout
in vanity back panel
LET YOUR DREAMS COME ALIVE, YOUR PASSIONS
BECOME REALITY, BE THE ENVY OF YOUR NEIGHBORS®
JORDAN MODULAR SERIES
5
INSTALLING A DRAWER CONSOLE AND THE SUPPORT LEG TO THE VANITY
o Unpack the Drawer Console, Vanity and Support Leg.
o Remove the door and drawers from the Drawer console and the Vanity. (This will make installation a lot
easier)
o Look inside the Vanity, you will see 2 holes near the top of the Vanity. These holes are bored halfway
through from the factory. On the side that you wish to hook the drawer console or the Vanity Drawer to,
bore the holes all the way through using a .394” (10 mm) drill bit.
o Lay Vanity and Drawer Console on the floor, back down.
o Slide the Drawer Console next to the Vanity lining up the holes at the top.
o Using the connecting bolts and T-nuts attach the drawer console to the Vanity. The connecting
T-nuts go on the Drawer console side and the Connecting Bolts go on the Vanity side. Tighten connecting
bolts and insert three small wood screws into the holes in the T-nut. This will lock the T-nut in place. Figure
C
o There will be 3 unused holes at the bottom of the Drawer console (below bottom panel). These holes are
for connecting screws. Install the 3 screws through the drawer console and into the vanity using a
cordless screwdriver. Figure D
o Place the support leg next to the drawer console. Line up the the preinstalled insert nut holes
with the holes in the end panel of the drawer console. Figure C
o Using the connecting bolts attach the support leg to the Drawer console. Only 2 connecting bolts will be
used. At the bottom of the drawer console there are 3 screw holes (below the bottom panel) Install screws
into the support leg using a cordless screwdriver. Figure D
Factory
Installed
insert nut
(2 total)
T-Nut (4 Total)
Small Wood Screw
(12 total)
There are 2 holes on each end panel of the vaity. The
holes are bored half way through the panel from the
factory. Customer will bore holes all the way through.
Bore all both hole through the panel when hooking up
the Drawer Console or the Vanity Drawer.
Connecting
Bolt (4 Total)
Flat Washer (4 Total)
Figure C
Customer Service: 561-274-2110
www.decolav.com
LET YOUR DREAMS
COME
ALIVE,
YOUR
PASSIONS
LETYOUR
DREAMS
COME
ALIVE,
YOURPASSIONS
® ®
BECOME REALITY,
BE THE
ENVY
OFENVY
YOUR
NEIGHBORS
BECOME
REALITY,
BETHE
OFYOUR
NEIGHBORS
JORDAN MODULAR SERIES
6
INSTALLING A DRAWER CONSOLE AND THE SUPPORT LEG TO THE VANITY
Figure D
Connecting Wood Screws
( 3 per side, 6 Total)
INSTALLING THE VANITY DRAWER AND THE SUPPORT LEG TO THE VANITY
o Unpack the Vanity Drawer, Vanity and Support Leg.
o Remove the door and drawers from the Vanity Drawer and the Vanity. (This will make installation a lot
easier)
o Look inside the Vanity, you will see 2 holes near the top of the Vanity. These holes are bored halfway
through from the factory. On the side that you wish to hook the Vanity Drawer to, bore the holes all the way
through using a .394” (10 mm) drill bit.
o Lay Vanity and Vanity Drawer on the floor, back down.
o Slide the Vanity Drawer next to the Vanity lining up the holes at the top.
o Using the connecting bolts and T-nuts attach the drawer console to the Vanity. The T-nuts go on the Vanity
Drawer side and the Connecting Bolts go on the Vanity side. Tighten connecting bolts and insert three small
wood screws into the holes in the T-nut. This will lock the T-nut in place. Figure E
o There will be 3 unused holes below the T-nut holes on the Vanity Drawer. These holes are for connecting screws.
Install the 3 screws through the Vanity Drawer and into the vanity using a cordless screwdriver. Figure E
o Place the support leg next to the Vanity Drawer. Line up the the preinstalled insert nut holes
with the holes in the end panel of the drawer console. Figure E
o Using the connecting bolts attach the support leg to the Vanity Drawer. Only 2 connecting bolts will be
used. At the bottom of the Vanity Drawer there are 3 screw holes (below the T-nut holes) Install screws
into the support leg using a cordless screwdriver. Figure E
Customer Service: 561-274-2110
www.decolav.com
LET YOUR DREAMS COME ALIVE, YOUR PASSIONS
BECOME REALITY, BE THE ENVY OF YOUR NEIGHBORS®
JORDAN MODULAR SERIES
Factory installed
insert nuts
T-Nut (4 total)
7
T-Nut (4 total)
Small Wood
Screw (12 total)
Small Wood Screw
(12 total)
Connecting
Wood Screw
Connecting
Bolt (4 Total)
Connecting Bolt (4 Total)
Flat Washer
(4 total)
Flat Washer (4 total)
There are 2 holes on each end panel of the
vaity. The holes are bored half way through
the panel from the factory. Customer will
bore holes all the way through. Bore all both
hole through the panel when hooking up
the Drawer Console or the Vanity Drawer.
INSTALLING THE SINK TO THE VANITY TOP
Step #1
o
o
o
o
The Sink and the Vanity Top
Lay the top upside down on the Floor
Using Epoxy (not included) glue the four brass inserts (Figure F) into their respective holes.
Allow cure time per epoxy manufactures recommendations.
Apply Epoxy to Each Hole
Vanity Top
Brass Insert
Figure F
Customer Service: 561-274-2110
www.decolav.com
LET YOUR DREAMS
COME
ALIVE,
YOUR
PASSIONS
LETYOUR
DREAMS
COME
ALIVE,
YOURPASSIONS
® ®
BECOME REALITY,
BE THE
ENVY
OFENVY
YOUR
NEIGHBORS
BECOME
REALITY,
BETHE
OFYOUR
NEIGHBORS
JORDAN MODULAR SERIES
8
Installing the Sink to the Vanity Top
Step #2
o Place the sink on the bottom side of the top.
o Apply the mounting clips and snug them slightly.
o Center the sink in the cutout (it may be necessary to look at counter from top side thats why the the
clips are to be used in this step)
o When Sink is in the desired location, using a magic marker make an outline around the sink on to
the top.
o Loosen the clips and remove the sink, apply silicone to the area inside the outline you just made.
o Place sink onto the under side of the top, align sink with the outline.
o Tighten mounting clips and check for proper alignment.
o If alignment is satisfactory, wipe up excess silicone and let cure per silicon manufacturers
reccomendations
Brass Insert
Sink
Mounting Clip
Washer
Figure G
Vanity
Top
Customer Service: 561-274-2110
www.decolav.com
Mounting Screw
LET YOUR DREAMS COME ALIVE, YOUR PASSIONS
BECOME REALITY, BE THE ENVY OF YOUR NEIGHBORS®
JORDAN MODULAR SERIES
9
INSTALLING THE TOP TO THE VANITY
Step #1
o With the vanity in the desired location Place a small bead of silicone to the areas shown in Figure G.
o Carefully lower top into position. There will be approximately 1/4 inch of top overhang on either side of
the top. Back of top should be aginst the wall
o Apply a bead of silicone to the bottom edge of the backsplash and to the back of the backsplash.
Apply backsplash to the back of the vanity top and the wall.
o Let Silicone Cure per manufactures specification before using.
Backsplash
Vanity Top
Use Silicone on the Bottom and the
Back Edge of the Backsplash
Apply a Small Amount of Silicone to the
areas shown
Vanity
Figure H
INSTALLING THE TOP ON THE VANITY CONSOLE/ VANITY DRAWER
Step #1
o Apply a small amount of Silicone to the areas shown. Figure I
o Because of the decorative moulding that is directlly below the Vanity top the Drawer Console top and the
Vanity drawer top must be slid in from the front. See Figure I
o The back edge of the Vanity drawer and Drawer Console should be flush with the back of the Vanity Drawer
chassis and the back of the Drawer console Chassis
Apply a Small Amount of Silcone
Apply a Small Amount of Silcone
to the areas shown
to the areas shown
Vanity Drawer
Vanity Drawer Top
Drawer Console
Drawer Console Top
Figure I
Customer Service: 561-274-2110
www.decolav.com
LET YOUR DREAMS COME ALIVE, YOUR PASSIONS
BECOME REALITY, BE THE ENVY OF YOUR NEIGHBORS®
JORDAN MODULAR SERIES
10
Adjusting the Hinges
ADJUSTING THE HINGES
o The rear screw will move the door closer to the end panel or away from the end panel. If the door is rubbing
the end panel, use this adjustment screw. Remember to adjust both hinges on the door for the desired
clearance.
o To get the doors even across the top and bottom edges of the doors use the side to side adjustment screw.
Remember to adjust both hinges on the door for the correct position.
o Doors were adjusted at the factory prior to shipping but due to the variances in home walls the hinges may
need slight adjustment.
Side to Side Adjustment
Front to Back Adjustment
CARE AND CLEANING
• DO NOT OVERTIGHTEN DRAIN. Overtightening of the drain can damage your DECOLAV® product.
• DO NOT clean the product with Detergents, Acid, Abrasives, Harsh Cleaners or a cloth with a coarse surface (S.O.S.®
Pads, Scotch Brite® Pads). This is good advice for any plumbing fixture regardless of material.
• DO NOT leave any cleaning agents other than water on your DECOLAV® product.
• DO NOT allow your DECOLAV® product to unnecessarily encounter other solid objects.
• DO clean your DECOLAV® product. Wipe with a damp cloth and dry with a soft cloth. If necessary, a general mild
soap and water solution can be used. Use a mild furniture polish to clean wood frame.
• DO clean underside of your DECOLAV® product with mild soap and water ONLY.
Customer Service: 561-274-2110
www.decolav.com
LET YOUR DREAMS COME ALIVE, YOUR PASSIONS
BECOME REALITY, BE THE ENVY OF YOUR NEIGHBORS®
JORDAN MODULAR SERIES
11
LIMITED LIFETIME WARRANTY
Any Deco Lav, Inc. (“DECOLAV”) product(s), sold after December 1, 2010, will be warranted to the original end consumer to be free of true defects in material and
workmanship during normal residential use for as long as the consumer owns his or her home subject to the following:
•
•
•
•
•
Proof of purchase (original sales receipt) from the original end consumer must be made available to DECOLAV for all warranty claims.
The person claiming a warranty issue must be able to establish original purchase and installation of the product.
Authorized DECOLAV personnel have inspected the product(s) and determined the product(s) to have true manufacturing defect(s) (unless other arrangements satisfactory to DECOLAV have been agreed upon).
Such product(s) are returned to DECOLAV (unless other arrangements satisfactory to DECOLAV have been agreed upon).
The product must have been purchased, directly or indirectly, through an authorized DECOLAV reseller.
This limited warranty is non-transferable and applies only to the original end consumer and to the original installation of the product. This limited warranty is void if
the product has been moved from its initial installation site or if ownership of the product has changed. DECOLAV’s product are produced from natural raw materials
and there may be a slight color variance from product appearing in catalogs, brochures, web-sites, or product samples, or prior production. These are not examples
of manufacturing defects and will not be covered under this warranty.
This limited warranty does not cover any mechanical pieces of any DECOLAV product. These mechanical pieces will be covered under a One Year Warranty, with all
other terms of this warranty applying except duration. This limited warranty does not cover the finish, color or plating of any DECOLAV product. The finish, color or
plating of any product will be covered under a One Year Warranty, with all other terms of this warranty applying exception duration.
If this product is used commercially or installed outside of North America, DECOLAV warrants the product to be free from defects in material and workmanship for
one (1) year from the date of installation with all other terms of this warranty applying except duration.
THIS LIMITED WARRANTY DOES NOT COVER ANY DAMAGES CAUSED BY SHIPPING, MISUSE, ABUSE, ACCIDENTS, NEGLECT, UNAUTHORIZED REPAIRS OR ALTERATIONS,
MODIFICATIONS, USE OF OTHER THAN GENUINE DECOLAV REPLACEMENT PARTS, DIRT, LIME SCALE, AND OTHER MINERALS, SCUFFS AND SCRATCHES, EXPOSURE TO
MARINE AREAS, ABNORMAL USAGE, AND NORMAL WEAR AND TEAR. ANY IMPROPER INSTALLATION, IMPROPER MAINTENANCE, IMPROPER HANDLING, IMPROPER
AND CONTRARY USES, IMPROPER CARE AND CLEANING AND ALL ACTS BEYOND DECOLAV’s CONTROL WILL VOID THIS LIMITED WARRANTY.
This limited warranty does not apply to local building code compliance. Since local building codes vary considerably, the original end consumer of the product(s)
should check with a local building or plumbing contractor to ensure local code compliance prior to installation.
If you believe that you have a valid warranty claim, contact your Home Center, Dealer, Plumbing Contractor or E-tailer. Please be sure to provide all pertinent information regarding your claim, including a complete description of the problem, the product, model number, the date the product was purchased, from whom the
product was purchased and the installation date and location. Also be sure to provide a copy of your original purchase invoice. For other questions, please write to
us at: Deco Lav, Inc., Attn. Returns Processing, 314 S. Chimney Rock Road, Greensboro, NC 27409.
Upon satisfaction of each of the foregoing conditions and requirements, DECOLAV shall, at its option, either repair or replace the defective product. DECOLAV shall
return any product repaired or replaced under this limited warranty to the original end consumer transportation prepaid. All Closeout/Discontinued product(s), at
time of a valid warranty claim, will either be repaired or replaced with a comparable item. DECOLAV’s option to repair or replace the product under this limited warranty does not cover any cost of labor to remove or install the DECOLAV product, usage and delay time, or other costs of removal or installation whatsoever. IN NO
EVENT WILL DECOLAV BE LIABLE FOR THE COST OF REPAIR OR REPLACEMENT OF ANY INSTALLATION MATERIALS, INCLUDING BUT NOT LIMITED TO, COUNTERTOPS,
TILES, MARBLE, GRANITE, ETC.
THIS LIMITED WARRANTY DOES NOT COVER ANY LIABILITY FOR CONSEQUENTIAL OR INCIDENTAL DAMAGES, ALL OF WHICH ARE HEREBY EXPRESSLY DISCLAIMED, OR
THE EXTENSION BEYOND THE DURATION OF THIS LIMITED WARRANTY. Some states do not allow the exclusion or limitation of incidental or consequential damages,
so the above limitation or exclusion may not apply to you.
THE WARRANTIES HEREIN:
•
ARE EXCLUSIVE AND STATED IN LIEU OF ALL OTHER WARRANTIES, WHETHER EXPRESS, STATUTORY, OR IMPLIED, INCLUDING BUT NOT LIMITED TO THE
WARRANTIES OF MERCHANTABILITY AND FITNESS FOR AN INTENDED PURPOSE, ALL OF WHICH ARE HEREBY EXPRESSLY DISCLAIMED.
•
NEITHER ASSUME NOR AUTHORIZE ORIGINAL END CONSUMER NOR ANY OTHER PARTY TO ASSUME ANY OTHER LIABILITIES IN CONNECTION WITH THE
MANUFACTURE OR SALE OF THE PRODUCT.
•
ARE SUBJECT TO THE LIMITATIONS ON DAMAGES AS SET FORTH ABOVE.
Customer Service: 561-274-2110
www.decolav.com
LET YOUR DREAMS COME ALIVE, YOUR PASSIONS
BECOME REALITY, BE THE ENVY OF YOUR NEIGHBORS®