1
Let your dreams come alive,
Your passions become reality,
Be the envy of your neighbors™;
DECOLAV
®
Changing the424
way
SWyou
12th view
Avenuethe bathroom™
Deerfield Beach, Florida 33442
Call: 561-274-2110 • Fax: 954-601-0881
www.decolav.com
© 2006 Deco Lav Inc. All Rights Reserved (9298•01/01/06)
Your passions become reality,
Be the envy of your neighbors™;
D E C O L AV
9298 Series
®
Changing the way you view the bathroom™
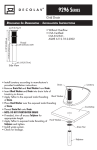
Push Button Closing Umbrella Drain
Roughing-In Dimensions - Installation Instructions
4" [10.16 cm]
3 3/4" [9.525 cm]
8 3/4" [22.225 cm]
2 3/4" [6.985 cm]
•Without Overflow
•CSA Certified:
CSA B125-01,
ASME A112.18.2-2002
•Patent 7,181,782
Thread
O.D. 1 5/8" [4.1275 cm] x
11TH
1 1/4" [3.175 cm]
Side View
• Install Lavatory according to manufacturer’s provided
installation instructions.
• Remove Drain Nut, Hard Washer and Thick Washer from
Drain.
• Insert Drain into drain hole of Lavatory as shown.
• NOTE: USE OF A NON-CORROSIVE SILICONE SEALANT
UNDER THE FLANGE OF THE DRAIN IS SUGGESTED. Drain
• Apply Teflon to the exposed male threading of Drain.
• Place Thick Washer then Hard Washer over the exposed
male threading of Drain.
• Thread Drain Nut onto Drain.
• NOTE: DO NOT OVERTIGHTEN DRAIN!
• If needed, trim off excess Tailpiece for
appropriate length.
• Apply Teflon to exposed male threading of
Tailpiece and tighten.
• Install waste system.
• Check for leakage.
Black Washer
Tailpiece
Lavatory
Countertop
Hard Washer
Drain Nut
Your passions become reality,
Be the envy of your neighbors™;
D E C O L AV
Serie 9298
®
Changing the way you view the bathroom™
Desagüe decorativo de cierre a botón
Medida
aproximada
- Instrucciones
4" [10.16 cm]
3 3/4" [9.525 cm]
8 3/4" [22.225 cm]
2 3/4" [6.985 cm]
de instalación
•Sin rebosadero
•Certificación de CSA:
CSA B125-01,
ASME A112.18.2-2002
•Patente 7,181,782
Rosca
O.D. 1 5/8" [4.1275 cm] x
11TH
1 1/4" [3.175 cm]
Vista lateral
• Instale el lavamanos según las instrucciones de
instalación del fabricante.
• Extraiga la tuerca del desagüe, la arandela rígida y la
arandela gruesa del desagüe.
• Inserte el desagüe en el agujero del
lavamanos como se muestra.
Lavamanos
• NOTA: SUGERIMOS UTILIZAR UN SELLADOR NO CORROSIVO DE SILICONA DEBAJO DEL REBORDE DEL DESAGÜE.
• Aplique teflón en la rosca macho expuesta
del desagüe.
Desagüe
• Coloque la arandela gruesa y, luego, la
arandela rígida en la rosca macho
expuesta del desagüe.
• Enrosque la tuerca del desagüe en el
desagüe.
• NOTA: NO AJUSTE DEMASIADO EL DESAGÜE
• Si es necesario, recorte el brazo de desagüe
vertical según el largo apropiado.
• Aplique teflón en la rosca macho
expuesta en el brazo de desagüe
vertical y ajuste.
• Instale el sistema de desagüe.
• Compruebe que no haya fugas.
Arandela
gruesa
Brazo de desagüe
vertical
Mostrador
Arandela
rígida
Tuerca del
desagüe
Your passions become reality,
Be the envy of your neighbors™;
D E C O L AV
Série 9298
®
Changing the way you view the bathroom™
Drain parapluie à fermeture par bouton-poussoir
Dimensions
de raccordement
8 3/4 po [22,225 cm]
3 3/4 po [9,525 cm] 4 po [10,16 cm]
2 3/4 po [6,985 cm]
- Instructions d’installation
• Sans trop-plein
• Certifié CSA :
CSA B125-01,
ASME A112.18.2-2002
•Brevet 7,181,782
Filetage
diam. ext. 1 5/8 po
[4,1275 cm] x11 fil
1 1/4 po [3,175 cm]
Vue de côté
• Installez le lavabo selon les directives d’installation du
fabricant.
• Retirez l’écrou de vidange, la rondelle dure et la rondelle
épaisse du drain.
• Insérez le drain dans l’orifice d’évacuation du
lavabo, tel qu’illustré.
• REMARQUE : IL EST CONSEILLÉ D’UTILISER UN MASTIC EN
Lavabo
SILICONE NON CORROSIF SOUS LA BRIDE DU DRAIN.
• Appliquez du Téflon au filetage mâle à
Drain
découvert du drain.
• Placez la rondelle épaisse, puis la rondelle dure
sur le filetage mâle à découvert du drain.
• Vissez l’écrou de vidange au drain.
Comptoir
• REMARQUE : NE SERREZ PAS LE DRAIN DE
FAÇON EXCESSIVE!
• Au besoin, coupez l’excédent de la
pièce de raccordement pour obtenir la
Rondelle épaisse
longueur appropriée.
• Appliquez du Téflon au filetage mâle à
découvert de la pièce de raccordement et
Pièce de
serrez.
raccordement
• Installez le circuit d’évacuation.
• Vérifiez qu’il n’y a pas de fuite.
Rondelle dure
Écrou de
vidange