1
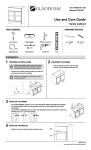
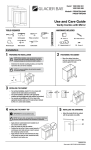
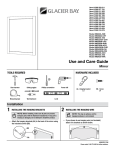
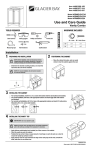
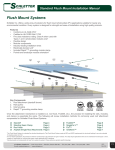
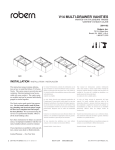
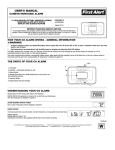
Item #100066005
Item #100066006
Model #CACO36
Model #CACO48D
Use and Care Guide
Vanity Cabinet
HARDWARE INCLUDED
TOOLS REQUIRED
Claw hammer
Safety goggles
Phillips screwdriver
Power drill
AA - Handle
CACO36-C x 3
CACO48D-C x 5
Measuring tape
Wall hardware
Keyhole saw
BB - Short Screw CC - Long Screw
CACO36-C x 6
CACO48D-C x 6
CACO48D-C x 4
Level
Installation
1 PREPARING FOR INSTALLATION
2 CUTTING THE OPENING FOR PLUMBING FIXTURES
NOTE: Before installation, make sure all parts are present.
Compare parts with the Hardware Included list. If any part is
missing or damaged, do not attempt to install the product.
□□ Determine the desired mounting location, and mark the
wall where the unit will be installed.
NOTE: This step applies to vanity
cabinets with full back panels only.
□□ Locate and mark plumbing on the back panel.
□□ Drill a pilot hole through the back panel.
□□ Use a keyhole saw to cut an opening for the plumbing fixtures.
NOTE: For secure installation, the unit
must be mounted to at least one wall stud.
3 POSITIONING THE CABINET
□□ Move the cabinet into place, and use wood shims to level
the cabinet against the wall.
4 INSTALLING THE CABINET
□□ For wall stud installation, insert #12 x 3 in. screws with
washers into the stud locations (not included).
□□ For drywall installation, drill holes at the appropriate locations
and insert toggle bolts with washers (not included).
□□ For concrete wall installation, drill 1/4 in. holes at the
appropriate locations and insert #12 wall anchors, followed by
#12 x 3 in. screws (not included).
5 INSTALLING THE HARDWARE
□□ Attach the handle (AA) to the door on the vanity with
short screws (BB) and to the drawers on the vanity
with long screws (DD).
CC
AA
BB
HOMEDEPOT.COM
Please contact 1-888-774-8062 for further assistance.
Installation (continued)
6 REMOVING THE DRAWER
NOTE: This step applies to vanity cabinets with full back panels only.
□□ Press release levers in opposite directions while pulling drawer out of the vanity.
Press
upward
Press
downward
7 RE-INSTALLING THE DRAWER
NOTE: This step applies to vanity cabinets with full back panels only.
NOTE: Drawer should install smoothly; however, there may be minor resistance
when the drawer is approximately half to two-thirds installed. This is normal.
□□ Move the ball bearing cages to the front and push the rear of the glides toward
the center of the vanity.
□□ Insert the drawer box.
□□ Ensure the drawer box glide members slide through the plastic guide at the
front of the vanity member on each side.
A LIATED
3. ELACS
A
A LIATED
3. ELACS
A LIATED
53. ELACS
A
B
B LIATED
1 E L A CS
A LIATED
3. ELACS
Troubleshooting
A
A LIATED
53. ELACS
Problem
Possible Cause
Solution
The doors do not align or
the space is too big or too
tight between the doors.
The hinges are misaligned.
Hold the door while loosening screws. Align
the doors properly, and re-tighten the screws.
Up — Down
In — Out
Left— Right
Safety Information
Please read and understand this entire manual before attempting to assemble, operate or install the product.
Care and Cleaning
□□ Use a water-dampened cloth to clean the cabinet. Avoid using abrasive cleaners.
□□ Use a mild liquid soap and a soft cloth to clean your vanity top. Avoid using any harsh, abrasive cleaners or mineral spirits.
Warranty
LIMITED LIFETIME
WHAT IS COVERED
The manufacturer warrants its parts and products to be free of substantial defects in materials and workmanship from the original date of
purchase under normal home use. This warranty is offered only to the original consumer purchaser and may not be transferred.
Coverage for vanity cabinets lasts for the life of the product.
During the warranty period, the manufacturer, at its option, will repair or replace any part or product that proves to have substantial defects
in materials or workmanship, or the manufacturer will provide an equivalent replacement product. In keeping with our policy of continuous
product improvement, the manufacturer reserves the right to change specifications in design and materials without notice and with no
obligation to retrofit products we previously manufactured.
This warranty gives you specific legal rights, and you may also have other rights that vary from state to state.
Because of the varying natural characteristics of wood and the effects of aging, product shown in displays and/or printed materials will not
be an exact match to new cabinetry you will receive. Depending on the wood characteristics, the age of a sample and the environment of
the showroom, samples will show some degree of variation from new product. In addition, you should not expect all doors, drawer fronts,
trim or molding to match exactly in either finish or grain. Variation in wood is normal and unavoidable. In addition, it is not possible to
exactly match our colors in printed materials. Therefore, you should view the actual samples when making your color selection.
WHAT IS NOT COVERED
This warranty does not cover any problems or damage which result from improper transportation, improper installation, mishandling,
misuse, abuse, neglect, abnormal use, commercial use, improper maintenance, non-manufactured repairs, accidents, or acts of God, such
as hurricanes, fire, earthquakes or floods. This warranty and any applicable implied warranties do not cover incidental or consequential
damages arising from any defects in the product, such as labor charges for installation or removal of the product or any associated
products. This warranty does not cover defects or damage caused by normal wear & tear, alterations, environmental conditions, humidity
absorption, or mold. In addition, variations in wood grain, finish color, aging or other natural wood and stain characteristics are not
considered defects and are not covered by this warranty. Some states do not allow the exclusion or limitation of incidental or consequential
damages, so the above limitation or exclusion may not apply to you.
THE MANUFACTURER DISCLAIMS ANY IMPLIED WARRANTY OF MERCHANTABILITY, AND THERE ARE NO WARRANTIES THAT EXTEND BEYOND
THE DESCRIPTIONS ON THE FACE HEREOF. TO THE EXTENT THAT SUCH DISCLAIMER IS NOT VALID UNDER APPLICABLE LAW, ANY IMPLIED
WARRANTY SHALL BE COEXTENSIVE IN DURATION WITH THIS WARRANTY.
Products should be examined for defects prior to installation. This warranty does not cover labor charges for installation or removal of the
product or any associated products. If upon inspection you find our product has a damaged or missing part, it may not be necessary to
return the unit to the store of purchase. Please contact customer service to obtain a replacement part.
If you need replacement parts or would like to make a warranty claim, please contact customer service at 1-888-774-8062. All warranty
claims must include the model number of the product, copy of the original receipt and the nature of the problem. In addition, the
manufacturer may at its discretion require inspection of the installation site or authorize the prepaid return of the claimed defective part.
Merchandise not pre-approved for return will not be accepted and the associated claim not accepted.
HOMEDEPOT.COM
Please contact 1-888-774-8062 for further assistance.
Núm. de artículo 100066005
Núm. de artículo 100066006
Núm. de modelo CACO36
Núm. de modelo CACO48D
Guía de uso y cuidado
Tocadores de vanidad
HERRAJE INCLUIDO
HERRAMIENTAS REQUERIDAS
Martillo de garra Gafas de seguridad Destornillador Phillips
Cinta métrica
Herraje de pared
Taladro
Sierra caladora
AA - Manija
BB - Tornillo corto
CC -Tornillo largo
CACO36-C x 3
CACO48D-C x 5
CACO36-C x 6
CACO48D-C x 6
CACO48D-C x 4
Nivel
Instalación
1 PREPARACIÓN PARA LA INSTALACIÓN
NOTA: Antes de comenzar a instalar, asegúrese de que
todas las partes estén presentes. Compare las partes con
la lista del Herraje Incluido. Si hace falta alguna parte o se
encuentra dañada, no intente instalar el producto.
CORTE DE LA ABERTURA PARA ACCESORIOS 2
DE FONTANERÍA
□□ Determine la ubicación deseada del montaje y marque la
pared donde se instalará la unidad.
NOTA: Para una instalación segura, la unidad
debe montarse en al menos un montante de pared.
NOTA: Este paso aplica para gabinetes de tocador
con paneles traseros completos solamente.
□□ Localice y marque la tubería en el panel trasero.
□□ Perfore un agujero piloto a través del panel trasero.
□□ Use un serrucho de calar para cortar una abertura para
los accesorios de fontanería.
3 COLOCACIÓN DEL GABINETE
□□ Mueva el gabinete a su lugar y use cuñas de
madera para nivelar el gabinete contra la pared.
4 CÓMO INSTALAR EL GABINETE
□□ Para instalación en montante de pared, inserte tornillos #12 x 3
pulg. con arandelas en las ubicaciones de los montantes.
□□ Para instalación en pared seca, perfore agujeros en las ubicaciones
apropiadas e inserte pernos acodados con arandelas.
□□ Para instalación en pared de concreto, perfore agujeros de 1/4 pulg.
en las ubicaciones apropiadas e inserte anclas de pared #12, y
luego tornillos #12 x 3 pulg.
5 INSTALACIÓN DE LAS MANIJAS
CC
□□ Fije las manijas (AA) a la puerta en el tocador con tornillos cortos (BB) y a las
gavetas en el tocador con los tornillos largos (CC).
AA
BB
HOMEDEPOT.COM
Para obtener asistencia, póngase en contacto llamando al 1-888-774-8062.
Instalación (continuado)
6 EXTRACCIÓN DEL CAJÓN
NOTA: Este paso se aplica a la vanidad armarios
con paneles sólo copia de seguridad completa.
Presiona
hacia arriba
□□ Presiona las palancas de desbloqueo en direcciones
opuestas mientras sacas el cajón del gabinete.
Presiona
hacia abajo
7 INSTALACIÓN DEL CAJÓN
NOTA: Este paso se aplica a la vanidad armarios
con paneles sólo copia de seguridad completa.
A
NOTA: El cajón debe instalarse suavemente aunque puede existir una pequeña resistencia
cuando la instalación haya llegado aproximadamente a la mitad o a los dos tercios. Esto es
normal y el cajón debe ser empujado suavemente hasta llegar adecuadamente a su lugar.
A LIATED
3. ELACS
A
□□ Prepara las correderas del gabinete moviendo las carcasas de los cojinetes de bolas
hacia delante y empujando la parte posterior de las correderas hacia el centro del
gabinete.Insérez le tiroir.
□□ Inserta el armazón del cajón. Asegúrate de que los componentes de las correderas del armazón del cajón
de deslicen a través de la guía de plástico en ambos lados de la parte frontal de la estructura del gabinete.
A LIATED
53. ELACS
A LIATED
3. ELACS
A
B
B LIATED
1 E L A CS
A LIATED
3. ELACS
A
A LIATED
53. ELACS
Resolución de fallas
Problema
Posible causa
Solución
Las puertas no se alinean o el
Las bisagras están Sostenga la puerta mientras afloja los
espacio es demasiado grande o está
desalineadas.
tornillos. Alinee las puertas adecuadamente
demasiado apretado entre las puertas.
y apriete de nuevo los tornillos.
Arriba — Abajo
En — Fuera
Izquierdo — Derecho
Información de seguridad
Por favor, lea y comprenda este manual completo antes de intentar ensamblar, operar o instalar el producto.
Cuidado y limpieza
□□ Use un paño humedecido con agua para limpiar el gabinete. Evite usar limpiadores abrasivos.
□□ Use un jabón líquido suave y un paño suave para limpiar la cubierta de su tocador. Evite usar limpiadores ásperos, abrasivos
o alcohol mineral.
Garantía
GARANTÍA LIMITADA POR 5 AÑOS
LO QUE ESTÁ CUBIERTO
El fabricante garantiza que sus piezas y productos están libres de defectos importantes en materiales y mano de obra a partir de la fecha original
de compra bajo uso normal doméstico. Esta garantía se ofrece solamente al comprador original y no puede ser transferida.
La cobertura para los combos de tocador dura cinco años a partir de la fecha original de compra.
Durante el periodo de la garantía, el fabricante, a su opción, reparará o reemplazará cualquier pieza o producto que se compruebe tiene defectos
importantes en materiales o mano de obra, o el fabricante proporcionará un producto de reemplazo equivalente. De acuerdo con nuestra política
de mejora continua del producto, el fabricante se reserva el derecho a cambiar especificaciones en el diseño y materiales sin previo aviso y sin
obligación para actualizar productos que hayamos fabricado anteriormente.
Esta garantía le otorga derechos legales específicos, y también puede tener otros derechos que varían de un estado a otro.
Debido a las características naturales variantes de la madera y los efectos del envejecimiento, el producto mostrado en exhibidores y/o
materiales impresos no coincidirá exactamente con el nuevo gabinete que usted reciba. Dependiendo de las características de la madera, la edad
de una muestra y el ambiente de la sala de exhibición, las muestras exhibirán algún grado de variación con respecto al producto nuevo. Además,
no debe esperar que todas las puertas, frente de gavetas, moldura coincidan exactamente con el acabado o el grano. La variación en la madera
es normal e inevitable. Además, no es posible hacer coincidir exactamente nuestros colores en los materiales impresos. Por tanto, usted debe ver
las muestras reales cuandohaga su selección del color.
LO QUE NO ESTÁ CUBIERTO
Esta garantía no cubre ningún problema o daño que resulte de transporte inadecuado, instalación inapropiada, mal manejo, mal uso, abuso,
negligencia, uso anormal, uso comercial, mantenimiento inadecuado, reparaciones que no sean del fabricante, accidentes o fenómenos naturales
como huracanes, incendio, terremotos o inundaciones. Esta garantía y cualquier garantía implícita aplicable no cubre daños incidentales o
consecuentes que surjan de cualquier defecto en el producto, como cargos de mano de obra por instalación o retiro del producto o cualquier
producto asociado. Esta garantía no cubre defectos o daños causados por desgaste normal, alteraciones, condiciones ambientales, absorción
de humedad o moho. Además, las variaciones en el grano de la madera, color de acabado, envejecimiento u otras características de la madera
natural o manchas no se consideran como defectos y no están cubiertos por esta garantía. Algunos estados no permiten la exclusión o la
limitación de los daños incidentales o consecuentes, por lo tanto, es posible que la exclusión o las limitaciones antes indicadas no correspondan
a usted.
El fabricante deniega cualquier garantía implícita de comercialización, y no hay garantías que se extiendan más allá de las descripciones en la
portada de este documento. En la medida de que tal descargo de responsabilidad no sea válida conforme a la ley aplicable, cualquier garantía
implícita será coextensiva en duración con esta garantía.
LOS PRODUCTOS DEBEN SER EXAMINADOS EN BUSCA DE DEFECTOS ANTES DE LA INSTALACIÓN. ESTA GARANTÍA NO CUBRE CARGOS DE MANO
DE OBRA POR INSTALACIÓN O RETIRO DEL PRODUCTO O CUALQUIER PRODUCTO ASOCIADO. SI LUEGO DE LA INSPECCIÓN ENCUENTRA QUE
NUESTRO PRODUCTO TIENE UNA PIEZA DAÑADA O FALTANTE, PUEDE QUE NO SEA NECESARIO DEVOLVER LA UNIDAD A LA TIENDA DE LA COMPRA.
PÓNGASE EN CONTACTO CON SERVICIO AL CLIENTE PARA OBTENER UNA PIEZA DE REEMPLAZO.
Si necesita piezas de reemplazo o le gustaría hacer un reclamo de garantía, póngase en contacto con servicio al cliente llamando al
1-888-774-8062. Todos los reclamos de garantía deben incluir el número de modelo del producto, copia del recibo original y la naturaleza
delproblema. Además, el fabricante puede a su discreción exigir inspección del sitio de instalación o autorizar la devolución prepagada de la
pieza defectuosa reclamada. La mercancía no pre-aprobada para devolución no será aceptada y tampoco el reclamo asociado.
HOMEDEPOT.COM
Para obtener asistencia, póngase en contacto llamando al 1-888-774-8062.
U180086