1
TOOLS & MATERIALS REQUIRED
HERRAMIENTAS Y MATERIALES REQUERIDOS
OUTILS ET MATÉRIAUX NÉCESSAIRES
EN Assembly of this shower kit requires
common household tools and:
• Drill with 3/16” (5 mm) bit for wall
anchors
• Hole saw
• Measuring tape, level & square
• 1/4" (6.3 mm) “v-notched” trowel for
spreading adhesive
• Two (2) 10.3 Fl. Oz. (304 ml) cartridges
of Latex/Acrylic Caulk. DO NOT USE
100% SILICONE.
• Six (6) 10.5 Fl. Oz. (310 ml) cartridges
of one of the following approved
adhesives:
• ASB Adhesive & Caulk Kit (2 kits)
• Franklin MultiBond
• Macco Adhesives’ Liquid Nails for
Tub Surrounds (LN 915)
• Dap 2000 Construction Adhesive
• Macklanburg-Duncan Adhesive
(suitable for polystyrene)
SP
El ensamble de este paquete de ducha
requiere herramientas de uso común y:
• Taladro con broca de 3/16” (5 mm)
para tornillos de fijación para muros
• Broca hueca
• Cinta medidora, nivel y escuadra
• Paleta muescada en “V” de 1/4”
(6,3 mm) para extender el adhesivo
• Dos (2) cartuchos de 10,3 onzas
líquidas (304 ml) de material de
calafateo acrílico/látex. NO UTILICE
SILICONA AL 100%.
• Seis (6) cartuchos de 10,5 onzas
líquidas (310 ml) de:
• Juego de material de calafateo y
adhesivo ASB (dos juegos)
• Franklin Multibond
• Macco Adhesives Liquid Nails para
cercos de bañera (LN 915)
• Adhesivo para construcción Dap
2000
• Adhesivo Macklanburg-Duncan
(adecuado para poliestireno)
FR
Pour monter ces parois de douche, vous
aurez besoin, en plus d’outils courants,
des outils et matériaux suivants :
• Perceuse avec mèche 3/16 po (5 mm)
pour les ancres de mur
• Scie emporte-pièce
• Ruban à mesurer, niveau et équerre
• Truelle à canelures de 1/4 po (6,3 mm)
pour étaler l’adhésif
• Deux (2) cartouches de 10,3 oz liq.
(304 ml) de scellant latex/acrylique.
NE PAS UTILISER DE SCELLANT
100 % SILICONE.
• Six (6) cartouches de 10,5 oz liq.
(310 ml) de l’un des adhésifs
suivants :
• Trousse d’adhésif et de scellant (2
trousses)
• Franklin MultiBond
• Macco Adhesives Liquid Nails pour
entourage (LN 915)
• Adhésif à construction Dap 2000
• Adhésif Macklanburg-Duncan
(conçu pour le polystyrène)
REQUIREMENTS FOR A SUCCESSFUL INSTALLATION
REQUERIMIENTOS PARA UNA INSTALACIÓN EXITOSA
POUR UNE INSTALLATION RÉUSSIE
EN
1. Confirm that all components have been included before beginning your installation. Please refer to the Parts List in this manual.
2. Walls must be solid, plumb and square. This shower kit has been designed with some adjustability for minor alignment problems, but
a poor foundation will result in a poor installation.
• Floor leveling compound should be used under the shower base if your floor is not perfectly level.
• Walls should be 1/2" (13 mm) drywall or water-resistant drywall. The surface must be free of dirt, film, waxes or any other residues.
Painted surfaces must be sanded. Remove wallpaper. Do not install panels over existing ceramic tile or plywood.
3. Do not screw or bolt the base to the floor nor the glass enclosure to the base.
4. Dry fit wall panels and corner caddy before applying adhesive. If trimming is necessary, carefully score the panel with a utility knife
and straightedge and snap apart.
5. Apply adhesive with a 1/4" (6.3 mm) v-notched trowel to the drywall, not the wall panels. Cover the entire area behind the panel. Firmly
press panels into place to ensure proper adhesion. Follow adhesive manufacturers’ instructions and note all ventilation and installation
precautions.
6. During the installation you have a choice to install the shower door with a left-hand or right-hand opening. Note that the door must
swing out.
7. Power screwdrivers are recommended only where indicated.
8. Follow manufacturers’ instructions but allow at least 24 hours for caulk and adhesive to set before using shower.
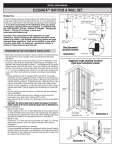
Flat Wall
IMPORTANT:
Flat wall installation – The wall panels are identical in size and shape. They must be installed 1-1/2”
(3.8 cm) in from the front of the base. The panels will not be visible outside the enclosure A .
Tile wall installation – Tile wall panels have a left-hand panel and a right-hand panel. The wall panels
are not interchangeable due to the rounded corners. Unlike Flat Tile wall panels, Sculptured Tile
panels have bullnosed edges. Sculptured Tile is installed with the bullnosed edge flush with the
outside edge of the base with the tile visible outside the shower B . Flat Tile can also be installed
flush C or 1-1/2” (3.8 cm) in from the front of the base D resulting in the tile visible only on the
inside of the shower.
Sculptured Tile
A
B
C
D
Flat Tile (Options)
2