1
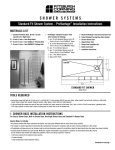
Pittsburgh Corning Glass Block Shower System ProVantage™ Installation Instructions
WALK-IN SHOWER SYSTEM KIT MATERIALS LIST
1 – Walk In Shower Base, 72 inch x 51 inch
110 – 6 inch x 8 inch x 4 inch Glass Blocks
30 – 6 inch x 8 inch x 4 inch ARQUE® Block
72"
20 – 6 inch x 8 inch x 4 inch EndBlock™ Finishing Unit
11/4"
36"
1 – ProVantage™ Walk In Spacer Pack which includes the following:
9 1/2"
30 – pcs. ARQUE® Horizontal Spacers
(27 whole spacers and 3 half spacers)
40 – pcs. ARQUE® Vertical Spacers
6" x 8" Premiere Series
10 – pcs. 4 7/8 inch Horizontal Spacers cut to fit
6 inch x 8 inch EndBlock™ shape
6" x 8" EndBlock™
Finishing Unit
48"
5 3/4"
51"
120 – pcs. 7 1/2 inch Vertical Spacers
6" x 8" ARQUE® Block
10 – pcs. 23 3/8 inch Horizontal Spacers
24" Approx.
Opening
6" x 8" Premiere Series
10 – pcs. 46 1/4 inch Horizontal Spacers cut to fit
6 inch x 8 inch EndBlock™ shape
18 5/16"
4 – pkgs. Anchor Packs
2 – Buckets ProVantage™ Glass Block Surface Grout
11/4"
1 – Chrome Shower Drain
25"
6" x 8" EndBlock™
Finishing Unit
PLAN VIEW
24 – Tubes Pittsburgh Corning Glass Block Sealant
1 – Bottle TGR Grout Sealer
WALK-IN SHOWER FLOOR PLAN
Installation Instructions
ProVantage™
Vertical Spacer
(Right or left entry available. Right entry shown above.)
ProVantage™
Horizontal Spacer
ProVantage™
Anchor
ProVantage™
ARQUE® Spacer
TOOLS REQUIRED
» Screw driver, power drill with an 1/8 inch and a 3/16 inch drill bit, 3/16 inch masonry drill bit, long nose pliers, rubber mallet, four-foot level, caulk gun, utility knife,
margin trowel, rubber float, bucket, tile/grout sponge, rubber gloves, cheese cloth and safety glasses.
» To set and install the shower base you will also need a mortar pan, mortar mixer hoe, brick trowel, wood shims, galvanized nails, 50 lb. bag of plaster or mortar
and a sheet of roofing paper or plastic the size of the shower base.
Continued to next page »
1. SHOWER BASE INSTALLATION INSTRUCTIONS
For Classic Shower Base, Walk-In Shower Base and Neo Angle Shower Base
Special Notes to Installer
» All pictures provided with these instructions are typical, and may appear different than the actual items being installed.
» The installer is solely responsible for determining the requirements necessary for compliance with all codes involving installation of this shower.
» All published unit dimensions are for reference only. Any critical dimensions required for installation should be taken directly from the shower base being installed.
» Carefully check the shower base upon receipt. Notify your supplier immediately if any questions or problems are encountered during this process.
Do not install the base without first addressing questions, which arise during inspection. Check for:
» Unit drain matches to the bathroom drain location.
» Surface damage.
» Color coordination to other bathroom fixtures.
Installation (Note: Shower base shown in photos may vary from actual style of base being installed.)
» Location of drain pipes and shower base drain must be made before the installation of shower base. The drain plug accommodates a 2 inch PVC waste pipe.
» Insure the floor and stud walls are square and plumb.
» After leveling base on sub floor (use shims if necessary), draw a line on the studs at the top edge of the shower base flange. This will be the installed height of the shower base.
» Make certain the drain assembly lines up with drain hole of shower base.
» Remove shower base and lay down roofing paper or plastic sheet with drain hole mark on it.
» Mix bedding material (plaster or mortar).
» Apply bedding material to paper or plastic 2 1/2 inch thick in a 12 inch x 12 inch grid pattern the full length and width of the shower base.
» Bedding material must not be under the apron (edge).
» Cut opening in paper at drain and lower shower base into position with drain assembly.
» It will be necessary to “rock” the shower base until the top of the shower base flange aligns with the lines drawn on the studs.
» Make certain the apron is contacting the floor along the entire edge of the base. If shims were used re-install them.
» Insure the base is level in two directions and against the stud framing.
» Fit drain assembly into shower base. Note: Allow the bedding material to completely harden before applying weight to the bottom of the shower base.
-2-
Stud
Cement Board
/4 inch Tile/Adhesive
1
Shower Base Flange
Caulk
Shower Base
» Drill 1/8 inch holes through the shower base flange at all stud locations.
» Secure the base to the studs with 11/2 inch roofing nails.
» Finish installation as shown above.
» If installing the shower base against an existing wall attach 3/8 inch thick furring strips to walls around the shower base or notch wall to accommodate shower base.
Cleaning Shower Base
» Use a mild, non-abrasive cleaner specifically formulated for gelcoat and acrylic surfaces. Rinse surface thoroughly.
2. GLASS BLOCK INSTALLATION
(Walk-In shower – Straight wall section)
2.1 After installation of the shower base, but before beginning to install the glass blocks, line up a course of glass blocks for the curb, seven 6 inch X 8 inch glass
blocks and one 6 inch x 8 inch EndBlock™ Finishing Unit. Layout one, 46 1/4 inch horizontal spacer and eight 7 1/2 inch vertical spacers for the curb. Insert wall
anchor into the 46 1/4 inch horizontal spacer.
2.2 Temporarily install the horizontal spacers on to curb. Next, starting with a vertical spacer install the glass blocks with vertical spacers between each block. Use a
level to check the alignment of the course of glass blocks.
-3-
2. GLASS BLOCK INSTALLATION
(Straight wall section - Continued)
2.3 If the finishing unit doesn’t fit firmly on the horizontal spacer trim the end of the horizontal spacer. Carefully remove the glass blocks and vertical spacers from the
bottom horizontal spacer. Trace the outline of the horizontal spacer on the curb.
2.4 Now! Let’s build the wall. Apply 1/2 inch beads of sealant on top of the curb 1/2 inch inside the lines on both sides where the horizontal spacer was positioned. Then
reinstall the horizontal spacer, pressing it down into the sealant. (Do not secure with screws)
2.5 Next, apply four 1/2 inch dabs of sealant to the first vertical spacer 1/2 inch in from the four corners. Press the spacer into place over the anchor. Apply 4 dabs of
sealant to the other side of the first vertical spacer.
2.6 Apply 1/2 inch beads of sealant to the row of glass blocks behind the raised edge of the glass block faces on both sides of the blocks. Next, install first block on
top of the horizontal spacer with the beads of sealant down, push the block firmly against the wall and the base.
-4-
2.7 Apply 1/2 inch dabs of sealant behind the raised edge of the glass block face 1/2 inch in from the four corners, then press another vertical spacer into place.
Apply four 1/2 inch dabs of sealant to the vertical spacer 1/2 inch in from the four-corners. Install the second glass block with sealant side down.
2.8 Now, that the first course is installed you will need to level the glass blocks using the wedges provided with the anchors. Place a level on top of the first glass
block. If the glass block is not level, carefully slide the tip of a screwdriver (straight tip) under the horizontal spacer until the glass block is level. Next, slide a
wedge under the horizontal spacer.
2.9 Level all the glass blocks. Be sure to slide the wedges between the horizontal spacers and shower base not between the glass block and the horizontal spacer.
2.10 Next, apply 1/2 inch beads of sealant to the top of the installed glass blocks behind the raised edge of the glass block faces on both sides of the blocks.
Next, install the second horizontal spacer with anchor inserted and push the spacer firmly in place. Install two screws in the anchor (use the screws provided
with anchors).
-5-
2. GLASS BLOCK INSTALLATION
(Straight wall section - Continued)
2.11 Now you will need to draw a plumb line vertically up the wall., Place a four foot level even with the V-notch in the wall anchor and draw a straight, level line on the
wall. Use this line as a guide when securing the anchors. Next, apply four 1/2 inch dabs of sealant to the first vertical spacer 1/2 inch in from the four corners.
2.12 Next, press the spacer it into place over the anchor. Apply 4 dabs of sealant to the other side of the first vertical spacer. Next, apply 1/2 inch beads of sealant to the
second row of blocks behind the raised edge of the glass block face on both sides of the blocks. Install this course of glass blocks the same as the first course.
IMPORTANT: After completing the second course of glass blocks check the horizontal and vertical joints for sealant. If there is sealant in the joints you need
to use a smaller bead or dab of sealant or slightly move the location of the bead of sealant behind the raised edge of the glass block face toward the center
of the block.
2.13 Check with a level to confirm that the wall is straight, level and plumb as you build. Use a level to check the alignment of the course of glass blocks.
After installing four or five courses of glass blocks, you may want to start on the curve wall. This will allow the sealant to set. Always apply sealant to the glass
blocks not on the installed horizontal spacers. Check the alignment of the glass blocks vertically and horizontally as you build.
-6-
2. GLASS BLOCK INSTALLATION
(Walk-In shower – Curved wall section)
2.14 Layout four 6 inch x 8 inch glass blocks, three ARQUE® blocks and one 6 inch x 8 inch EndBlock™ Finishing Unit. Vertical spacers needed are: four 7 1/2 inch vertical
spacers and four ARQUE® vertical spacers. Horizontal spacers needed are: one 23 3/8 inch horizontal spacer, three ARQUE® horizontal half spacers and one 4 7/8 inch
horizontal spacer. Insert wall anchor into the first 23 3/8 inch horizontal spacer. Temporarily install the horizontal spacers on to curb, one 23 3/8 inch horizontal spacer
with anchor, three ARQUE® horizontal half spacers with tabs removed (bend barb tab back and forth until it snaps off) and one 4 7/8 inch horizontal spacer.
2.15 Temporarily install glass blocks on horizontal spacers. Start with a 7 1/2 inch vertical spacer, four 6 inch X 8 inch glass blocks with 7 1/2 inch vertical spacers
between the glass blocks and three ARQUE® glass blocks starting with an ARQUE® vertical spacer and ending with an ARQUE® vertical spacer (thick part of the
spacer towards the outside).
2.16 Install one 6 inch x 8 inch EndBlock™ Finishing Unit after the last ARQUE® vertical spacer. Carefully adjust these blocks to fit the curb and then carefully remove the
glass blocks from the bottom horizontal spacers (do not move the bottom spacers).
2.17 Next, mark the location of the horizontal spacers on the curb. Reinstall first horizontal spacer and four 6 x 8 inch glass blocks with sealant following the procedures
in the straight wall section. Next apply a 1/2 inch bead of sealant around the inside perimeter of the markings on the curb for the first ARQUE® glass block.
-7-
2. GLASS BLOCK INSTALLATION
(Curved wall section - Continued)
2.18 Install the first ARQUE® horizontal half spacer with tabs removed. Apply four 1/2 inch dabs of sealant to the side of the last 6 inch x 8 inch glass block, next install
the ARQUE® vertical spacer.
2.19 Apply a 1/2 inch bead of sealant around the perimeter of the first ARQUE® glass block, next, apply four 1/2 inch dabs of sealant to the installed ARQUE® vertical
spacer. Install the ARQUE® glass block, sealant side down.
2.20 Repeat these procedures for the next two ARQUE® glass blocks. Apply four 1/2 inch dabs of sealant to the side of the last installed ARQUE® glass block and apply a
1
/2 inch bead of sealant around the inside perimeter of the markings on the curb for the 4 7/8 inch horizontal. Install the ARQUE® vertical spacer and the 4 7/8 inch
horizontal spacer.
2.21 Apply four 1/2 inch dabs of sealant to the installed ARQUE® vertical spacer. Next apply a 1/2 inch bead of sealant around the inside perimeter of the finishing unit,
then install it on the 4 7/8 inch horizontal spacer.
-8-
2.22 Follow the procedures in the straight wall section for leveling each glass block. Use a level to check the alignment of each course of glass blocks.
2.23 Make certain your glass blocks are level from beginning to end. Now you need to assemble the first set of horizontal spacers. Insert a wall anchor in the end of a
23 3/8 inch horizontal spacer.
2.24 Next, slip the tab of an ARQUE® spacer into the other end of the horizontal spacer. The tabs of the three ARQUE® spacers slid into each other slots. Now slide the tab
of the last ARQUE® spacer into the 4 7/8 inch horizontal spacer.
2.25 Adjust the spacers to fit firmly on top of each glass block.
-9-
2. GLASS BLOCK INSTALLATION
(Curved wall section - Continued))
2.26 Now, apply two 1/2 inch beads of sealant on the top of the installed glass blocks behind the raised edges of the glass blocks.
2.27 Now, you will need to draw a plumb line vertically up the wall. Place a four feet level even with the V-notch in the wall anchor and draw a straight, level line on the
wall. Install two screws in the anchor (screws provided with anchors). Use this line as a guide when installing the rest of the anchors.
2.28 Repeat these steps for every course making sure to install the appropriate vertical spacer at the beginning, between each glass block and at the end of the ARQUE®
glass blocks. Remember to apply sealant to the vertical spacers. Check with a level to confirm that the wall is straight, level and plumb as you build. Always apply
sealant to the top of glass blocks, not on the installed horizontal spacers. IMPORTANT: After completing the second course of glass blocks check the horizontal
and vertical joints for sealant. If there is sealant in the joints you need to use a smaller bead or dab of sealant or slightly move the location of the bead of
sealant behind the raised edge of the glass block face toward the center of the block.
2.29 After installing four or five courses of glass blocks on the curved wall, you may want to stop and let the sealant set while your resume installing the remaining
courses of the straight wall. Always apply sealant to the glass blocks not on the installed horizontal spacers. Check the alignment of the glass blocks vertically and
horizontally as you build. Continue installing glass block until all courses are completed. Check one final time with a level to confirm that the wall is straight, level
and plumb. Use a rubber mallet to help aid final alignment. Once satisfied, let the sealant dry overnight.
-10-
3. FINISHING THE JOINTS
Grout Application
ProVantage™ Glass Block Surface Grout is a high performance white grouting compound designed for interior and exterior applications for use with glass blocks and
the ProVantage™ Glass Block Installation System.
IMPORTANT: The ProVantage™ Glass Block Surface Grout was designed and tested for this application – DO NOT SUBSTITUTE!
Caution: Avoid contact with skin. Safety glasses and impervious gloves are recommended to minimize skin and eye contact.
Reminder: Make sure that sealant has been allowed to cure for 24 hours before applying grout. THIS IS A FAST CURE GROUT AND SHOULD BE APPLIED AND
COMPLETELY WIPED DOWN WITHIN ONE HOUR. GROUT WILL CURE VERY RAPIDLY AFTER THIS TIME PERIOD.
Tools required: mechanical mixing recommended.
Small power mixer (makes mixing easier, but can also be mixed manually), rubber float, tile/grout sponge, safety glasses rubber gloves utility knife, margin trowel
and clean bucket.
Before beginning the application of the grout, inspect the glass block joints and remove any excess sealant from the vertical and horizontal joints with a utility knife.
Mixing: Remove the bag of grout from bucket. Pour in approximately 16 ounces of clean water.
Gradually add half the bag of ProVantage Grout powder while slowly mixing. Use a low-speed mixer. Mix thoroughly to a smooth, homogeneous consistency.
-11-
3. FINISHING THE JOINTS
(Continued)
Allow material to stand (“slake”) for approximately 5 to 10 minutes. Re-mix without adding more water or powder.
Begin application of grout: Starting at the top of the glass block wall, apply grout to the joints of glass blocks by moving the rubber float diagonally on a 45° angle
across the joints. This is the best application method to fill the joints with grout. Pack material into joints with float until full. Be carefully not to move glass blocks
while grouting since wall might still be flexible prior to grout cure.
Do not grout the perimeter joints between the blocks and the wall and curb. These joints must be caulked after the grout has dried for a pliable watertight joint.
Drag grout float across surface at a 45-degree angle to pick up excess grout.
IMPORTANT: Use the margin trowel to thoroughly pack the grout in the joints of the EndBlock Finish Units. Apply all the mixed grout before begin the cleaning process.
-12-
Allow grout to firm up in the joints approximately 5 to 10 minutes, and begin cleaning process. Use a clean tile grout sponge and clean, cool water. Dampen sponge
and wring- out as much water as possible. Excessive water during cleanup will weaken grout. Work sponge diagonally to pick up excess grout on surface of blocks.
Run sponge lightly through joints to ensure joints are even.
Wipe down should recur in multiple directions until all grout is removed from blocks and joints are smooth. Rinse and wring out sponge frequently. Let glass block wall
set for 15 minutes and wipe down again with a clean bucket of water. The grout will harden within 3 hours. At this point you can begin polishing glass blocks by wiping
down with a soft rag or towel. Wait four hours then apply grout sealer to all grout joints. Immediately wipe off any excess sealer with a clean, dry cloth to prevent it from
adhering to the glass blocks. For maximum protection it is recommended that you apply a second coat of sealer after the first coat has dried. After 72 hours cure of the
grout caulk all perimeter joints.
4. ACRYLIC SHOWER BASE CARE & CLEANING INSTRUCTIONS
The Lucite® cast acrylic surface of all Pittsburgh Corning Shower Bases is among the glossiest, highest quality surfaces available. Its hard, non-porous surface
prevents dirt from accumulating and resists stains better than other materials. With normal use, Lucite cast acrylic will retain its beauty with only a minimal amount
of care. To maintain the high gloss, elegant look of the Lucite cast acrylic surface, follow these simple steps:
1. Use common household, non-abrasive cleaners for most cleaning jobs, (for example: Lysol Basin, Tub & Tile Cleaner®; Glass Plus®; Simple Green®; Mr. Clean; and
Top Job, or a mild dishwashing detergent such as Ivory® Liquid). Follow manufacturers’ directions and precautions. Rinse well and dry with a clean cloth.
2. Never use abrasive cleaners.
3. Do not allow your Lucite® cast acrylic surface to come into contact with products such as acetone (nail polish remover), nail polish, dry cleaning solution, lacquer
thinners, gasoline, pine oil, winter green, etc.
4. Remove dust and dry dirt with a soft, damp cloth.
5. Clean grease, oil, paint or ink stains with isopropyl (rubbing) alcohol. Dry with a clean, soft cloth.
6. Avoid using razor blades or other sharp objects that might scratch the surface. Small scratches can be removed by applying a thin coat of automotive paste wax and
buffing lightly with a clean cloth. For deeper scratches, sand the surface lightly with a 400 grit “wet or dry” paper and buff with a fine-grit buffing compound.
5. IF YOU NEED ASSISTANCE
We hope these instructions are clear and answer your questions about the installation of the Pittsburgh Corning Glass Block Shower Systems. For additional information
on Pittsburgh Corning Glass Block visit our website at www.pittsburghcorning.com. For specific questions regarding the installation of the Pittsburgh Corning Glass Block
Shower System call Technical Support at 1-800-871-9918.
-13-
The information contained herein is accurate and reliable to the best of our knowledge. But, because Pittsburgh Corning has no control over installation, workmanship,
accessory materials, or conditions of application NO REPRESENTATION OR WARRANTY, EXPRESSED OR IMPLIED, EITHER AS TO MERCHANTABILITY OR FITNESS FOR A
PARTICULAR PURPOSE, IS MADE as to the performance or results of an installation containing the products which extends beyond the description on the face hereof and
ANY AND ALL LIABILITY FOR NEGLIGENCE, STRICT LIABILITY OR ANY OTHER THEORY OF TORT LIABILITY IS EXPRESSLY DISCLAIMED.
If the products otherwise fail to conform to the representations made herein, through no fault of the buyer, buyer’s exclusive remedy at Pittsburgh Corning’s option,
is the repair or replacement, of the nonconforming products or return of the purchase price paid by purchaser. If replacement is elected, Pittsburgh Corning will not be
responsible for installation or labor costs. In no event shall Pittsburgh Corning be responsible or liable for any incidental, special, consequential or punitive damages
which might result from product failure, regardless of the theory of liability upon which any such damages are claimed.
Pittsburgh Corning Corporation provides written warranties for many of its products, and such warranties take precedence over the statements contained herein.
You may obtain a copy of the warranty for this product by contacting Pittsburgh Corning.
-14-
-15-
800 Presque Isle Drive
Pittsburgh, PA 15239-2799
TEL: 800-624-2120
FAX: 724-325-9704
www.pittsburghcorning.com
© 2005 Pittsburgh Corning Corporation
All trademarks used in this publication are the property of Pittsburgh Corning Corporation.
GB-297 2.5M 4/05