1
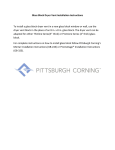
PITTSBURGH CORNING
Thinline™ Track
Spacer System for
Thinline™ Series
Glass Block
ASSEMBLY INSTRUCTIONS
Option 1 – Silicone Joints Finish
Option 2 – Grout Joints Finish
www.pittsburghcorning.com
Introduction
The Thinline Track Spacer System is the easiest way to install
Pittsburgh Corning Thinline™ Series Glass Block. No special
skills or tools are required to create the project of your
dreams. Now you have two options:
Option 1 – Sealant joints for an all-glass, crystal-like appearance or;
Option 2 – Grouted joints for a modular, mortar-like look.
™
Option 2 – Typical materials required for Grouted Joints Installation include:
Thinline™ Track Spacers are available in 31 1/2” length.
•Pittsburgh Corning Thinline™ Series Glass Block
•Thinline™ Track Spacers
•Pittsburgh Corning Thinline™ Series Perimeter Channels
•Pittsburgh Corning Glass Block Sealant
•#6 x 1” flat head galvanized screws (approx. 3 per lineal foot of perimeter channel)
•ProVantage® Glass Block Grout
•Grout Sealer
Thinline™ Series Perimeter Channels are available in 48” or
96” lengths.
4. Prepare the Opening
1.General Information
• Prepare the rough opening where the panel will be located. Make opening plumb and square to dimensions shown in Table 1.
•Designed for use with Pittsburgh Corning Thinline™ Series (3” thick) Glass Block only.
•Interior panels no larger than 85 sq. ft. framed on at least
three sides with unfinished side no larger than 6 ft. Exterior panels must be no larger than 25 sq. ft. and framed on all four sides.
•All glass block panels are non-load bearing, so adequate provisions must be made for support of construction around the panel.
•Not for use in constructing curved glass block walls.
2.Tools Required
•Screwdriver, electric drill, fine tooth saw, caulking gun, utility knife, rubber mallet, tape measure, razor blade and a two foot level.
•Plus, for grouted joints only, you need a hard rubber float, trowel, soft rag and grout sponge.
3.Materials Required
•Pittsburgh Corning Glass Block Project Planner is available where glass block is sold or on our website at www.pittsburghcorning.com. This is a step by step guide you can use to determine the exact amount of materials required for your special project.
Option 1 – Typical materials required for Sealant Joints Installation include:
•Pittsburgh Corning Thinline™ Series Glass Block
•Thinline™ Track Spacers
•Pittsburgh Corning Thinline™ Series Perimeter Channels
•Pittsburgh Corning Glass Block Sealant
•#6 x 1” flat head galvanized screws (approx. 3 per lineal foot of perimeter channel)
TABLE 1. Thinline™ Series Glass Block
Rough Opening Size (Inches)
Number
of Blocks
1 2 3
4 5
6
7
8
9
10
11
12
Rough Opening Width
Rough Opening Height
4”
Wide
Block
4 1/8
8
11 7/8
15 3/4
19 5/8
23 1/2
27 3/8
31 1/4
35 1/8
39
42 7/8
46 3/4
4”
High
Block
4 3/8
8 1/4
12 1/8
16
19 7/8
23 3/4
27 5/8
31 1/2
35 3/8
39 1/4
43 1/8
47
6”
Wide
Block
6 1/8
12
17 7/8
23 3/4
29 5/8
35 1/2
41 3/8
47 1/4
53 1/8
59
64 7/8
70 3/4
8”
Wide
Block
8 1/8
16
23 7/8
31 3/4
39 5/8
47 1/2
55 3/8
63 1/4
71 1/8
79
86 7/8
94 3/4
6”
High
Block
6 3/8
12 1/4
18 1/8
24
29 7/8
35 3/4
41 5/8
47 1/2
53 3/8
59 1/4
65 1/8
71
8”
High
Block
8 1/4
16 1/8
24
31 7/8
39 3/4
47 5/8
55 1/2
63 3/8
71 1/4
79 1/8
87
94 7/8
Note: Blocks are available in 4” x 8”, 6” x 6”, 6” x 8”, and 8” x 8” sizes.
•Cut the perimeter channels to length to fit the bottom top and both sides of this opening (Illus. A). These may be cut square or mitered. Apply two 1/4” beads of sealant on underside of channels horizontally 1/2” from both sides. Screw channels to the bottom and two sides of opening using the holes provided. Use two screws to fasten each end. If you cut off the predrilled holes when trimming the length, simply drill new ones at each end of the cut piece. Paint the screw heads white to reduce visibility.
•So that the last row of Pittsburgh Corning Glass Block units can be installed easily, cut the top perimeter channel in half lengthwise with a utility knife. Apply one bead of sealant. Install that half of the channel at the top of opening (Illus. B). On exterior applications, secure the exterior-side half of the channel with screws. The interior half of the channel will be sealed in place.
A
Q
PERIMETER
CHANNELS
6.Assemble the Panel
•Follow the instructions on the glass block sealant tube to open the tube. Coverage rate is one tube per twenty (20) blocks (adhere horizontal joints only). Cut the tip of the tube on a
45° angle at the 1/4” mark. The sealant skins over in 15-17 minutes. Do not apply sealant to more glass blocks than can be installed in 17 minutes.
•Apply beads of sealant on the interior corners of the sill channel the full length (Illus. C). Slide one block into the right jamb, and
one into the left jamb (Illus. D). Install the remaining blocks in this row. As you install multiple rows, make sure to apply beads of sealant on the interior corners of the vertical side channels.
C
Q
B
Q
Q
SEALANT
Q
HEAD CHANNEL
CUT LENGTHWISE
AND PLACED AT HEAD
D
5.Cut Thinline™ Track Spacers to Length
•Cut the Thinline™ Track Spacers for each course to fit inside the vertical perimeter channels. Save the short pieces.
•For 8” block, the spacer is already scored at 73/8” intervals
for cutting the vertical spacers. Vertical spacers for use with 4” or 6” block, should be cut at 33/8” or 53/8” respectfully.
•Install vertical spacers between each of the glass blocks, you may need the rubber mallet to tap the last vertical spacer
into position (Illus. E). Inspect each joint for alignment of
the spacers. Align this row of blocks between both jambs,
you may need to tap a wedge into the right or left jamb to center the row (remove the wedge). See Illus. F.
•Apply a 1/4” bead of sealant on across the row of blocks behind the raised edge of the glass block face on both sides of the blocks (Illus. G).
•Place the horizontal spacer on top of the first row of glass blocks (Illus. I). Remove any excess sealant. Adjust size of beads of sealant to prevent squeeze out (keep joint areas clean). If it’s necessary to have a joint in the end of the horizontal spacer to extend it, cut the spacers so that the joint is under a vertical spacer. Stagger these horizontal joints from end to end on each proceeding row of
glass blocks.
H
E
I
Q
SEALANT
Q
F
Q
WEDGE
(if needed)
•Line up enough glass blocks to complete the next row. Apply two beads of sealant (Illus. I) and install these blocks sealant side down on horizontal spacer (Illus. J). Install vertical spacers and align the row with previous row.
J
Q
G
Q
SEALANT
SEALANT
Q
Q
•Repeat these same procedures for all rows, except the top row.
•Before installing these blocks apply a 1/4” bead of sealant horizontally along the top inside leg of channel where the glass block face butts.
•Install the glass blocks then slide the vertical spacers in from the front of the glass block joints. The last spacer may need to be tapped in with a rubber mallet (Illus. K).
K
L
7. Seal The Joints
Option 1 – Sealant Joints Finish:
•Follow APPLICATION instructions on the glass block sealant tube to open the tube. Coverage rate is one tube per sixteen (16) blocks. The sealant skins over in 15-17 minutes. Don’t
seal more joints than can be tooled in approximately
17 minutes. Practice the sealing technique before starting.
M
Thinline™ TRACK
SPACER
Q
•Now that last row of blocks have been installed, slide short pieces cut from the Thinline™ Track spacers into the gap
between top of blocks and half-channel previously installed,
if space permits.
•Apply a 1/4” bead of sealant horizontally across the top of the rough opening (1/2” from exposed edge).
•Then apply a 1/4” bead of sealant horizontally across the top inside edge of the other half of channel and slide it into place wedging it between the spacer and the top of the rough opening (Illus.L) (you may need a piece of tape to hold the channel in place until the sealant sets).
Q
GLASS
BLOCK
Q SEALANT
N
O
•Seal the horizontal joints first, pulling the tube through the joint. Slightly over fill the joint. See illustration (Illus. M).
•Use the spoon-shaped finishing tool and push it over the joints at an angle to collect the excess sealant and seal the joint. Periodically wipe the sealant from the joint finishing tool bowl (Illus. N & O).
•Remove any excess sealant from the block faces with the
side of your finishing tool.
•Use the same method to fill the vertical joints. Carefully
work the joint intersections to create a smooth finish.
Repeat this procedure to seal the opposite side of the panel.
•Do not use the back of the finishing tool to smooth joints. This will only smear the sealant.
•Allow the sealant to cure 48 hours before putting any stress on the panel.
•For all exterior panels and panels exposed to water, run a bead of sealant between the perimeter channels and the
face of the blocks. Also, between the perimeter channels
and the framing. Use the joint finishing tool to seal these joints. Remove excess sealant.
•The piece of perimeter channel along the top (which was wedged in place earlier) must always have a bead of sealant applied between the channel and the frame.
•
•
•
After 48-hours remove any excess sealant from the glass block faces with a razor blade.
Clean channel surfaces and glass block faces with glass cleaner or soapy water. Do not use abrasive cleaners or steel wool which may damage the glass surface and sealant.
Install surrounding wood or other trim, if desired.
Option 2 – Grouted Joint Finish:
IMPORTANT: The ProVantage® Surface Grout was designed and tested for this application – DO NOT SUBSTITUTE!
•
•
•
•
•
•
•
•
•
•
Caution: Avoid contact with skin. Safety glasses and impervious gloves are recommended to minimize skin and eye contact.
This is a fast cure grout and should be applied and completely wiped down within 1 hour. Grout will cure very rapidly after this time period.
Do not grout the perimeter joints between the blocks and the channels. These joints must be caulked after the grout has dried for a pliable watertight joint.
Directions must be followed to the exact detail.
Follow mixing instructions on ProVantage® Surface Grout.
Grout coverage rate is 80 glass block units per 15 lb. bucket.
Approximate ratio is: 3 cups grout to 1 cup water (grout should be mixed to a toothpaste-like consistency).
Apply grout with a rubber float by pushing grout into all joints. Make sure to push grout in from multiple directions
to assure joints are FULLY packed with grout. Be careful not
to move the glass blocks while grouting, as the wall will still be a bit flexible prior to the grout curing completely. Movement may cause the grout to separate or squeeze out.
Wipe down the glass block wall using a tile/grout sponge and a clean bucket of water. Always wipe down in a diagonal direction. This will prevent the grout from being wiped out of the joints. Make sure to rinse the sponge frequently, as it will quickly fill up with excess grout. Fully wring out all the water from the sponge prior to wiping.
Wipe down should recur in multiple directions until all the grout is removed from the block surface, and joints are smooth.
Let the glass block wall set for 15 minutes, then wipe it down again using a clean bucket of water.
The grout will cure within four hours. At this point you can begin polishing glass blocks by wiping down with cheesecloth.
•
•
After the grout is completely dry (approx. 4 hrs.), seal the perimeter joints between the blocks and the channels.
Use a plastic spoon to take off and smooth out any excess sealant.
Grout Sealer
•
•
Wait four hours, then apply grout sealer to all grout joints. Immediately wipe off any excess sealer with a clean, dry cloth to prevent it from adhering to the glass block.
For maximum protection it is recommended that you apply a second coat of sealer after first coat has dried.
Install surrounding wood or other trim, if desired.
Maintenance
An important part of the functional beauty of Pittsburgh
Corning Glass Block products is that they are virtually
maintenance free! There’s nothing to rot, rust, peel or paint.
All that is needed is an occasional wiping with a damp, soft
cloth on interior panels or a hosing on exterior panels. With
minimal attention, your Pittsburgh Corning Glass Block
panel will remain sparkling and beautiful for years!
Caution: Shower applications—avoid cleaning procedures
which may damage the joint sealant and cause water
leakage through the joint.
If You Need Assistance
We hope these instructions are clear and answer your
questions about the installation of basic, straight Pittsburgh
Corning Thinline™ Series Glass Block panels with the
Thinline™ Track Spacer System. For additional information
on Pittsburgh Corning Glass Block visit our website at
www.pittsburghcorning.com or call
1-800-624-2120.
The information contained herein is accurate and reliable to
the best of our knowledge. But, because Pittsburgh Corning
Corporation has no control over installation workmanship,
accessory materials or conditions of application, NO EXPRESS
OR IMPLIED WARRANTY OF ANY KIND, INCLUDING THOSE OF
MERCHANTABILITY OR FITNESS FOR A PARTICULAR PURPOSE,
IS MADE as to the performance of an installation containing
Pittsburgh Corning products. In no event shall Pittsburgh Corning
be liable for any damages arising because of product failure,
whether incidental, special, consequential or punitive, regardless of
the theory of liability upon which any such damages are claimed.
Pittsburgh Corning Corporation provides written warranties for
many of its products, and such warranties take precedence over
the statements contained herein.
Pittsburgh Corning Corporation
800 Presque Isle Drive
Pittsburgh, PA 15239
1-800-624-2120
www.pittsburghcorning.com
All trademarks and registered trademarks in this brochure are
owned and protected by Pittsburgh Corning Corporation,
Pittsburgh, PA 15239
© 2007 Pittsburgh Corning Corporation
Printed in U.S.A.
GB-311 50M 7/07