1
9
8
SIL
NE
I CO
7
1
3
1
2
3
2
1
4
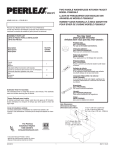
Apply silicone to underside of flange (1). Insert flange
into sink.
Aplique silicón por debajo de la brida (1). Introduzca
la brida dentro del lavamanos.
Appliquez de composé à la silicone sous la collerette
(1). Introduisez la collerette dans l’évier.
With pivot (1) facing toward faucet, pull pop-up
straight down into drain hole and secure
gasket (2), brass nut and washer (3). DO
NOT TURN POP-UP WHILE TIGHTENING
BRASS NUT OR SEALANT MAY NOT SEAL
DRAIN. Remove excess sealant.
Con el pivote (1) de frente a la llave, hale el
desagüe automático directamente hacia abajo
dentro del drenaje y fije el empaque (2), la
tuerca de bronce y la arandela (3). NO GIRE
EL DRENAJE AUTOMÁTICO MIENTRAS
APRIETE LA TUERCA DE BRONCE O EL
SELLADOR PUEDA NO SELLAR EL
DRENAJE. Quite el exceso de sellador.
Alors que le pivot (1) fait face au robinet, tirez
le renvoi directement vers le bas dans l’orifice
de l’évier, puis fixez le joint (2), l’écrou en
laiton et la rondelle (3). NE TOURNEZ PAS
LE RENVOI PENDANT QUE VOUS
SERREZ L’ÉCROU EN LAITON CAR LE
COMPOSÉ À LA SILICONE POURRA
NE PAS ASSURER L’ÉTANCHÉITÉ DU
RENVOI. Enlevez l’excès de composé
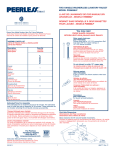
Install black gasket (1), washer and brass nut (2)
onto flange (3) from below sink but do not tighten
brass nut (2). Screw on tail piece (4) and hand
tighten.
Instale el empaque negro (1), la arandela y la
tuerca de bronce (2) en la brida (3) desde la
parte interior del lavamanos pero no apriete la
tuerca de bronce (2). Atornille la pieza de cola
(4) y apriete a mano.
Montez le joint noir (1), la rondelle et l’écrou en
laiton (2) sur la collerette (3) par dessous l’évier
sans serrer l’écrou en laiton (2). droit de vidange
(4) et serrez-le à la main.
d’étanchéité.
12
11
10
4
4
3
5
2
2
3
1
4
5
1
6
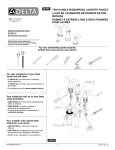
Remove pivot nut (1). Install horizontal rod (2)
and stopper (3) as removable (4) or
non-removable (5). Hand tighten pivot nut (1).
Attach horizontal rod (1) to strap (2) using clip (3).
Install lift rod (4), tighten screw (5). Connect
assembly to drain (6).
CONNECT TO WATER SUPPLIES. (HOOK-UPS
NOT PROVIDED).
Quite la tuerca del pivote (1). Instale la barra
horizontal (2) y el tapón (3) como desmontable (4)
o fijo (5). Apriete a mano la tuerca del pivote (1).
Una la barra horizontal (1) a la barra chata (2)
utilizando el gancho (3). Instale la barra de alzar
(4), apriete el tornillo (5). Conecte el ensamble al
desagüe (6).
CONECTE A LOS SUMINISTROS DE AGUA.
(LAS CONEXIONES NO SON PROPORCIONADAS).
Enlevez l’écrou du pivot (1). Installez la tige
horizontale (2) et la bonde (3) de manière que la
bonde soit amovible (4) ou non amovible (5).
Serrez l’écrou (1) du pivot à la main.
Fixez la tige horizontale (1) au feuillard (2) à l’aide
de l’agrafe (3). Installez la tige de manoeuvre (4) et
serrez la vis (5). Fixez l’ensemble au renvoi (6).
RACCORDEMENT À LATUYAUTERIE D’ALIMENTATION
(RACCORDS NON FOURNIS)
3
66471 Rev. D