1
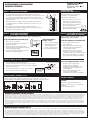
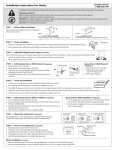
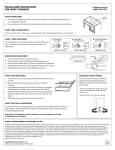
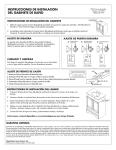
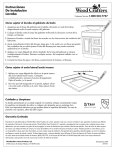
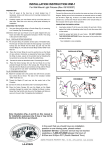
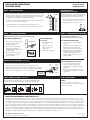
INSTALLATION INSTRUCTIONS
FOR LINEN TOWER
Customer Service
1(800) 235-7747
ADJUSTABLE HEIGHT
LEVELERS (LEGS) (IF APPLICABLE)
STEP 1 TOWER INSTALLATION
1.
top
O
IC
SIL
back
top rail
E
N
We recommend, in order to avoid an accident, to secure the linen tower to the wall
by passing screws of 1¼" or 2" (not included) through the back top rail and into the
wall studs. If it is not possible to fasten into a wall stud, we then recommend using
3/
16" toggle bolts (not included) or an appropriate wall anchor.
wall stud
To secure to a concrete or brick formed wall, for better safety we recommend to use
two 1¼" or 2" concrete screws (not included).
2.
* To lower the cabinet turn levelers clock wise or to
rise the cabinet turn levelers counter clock wise.
* Adjust until level across the top is leveled.
For models that include a non-installed top, apply a thin bead of silicone
compound around the tower base to properly secure the top onto the linen tower.
STEP 2
STEP 3
TOWER DRAWER REMOVAL
FULL EXTENSION DRAWER GLIDES
EPOXY DRAWER GLIDES
1.
Open the drawer as far as possible.
2.
Identify the plastic spring clips
located in both slides.
3.
At the same time, press the right
slide spring clip downward
and the left slide spring clip upward
(Fig.#1 & Fig.#2).
Once both spring clips are held in
the indicated position, pull the
drawer straight out.
DRAWER FRONT ADJUSTMENT
spring clip
Fig.#1
(IF APPLICABLE)
FULL EXTENSION DRAWER GLIDES
1.
Open the drawer as far
as possible.
1.
Close completely both slides attached to
the vanity.
2.
Lift the front part of the
drawer to reach a 30º
angle position.
2.
Move the component of the slides with
ball bearings to the front of the slides,
maintaining the slides completely closed.
3.
Pull the drawer straight out.
3.
Carefully line up the slides of the drawer
box with the slides in the vanity and close
the drawer all the way to the back.
4.
Open the drawer completely to ensure it is
properly installed.
left side
Fig.#2
(IF APPLICABLE)
EPOXY DRAWER GLIDES (IF APPLICABLE)
1.
Remove decorative hardware from the drawer front.
2.
Hold drawer front in place and slightly loosen both alignment screws.
3.
Move the drawer front left, right, up or down to desired position for alignment.
4.
While holding the drawer front in place, tighten the alignment screws securely.
5.
Install the decorative hardware to the outside of the drawer front.
drawer
box
B Used to adjust
door height
C Used to adjust between
gaps between doors
A
CABINET FRONT VIEW
door and cabinet
In a 30º angle position, introduce the
drawer in the vanity making sure the
drawer slide wheels are above the vanity
slide wheels.
2.
Close the drawer completely and to ensure
it has been properly installed, open it as far
as possible.
decorative hardware
TOWER
To clean surface of doors or cabinet, use
non-abrasive cleaners and or cleaning agents that
do not contain solvents.
C
B
CABINET FRONT VIEW
1.
CARE & MAINTENANCE
(IF APPLICABLE)
The door alignment was set in the factory, but it could have shifted during transit.
If adjustment is needed, follow the instructions provided in the adjacent chart.
A Used to adjust
alignment
screws
drawer front
alignment screws
HINGE | DOOR ADJUSTMENT
TOWER DRAWER INSTALLATION
If removal of tower drawers was
necessary follow these steps to re-install:
If removal of tower drawers is required, follow these steps:
4.
Make sure the base of the vanity is leveled by laying a
level (not included) across the top. If adjustment is
needed use base levelers located under each leg.
CABINET SIDE VIEW
LIMITED LIFETIME WARRANTY APPLICABLE TO USA
The product has been manufactured by WoodCrafters Home Products, LLC 2700 Camino de Verdad, Weslaco, TX 78596 and is warranted under normal use and service, to be free
from defects in material and workmanship for as long as the original purchaser remains the owner. During this warranty period, WoodCrafters Home Products, LLC will repair or replace
at WoodCrafters Home Products, LLC sole option, free of charge, any defective part or parts returned with shipping charges prepaid to the distribution center listed below. Please include
the original receipt with date of purchase and the nature of the problem. Merchandise not returned prepaid will be refused. Our warranty does not cover damage or failure caused by
abuse, misuse, abnormal usage, faulty installation, improper maintenance or any repair other than those by WoodCrafters Home Products, LLC. There are no obligations or liabilities on
the part of WoodCrafters Home Products, LLC for consequential damage or lost profits arising out of or in connection with the use or performance of the product or any indirect damages
included, but not limited to labor charges for installation or removal. This warranty gives you specific legal rights, and you may also have other rights that may vary from jurisdiction to
jurisdiction. Further information regarding this warranty may be obtained without charge by contacting WoodCrafters Home Products, LLC Customer Service. If any parts are missing or
damaged, please call WoodCrafters Home Products, LLC Customer Service at (800) 235 - 7747, between 8 a.m. and 5 p.m. C. S. T.
WoodCrafters Home Products, LLC
2700 Camino de Verdad, Weslaco, TX 78596-1266
October 2011
551716
Customer Service USA
1(800) 235-7747
INSTRUCCIONES DE INSTALACIÓN
GABINETE UTILITARIO
PASO 1
INSTRUCCIÓN PARA
NIVELAR EL UTILITARIO
INSTALACIÓN DEL UTILITARIO
Se recomienda, para evitar un posible accidente, fijar la torre a la pared,
atronillando a través del respaldo o del soporte trasero con dos pijas de 1¼" or 2"
(no incluidas). Si no es posible fijar la torre sobre el barrote de la estructura,
entonces puede utilizar taquetes para tablaroca de 3/16" (no incluidos) o anclas de
pared apropiadas.
cubierta
N
CO
LI
SI
1.
Centro de Atención al Cliente México
01(800) 570-0319
soporte
trasero
Coloque el nivelador de gota en el lavabo
(no incluido), si no queda la burbuja
centrada siga los siguientes pasos.
barrotes
* Ajuste los niveladores de tornillo que se
encuentran en la cara inferior de las 4
patas del mueble, girándolos en sentido
de las manecillas del reloj para bajar o
gírelos en contra para subir.
Para pared de concreto o ladrillo, para mayor seguridad de la instalacion, le
recomendamos fijar la torre utilizando dos taquetes de concreto de 1¼" or 2"
(no incluidos).
2.
En los modelos que incluyan una cubierta no instalada, coloque una
capa delgada de silicón alrededor de la parte superior del mueble y coloque la
cubierta de resina centrada en el mueble.
PASO 2
* Ajuste hasta que logre que la burbuja
del nivelador quede centrada.
INSTRUCCIÓN PARA RE-INSTALAR
INSTRUCCIÓN PARA REMOVER
LOS CAJONES DEL UTILITARIO
PASO 3 LOS CAJONES DEL UTILITARIO
Si fue necesario remover los cajones, siga los
siguientes pasos para re-instalar:
En caso de que requiera remover los cajones, siga los siguientes pasos:
CAJÓN CON CORREDERA DE EXTENSIÓN TOTAL
1.
Abrir el cajón en su totalidad.
2.
Localizar las pestañas de plástico ubicadas en
ambos rieles del cajón.
3.
Al mismo tiempo, empujar la pestaña del riel
derecho hacia abajo y la pestaña del riel izquierdo
hacia arriba (Fig.#1 & Fig.#2).
4.
Una vez teniendo ambas pestañas en la posición
indicada, tirar el cajón hacia afuera.
pestañas de
plástico
Fig.#1
CAJON CON CORREDERA
EPÓXICA (SI APLICA)
CAJÓN CON CORREDERA DE EXTENSIÓN TOTAL
1.
Abrir el cajón en su totalidad.
1.
2.
Levantar la parte frontal del
cajón hasta llegar a una
posición con ángulo de 30º.
Cerrar completamente ambos rieles
sujetos al gabinete.
2.
3.
Tirar el cajón hacia afuera.
Mover la placa interior con balines hacia
el frente de ambos rieles manteniendo el
riel completamente cerrado.
3.
Cuidadosamente alinear los rieles sujetos
al cajón con los rieles sujetos al gabinete
e introducir el cajón hasta cerrarlo por completo.
4.
Abrir el cajón completamente para asegurarse
que el cajón ha sido instalado correctamente.
izquierdo
Fig.#2
AJUSTE DE FRENTES DE CAJÓN
1.
(SI APLICA)
Remueva el herraje decorativo del frente del cajón.
2.
Sostenga el frente del cajón en su lugar y afloje un poco los tornillos.
3.
Mueva el frente hacia la izquierda, derecha, hacia arriba o abajo hasta
lograr la posición deseada.
4.
Sosteniendo el frente del cajón en su lugar, apriete los tornillos.
5.
Instale el herraje decorativo por el frente del cajón.
AJUSTE DE PUERTA | BISAGRA
cajón
tornillos para alineamiento
tornillos para
alineamiento
C Ajuste entre puerta y
entre las puertas
A
VISTA DE FRENTE
En una posición con ángulo de 30º,
introducir el cajón en el gabinete
asegurándose que las ruedas de los rieles
del cajón pasen sobre las ruedas de los
rieles del gabinete.
2.
Cierre el cajón completamente y para
asegurar que ha sido instalado
correctamente, abra el cajón en su totalidad.
(SI APLICA)
B Ajuste de espacio
de la puerta
CAJON CON CORREDERA EPÓXICA (SI APLICA)
1.
frente del cajón
herraje decorativo
Las puertas estan alineadas de fábrica, pero pudieron haberse desalineado en el envío. Si es
necesario alinearlas, recomendamos ajustar las puertas según se muestra en el siguiente diagrama.
A Ajuste de altura
(SI APLICA)
gabinete
C
B
VISTA DE FRENTE
CUIDADO Y LIMPIEZA
UTILITARIO
Para limpiar la superficie del gabinete o las
puertas, use un trapo limpio y seco y limpie toda
la superficie.
No usar limpiadores abrasivos.
VISTA LATERAL
GARANTÍA LIMITADA APLICABLE A MÉXICO
Woodcrafters Home Products S. de R.L. de C.V. garantiza este producto a partir de la fecha de compra y durante el tiempo que el comprador original lo posea. Esta garantía cubre al producto exclusivamente
por defectos en los materiales o en su fabricación. Woodcrafters Home Products S. de R.L. de C.V. reemplazará bajo su propio costo, el Gabinete Completo. En los casos que el modelo esté descontinuado, se
ofrecerá reemplazar el producto por uno de características similares, que se encuentre disponible en el mercado. Para hacer válida la garantía, deberá acudir a la tienda de Home Depot donde realizó su
compra incluyendo el artículo a reemplazar, recibo original o factura de compra que indique la fecha para su reemplazo. Nuestra garantía no cubre daños por el uso inapropiado o abuso que se le dé al
producto, ni por daños realizados durante la instalación, así mismo, excluye los daños causados por condiciones del ambiente, humedad, limpiadores o substancias abrasivas. Esta garantía no podrá
transferirse. Esta garantía es aplicable sólo a los productos fabricados después del 1 de Diciembre del 2010. Para mayor información, favor de comunicarse al número gratuito 01-800-570 - 0319 desde el
interior de la República Mexicana derechos que lleguen a cambiar de estado a estado. Si faltara alguna parte o estuviera dañada, favor de llamar al Centro de Atención al Cliente, al número de teléfono sin
costo, dentro de los Estados Unidos de América, (800) 235-7747, en el horario de 8 a.m. a 5 p.m. tiempo del Centro. Para mayor información relacionada a esta garantía, favor de comunicarse al Centro
de Atención al Cliente.
GARANTÍA LIMITADA APLICABLE A E.U.A.
El producto ha sido fabricado por WoodCrafters Home Products, LLC y tiene garantía, bajo uso y servicio normales, lo que garantiza al producto por defectos de materiales y fabricación. Durante este
periodo, WoodCrafters Home Products, LLC reparará o reemplazará, bajo su propio costo, cualquier parte o partes defectuosas, que sean enviadas con gastos de envío pagados, al centro de distribución
que se enlista al final de este párrafo. Favor de incluir el recibo original de compra, que indique la fecha de compra y la causa del problema. No se recibirá mercancía enviada por cobrar. Nuestra garantía
no cubre daños por el uso inapropiado o abuso que se le dé al producto, así como ningún cargo de instalación. Esta garantía tiene específicos derechos legales, así como los derechos que lleguen a cambiar
de estado a estado. Si faltara alguna parte o estuviera dañada, favor de llamar al Centro de Atención al Cliente, al número de teléfono sin costo, dentro de los Estado Unidos de América, (800) 235-7747,
en el horario de 8:00 AM a 5:00 PM tiempo del Centro. Para mayor información relacionada a esta garantía, favor de comunicarse al Centro de Atención al Cliente.