Download Hampton Bay HDP12069 Installation Guide
Transcript
Item # XXXXX Model # HDP12069 USE AND CARE GUIDE ARGYLE 4-LIGHT CHANDELIER Questions, problems, missing parts? Before returning to the store, call Hampton Bay Customer Service 8 a.m.-6 p.m., EST, Monday-Friday 1-877-527-0313 HOMEDEPOT.COM THANK YOU We appreciate the trust and confidence you have placed in Hampton Bay through the purchase of this light fixture. We strive to continually create quality products designed to enhance your home. Visit us online to see our full line of products available for your home improvement needs. Thank you for choosing Hampton Bay! Table of Contents Safety Information .................................................... 2 Assembly ..................................................................... 5 Warranty ................................................................... 2 Installation ................................................................... 6, 7 Pre-Installation .......................................................... 3 Care and Cleaning ....................................................... 7 Planning installation ............................................ 3 Troubleshooting ........................................................... 7 Tools Required ..................................................... 3 Materials Required ............................................... 3 Hardware Included ............................................... 3 Package Contents ................................................. 4 Safety Information □ Consult a qualified electrician with any electrical questions you may have. IMPORTANT: Inspect the wire insulation for any cuts, abrasions, or exposed copper that may have occurred during shipping. If there is a defect in the wire, do not continue the assembly process. Please call our Customer Service Team at 1-877-527-0313. Warranty The manufacturer warrants this lighting fixture to be free from defects in the materials and workmanship for a period of one (1) year from date of purchase. This warranty applies only to the original consumer purchaser and only to products used in normal use. If this product is found to be defective, the manufacturer's only obligation, and your exclusive remedy, is the repair or replacement of the product at the manufacturer's discretion, provided that the product has not been damaged through misuse, abuse, accident, modifications, alterations, neglect or mishandling. This warranty shall not apply to any product that is found to have been improperly installed, assembled, or used in any way not in accordance with the instructions supplied with the product. This warranty shall not apply to a failure of the product as a result of an accident, misuse, abuse, negligence, alteration, faulty installation, or any other failure not relating to faulty material or workmanship. This warranty shall not apply to the finish on any portion of the product due to weathering, as this is considered normal wear. The manufacturer does not warrant and specifically disclaims any warranty, whether expressed or implied, other than the warranty contained herein. The manufacturer specifically disclaims any liability and shall not be liable for any consequential or incidental loss or damage, including but not limited to, any labor or expense costs involved in the replacement or repair of the product. Contact the Customer Service Team at 1-877-527-0313 or visit www.HomeDepot.com . 2 Pre-Installation PLANNING INSTALLATION Read all instructions before assembly. To avoid damaging this product, assemble it on a soft, non-abrasive surface such as carpet or cardboard. Inspect each part for defects that may have occurred during shipping. Keep your receipt and these instructions for proof of purchase. TOOLS REQUIRED Safety goggles Phillips screwdriver Flathead screwdriver Wire strippers Wire cutters Ladder Pliers MATERIALS REQUIRED 60-watt max. type A bulb (4) Electrical tape HARDWARE INCLUDED NOTE: Hardware not shown to actual size. AA BB CC DD EE FF GG HH II JJ Part Description Quantity Part Description AA Wire nut 3 FF Nipple 1 BB Cross bar 1 GG 1 CC Outlet box screw 2 HH Canopy Screw Collar Loop DD Lock nut 1 II 1 EE Ground screw 1 JJ Screw Collar Nut Chain 3 Quantity 1 1 HOMEDEPOT.COM Please contact 1-877-527-0313 for further assistance. Pre-Installation (continued) PACKAGE CONTENTS Part Description Quantity A Chain loop 1 B Pole assembly 1 C Socket ring 4 D Glass shade 4 E Light fixture 1 F Distributor 1 G Arm 4 4 Assembly 1 2 Assembling the light fixture □ Carefully unpack the fixture, lay out all parts on clean surface. □ Pull the excess power cord through the chain loop (A). □ Screw the pole assembly (B) to top of the distributor (F). □ Place a glass shade (D) over each socket and secure with a socket ring (C). □ Install a 60-watt max. type A bulb (not included) into each socket on the light fixture. □ The arms (G) can be rotated 180 ° clockwise for uplight or downlight applications. 5 Preparing the light fixture to hang □ Use chain pliers or pliers with a screwdriver (see below) to open one link on the end of the chain (JJ) and attach the chain (JJ) to the chain loop (A) on the top of the light fixture (E). □ Remove or add chain links from the chain (JJ) in order to achieve the desired length for hanging the light fixture (E). □ Thread the fixture and silver ground wires up through every other link in the chain (JJ). HOMEDEPOT.COM Please contact 1-877-527-0313 for further assistance. Installation 1 2 Installing the cross bar □ Turn off the switch at the wall. □ Turn the power off at the main fuse box. □ Install the cross bar (BB) with nipple (FF), lock nut (DD), and screw collar loop (HH) to the outlet box using two outlet box screws (CC). □ Slide the screw collar nut (II) and then the canopy (GG) onto the end of the chain (JJ). □ Fasten the end link of the chain (JJ) to the screw collar loop (HH). □ Insert the fixture wires up through the nipple (FF). 6 Connecting the wires □ Install the fixture bare silver ground wire (KK) under the ground screw (EE) on the cross bar (BB). □ Connect the fixture and supply ground wires (KK) in the outlet box using a wire nut (AA). □ Connect the ribbed fixture and white (or ribbed) supply wires (LL) in the outlet box using a wire nut (AA). □ Connect the smooth fixture and black (or red) supply wires (MM) in the outlet box using a wire nut (AA). 
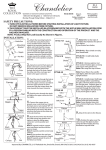
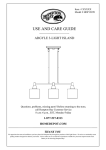
Installation (continued) 3 Hanging the light fixture □ Push all excess wires into the outlet box. □ Raise the canopy (GG) to the ceiling and secure in place by screwing the screw collar nut (II) onto the screw collar loop (HH). Care and Cleaning □ Clean the light fixture with a soft, dry cloth. Do not use any cleaners with chemicals, solvents, or harsh abrasives. Troubleshooting Problem Possible Cause Solution The bulb will not light. □ The bulb is burned out. □ Replace the light bulb. □ The power is off. □ Ensure that the power supply is turned on. □ There is a faulty wire connection. □ Check the wiring. □ The circuit breaker is off. □ Ensure that the circuit breaker is set in the on position. The fuse blows or a □ There is an exposed wire. circuit breaker trips when □ There are too many items on the light is turned on. one circuit. 7 □ Discontinue use of the light fixture. □ Contact a qualified electrician or call the Customer Service Team at 1-877-527-0313. □ Unplug other items on the circuit. HOMEDEPOT.COM Please contact 1-877-527-0313 for further assistance. Questions, problems, missing parts? Before returning to the store, call Hampton Bay Customer Service 8 a.m.-6 p.m., EST, Monday-Friday 1-877-527-0313 HOMEDEPOT.COM Retain this manual for future use.