1
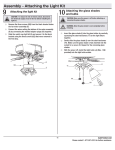
Assembly - Attaching the Light Kit
10
11
Attaching the light kit
CAUTION: To reduce the risk of electric shock, disconnect
the electrical supply circuit to the fan before installing the
light fixture.
□□ Remove the rubber washer, hex nut, and finial from the light
□□
□□ Remove the four screws on the black bracket of the fanmotor assembly (D).
□□
□□ Connect the wires exiting the bottom of the black bracket
□□
Installing the bulbs and attaching
the glass bowl
with the light kit fitter assembly by connecting the molded
adaptor connectors together.
Secure the light kit fitter assembly to the black bracket using
the four screws that were removed in the first step above.
□□
□□
kit fitter assembly.
With power off, install the three bulbs (K) (Max. 14W, included)
by screwing into the light bulb sockets.
Position the glass bowl (I) over the threaded nipple and pass
the pull chain (FF) for the fan through the pull chain guide on
the side of the light kit fitter assembly to avoid the chain from
touching the glass bowl.
Re-install the rubber washer and hex nut to the threaded
nipple to secure the glass bowl (I) properly.
Re-install the finial.
CAUTION: Do not over tighten the hex nut, overtightening the
hex nut may cause the glass to break.
D
K
E
I
FF
NOTE: Notice the location of the fan’s slide switch. This is the switch
used to change the fan’s directional rotation. For more information
on the operation of this switch, see Operating Your Fan and Remote
Control on page 12.
11
HAMPTONBAY.COM
Please contact 1-877-527-0313 for further assistance.
Ensamblaje – Cómo Unir los Accesorios
10
Cómo montar el juego de luces
11
□□ Retira la arandela de goma, la tuerca hexagonal y el ensam-
PRECAUCIÓN: Para disminuir el riesgo de descarga
eléctrica, desconecta el circuito de energía del ventilador
antes de instalar la lámpara.
□□
□□ Afloja los cuatro tornillos de la cubierta de la caja del inter□□
□□
Cómo instalar los focos y
colocar el tazón de vidrio
□□
ruptor (E) del ensamblaje del motor (D).
Conecta los cables que salen del fondo de la placa negra con
el ensamblaje del juego de luces/caja del interruptor, uniendo
los conectores con adaptadores moldeados.
Asegura el ensamblaje del juego de luces/caja del interruptor
a la placa negra mediante los cuatro tornillos que quitaste en
el paso uno.
□□
□□
blaje del ensamblaje del juego de luces/caja del interruptor.
Con el ventilador apagado, instala los tres focos (K) (de 14 W
Máximo, incluidas) ajustándolas en los portafocos.
Coloca el tazón de vidrio (I) sobre la boquilla enroscada y pasa
la cadena del interruptor (FF) del ventilador a través del orificio guía en el lado del ensamblaje del juego de luces/caja del
interruptor para evitar que toque el tazón de vidrio.
Reinstala la arandela de goma y la tuerca hexagonal en la
boquilla enroscada para asegurar el tazón de vidrio (I) correctamente.
Reinstala el remate.
CAUTION: No aprietes demasiado la tuerca hexagonal. Si lo
haces, podría quebrarse el vidrio.
D
K
E
I
FF
NOTE: Nota la ubicación del interruptor deslizable del ventilador.
Este interruptor se usa para cambiar la rotación direccional del
ventilador. Para más información sobre la operación del interruptor,
consulta las Instrucciones para Operar el Interruptor Deslizable en
la página 12.
11
HAMPTONBAY.COM
Para obtener asistencia, llama al 1-877-527-0313.