1
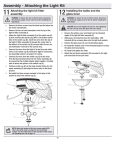
Installing the Light
Kit/ Glass Bowl
CAUTION - To reduce the risk of electrical
shock, disconnect the electrical supply circuit to
the fan before installing the light kit.
THE GLASS IS FRAGILE, USE ACRE WHEN
INSTALLING THE LIGHT KIT AND THE
GLASS SHADE.
1. Loosen but do not remove three of four
mounting screws from the light kit adaptor
below the fan motor assembly; remove one
mounting screw (Figure 11).
2. Connect the blue and white wires exiting the
light kit adaptor with the black and white
wires from the light kit assembly by engaging the molded adaptor plugs (blue to black;
white to white).
3. Carefully tuck connectors into the light
kit adaptor. Position the light kit assembly
onto the light kit adaptor, aligning each of
the four holes. Rotate the light kit assembly clockwise to engage the three mounting
screws with the three key hole slots, tighten
the screws. Re-install the one mounting
screw that was removed in step 1 and tighten
firmly.
4. With power off, install the two fluorescent
bulbs (Max. 14W, supplied) by screwing
into the light bulb sockets (Figure 12).
5. Place the glass shade into the light kit assembly, aligning the three flat areas on the
top flange of the glass shade with the three
raised dimples in the light kit assembly.
Turn the glass shade clockwise until it stops
(Figure 12).
8.
Figure 11
Figure 12
PERIODICALLY CHECK THE GLASS IS SEATED FULLY CLOCKWISE IN THE LIGHT KIT
ASSEMBLY.
ALLOW THE BULB TO COOL COMPLETELY BEFORE TOUCHING OR REPLACING THE BULBS
TO AVOID ACCIDENTAL BURNING OF THE SKIN.
Cómo instalar el kit de
luces/tazón de vidrio
PRECAUCIÓN - Para disminuir el riesgo de
descarga eléctrica, desconecta el circuito de energía del ventilador antes de instalar el kit de
luces.
EL VIDRIO ES FRÁGIL, TEN CUIDADO AL
INSTALAR EL KIT DE LUCES Y LA PANTALLA DE VIDRIO .
1. Afloja, pero no quites, tres de los tornillos de
montaje del adaptador del kit de luces debajo del ensamblaje del motor del ventilador,
retira un tornillo de montaje (Figura 11).
Figure 11
2. Conecta el cable azul y el cable blanco que
salen del adaptador del kit de luces con el
cable negro y el cable blanco del ensamblaje
del kit de luces, enganchando los enchufes
con adaptador moldeado (azul con negro,
blanco con blanco).
3. Coloca con cuidado los conectores dentro
del adaptador del kit de luces. Coloca el ensamblaje del kit de luces en el adaptador del
kit de luces, alineando cada uno de los cuatro orificios. Rota el ensamblaje del kit de
luces de izquierda a derecha para enganchar
los tres tornillos de montaje con los tres orificios tipo ojo de cerradura, ajusta los tornillos. Reinstala el tornillo de montaje que retiraste en el paso 1 y apriétalo firmemente.
Figura 12
4. Con el ventilador apagado, instala las dos
bombillas fluorescentes (máximo 14 vatios,
incluidas) ajustándolas en el portabombillas
(Figura 12).
VERIFICA CON FRECUENCIA QUE EL VIDRIO
ESTÉ AJUSTADO POR COMPLETO DE IZQUIERDA A DERECHA EN EL ENSAMBLAJE DEL
KIT DE LUCES.
5. Coloca la pantalla de vidrio en el ensamblaje del kit de luces, alineando las tres áreas
planas en el reborde superior de la pantalla
de vidrio con las tres muescas salientes del
ensamblaje del kit de luces. Gira la pantalla
de vidrio de izquierda a derecha hasta que se
detenga (Figura 12).
ESPERA QUE LA BOMBILLA SE ENFRÍE POR
COMPLETO ANTES DE TOCARLA O DE REEMPLAZARLA PARA EVITAR QUEMADURAS ACCIDENTALES EN LA PIEL.
8.