1
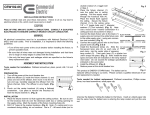
___________________________
ASSEMBLY AND INSTALLATION
1.
STEEL PLATE 2-LIGHT 4-FT
SHOPLIGHT MODEL CESL403-CL
2.
INSTALLATION INSTRUCTIONS
Please read carefully and save these instructions. Failure to do so may lead to
electrical shock or fire, which may cause injury or death.
Attach the small loop of each “S”
HOOK (2) to the end of each
3
SUPPORT CHAIN (3). Feed the
large loop of each “S” HOOK (2)
through the holes provided at each
end of the CHANNEL (1). Close
both ends of each “S” HOOK (2)
using pliers. (Fig. 1)
Select the desired installation
location. Be sure that a standard
120 V – 60 Hz outlet is located within
reach of the fixture’s power cord.
Fig. 1
Install two hooks (not included) on
the desired location of the ceiling.
Be sure to install the ceiling hooks no more than fixture length apart. Install the
fixture to the ceiling by looping the remaining ends of each SUPPORT CHAIN (3)
to each ceiling-installed hook.
3.
To install the tube lamps, guide the pins on one end of the lamp into one socket
(4). Guide the other end of the tube into the opposite socket (4). Rotate the tube
90° (1/4 turn) in either direction until seated. Be sure to use the correct type and
wattage lamps, which are specified on the provided label on the fixture.
4.
Plug the fixture’s power cord to a 120 V – 60 Hz outlet.
5.
Pull the HANGING SWITCH CHAIN to turn the fixture on or off.
_______
CAUTION
WARNING – RISK OF FIRE: Turn off the main power at the circuit breaker before
installing the fixture, changing lamps, or performing other maintenance in order to
prevent possible shock.
Fig. 3
________
GENERAL
All electrical connections must be in accordance with local, and national electrical
codes.
Prior to installation it is important to follow the following guidelines:
_____________________
A. Be sure the insulation power cord has not been damaged during
installation and that there are no rough or sharp edges in contact with
the wires.
This product is ENERGY STAR® listed. The ballast can be replaced without having to
cut wires. Please contact a qualified electrician if ballast replacement is needed.
B. Use only the type of light bulb specified, with wattage not greater than
specified on the wattage label found on the fixture.
Tools needed for ballast replacement:
Flathead screwdriver, Phillips screwdriver,
hex head screwdriver, small paper clip
C.
Remove all protective plastic film covering from the fixture.
D.
Do not mount the fixture vertically or flush against the ceiling.
Tools needed for installation: Phillips screwdriver, pliers.
Unscrew the fastener holding the ballast to the fixture. Insert an unbent paper clip into
the same hole the ballast wire is entering the lamp socket and pull the wire out.
______________________
MONTAJE E INSTALACIÓN
1.
Coloque el bucle pequeño de cada
GANCHO "S" (2) al final de cada
CADENA DE SOPORTE (3). Inserte el
bucle grande de cada GANCHO "S" (2)
a través de los agujeros provistos en
cada extremo del CANAL (1). Cierre
ambos extremos de cada GANCHO "S"
(2) con unos alicates. (Fig. 1)
2.
Seleccione el lugar de instalación
deseado. Asegúrese de que un enchufe
Fig. 1
estándar de 120 V - 60 Hz este al
alcance del cable de alimentación del
aparato. Instale dos ganchos (no
(no incluido) en la ubicación deseada del techo. Asegúrese de que los ganchos
del techo no se instalen mas lejos que la longitud de la lámpara. Instale el aparato
en el techo haciendo un bucle en los extremos restantes de cada cadena (3) a
cada gancho del techo instalado.
3.
Para instalar los tubos fluorescentes, guie los pasadores en un extremo de la
tubo hacia un extremo de la tubo hacia un ZOCALO (4). Guie el otro extremo del
tubo hacia el ZOCALO (4) opuesto. Gire el tubo 90° (1/4 vuelta) en cualquier
dirección hasta que se asiente. Asegúrese de usar el tipo y potencia correcto de
lámparas que se especifican en la etiqueta de la lámpara.
4.
Conecte el cable de alimentación de la lámpara a un enchufe de 120 V – 60 Hz.
5.
Jale la CADENA COLGANTE para encender o apagar la lámpara.
PLATO DE ACERO 2-LUCES 4-PIES
LUZ DE TALLER MODELO CESL403-CL
INSTALLATION INSTRUCTIONS
Please read carefully and save these instructions. Failure to do so may lead to
electrical shock or fire, which may cause injury or death.
_______
CAUTION
WARNING – RISK OF FIRE: Turn off the main power at the circuit breaker before
installing the fixture, changing lamps, or performing other maintenance in order to
prevent possible shock.
3
Fig. 3
________
GENERAL
All electrical connections must be in accordance with local, and national electrical
codes.
Prior to installation it is important to follow the following guidelines:
___________
A. Be sure the insulation power cord has not been damaged during
installation and that there are no rough or sharp edges in contact with
the wires.
Este producto esta en la lista de ENERGY STAR®. El lastre puede cambiarse sin
necesidad de cortar cables. Póngase en contacto con un electricista calificado si es
necesario el reemplazo del balastro.
B. Use only the type of light bulb specified, with wattage not greater than
specified on the wattage label found on the fixture.
Herramientas necesarias para la sustitución
de lastre: desarmador plano, desarmador Phillips,
desarmador de cabeza hexagonal, un clip de
papel pequeño.
C.
Remove all protective plastic film covering from the fixture.
D.
No monte el luminario verticalmente o al ras con el techo.
Tools needed for installation: Phillips screwdriver, pliers.
Desatornille el sujetador sosteniendo el balasto a la lámpara. Introduzca un clip de
papel enderezado en el hoyo del casquillo donde está entrando el cableado eléctrico
en la lámpara y jale el cable hacia fuera.
___________________________
ASSEMBLAGE ET INSTALLATION
Enfiler les petites boucles de crochets
en S (2) à une extrémité de chaque
chaîne de support (3). Enfiler les
grands boucles de crochets en S (2) à
travers les trous prévus dans le boîtier
(1). Femer les deux extrémités de
chaque crochet en S (2) à l’aide d’une
pince. (Fig. 1)
2.
Choisir
un
emplacement
pour
Fig. 1
l’installation. S’assurer qu’une prise
secteur standard 120 V/60 Hz se
trouve à portée du cordon d’alimentation en la lampe. Installer deux crochets (non
fournis) à l’emplacement choisi au plafond. Fixer la lampe au plafond en
passant l’autre extrémité des deux chaînes (3) dans les crochets.
3.
Pour installer des tubes fluorescents, guidez les broches à une extrémité de l’tube
dans l’une des douilles (4). Placez l’autre extrémité de l’ampoule. l’ampoule dans
la douille (4) opposée. Faites pivoter l’tube 90° (1/4 tour) dans un sens ou l’autre
jusqu’à ce qu’elle se bloque en place. Assurez-vous d'utiliser le bon type et
lampes de puissance qui sont indiquées sur l'étiquette fournie avec l'appareil.
4.
Rétablir le courant, puis brancher le cordon de la lampe sur une prise de120 V/60
Hz.
5.
Tirez la chaîne pendante de tourner la lampe ou désactiver.
PLAQUE D’ACIER 2-AMPOULE 4-PIEDS
LUMIÈRE DE BOUTIQUE MODÈLE CESL403-CL
INSTRUCTIONS D’INSTALLATION POUR PLAFONNIER
Lire attentivement ce mode d’emploi et le conserver. Tout manquement à ces
instructions risqe d’entrainer un choc électrique ou un incendie povant causer de
blessures, voire la mort.
____________
PRECAUTION
3
1.
ATTENTION– RISQUE D’INCENDIE: couper le courant au niveau du disjoncteur
avant d’installer la lampe et avant toute intervention de maintenace pour éviter tout
risque de choc électrique.
____________
GENERALITES
Fig. 3
Toutes les connexiones électriques doivent être conformes aux réglementations
nationales et locales en d’installations électriques.
Veiller à bien suivre la procédure suivante avant l’installation:
_____________________
A.
S’assurer que le cordon d’alimentation n’a pas été endommagé pendant
l’installation et qhe le càbles ne touchent aucun bord rugueux ni arête
vive.
Ce produit est certifié ENERGY STAR®. Le ballast peut être remplacement sans
avoir à couper les fils d’alimentation. Si vous devez remplacer le ballast, veuillez vous
adresser à un électricien certifié.
B.
N’utiliser que des tubes fluorescents du type indiqué, don’t la
puissance ne dépasse pas la valeur précisée sur l’ étiquette de la
lampe.
Outils nécessaires au remplacement du ballast:
tournevis à tête plate, tournevis Phillips,
tournevis à tête hexagonale, trombone.
C.
Enlevez le film protecteur de plastique recouvrant du projecteur.
D.
Ne pas monter le luminaire verticalement ou à égalité avec le plafond.
Outils nécessaires à l’installation: tournevis Philips, pinces
Dévissez l’attache fixant ballast sur le luminaire. Insérez un trombone dans le trou
dans lequel le fil d’alimentation du ballast passe pour entrer dans la douille de la lampe
et tirez le fil hors du trou.