1
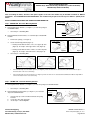
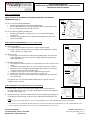
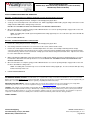
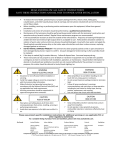
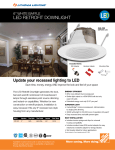
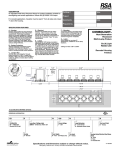
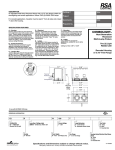
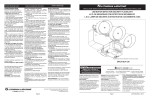
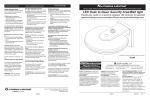
LED IMPORTANT SAFETY INSTRUCTIONS
READ AND FOLLOW ALL SAFETY INSTRUCTIONS! SAVE THESE
INSTRUCTIONS AND DELIVER TO OWNER AFTER INSTALLATION
• To reduce the risk of death, personal injury or property damage from fire, electric
shock, falling parts, cuts/abrasions, and other hazards please read all warnings and
instructions included with and on the fixture box and all fixture labels.
• Before installing, servicing, or performing routine maintenance upon this equipment,
follow these general precautions.
• Installation and service of luminaires should be performed by a qualified licensed
electrician.
• Maintenance of the luminaires should be performed by person(s) familiar with the
luminaires’ construction and operation and any hazards involved. Regular fixture
maintenance programs are recommended.
• It will occasionally be necessary to clean the outside of the refractor/lens. Frequency
of cleaning will depend on ambient dirt level and minimum light output which is
acceptable to user. Refractor/lens should be washed in a solution of warm water and
any mild, non-abrasive household detergent, rinsed with clean water and wiped dry.
Should optical assembly become dirty on the inside, wipe refractor/lens and clean in
above manner, replacing damaged gaskets as necessary.
• DO NOT INSTALL DAMAGED PRODUCT! This luminaire has been properly
packed so that no parts should have been damaged during transit. Inspect to confirm.
Any part damaged or broken during or after assembly should be replaced.
• Recycle: For information on how to recycle LED electronic products, please
visit www.epa.gov.
• These instructions do not purport to cover all details or variations in equipment nor to
provide every possible contingency to meet in connection with installation, operation,
or maintenance. Should further information be desired or should particular problems
arise which are not covered sufficiently for the purchaser’s or owner’s purposes, this
matter should be referred to Acuity Brands Lighting, Inc.
WARNING RISK OF ELECTRIC SHOCK
• Disconnect or turn off power before installation or servicing.
• Verify that supply voltage is correct by comparing it with the luminaire
label information.
• Make all electrical and grounded connections in accordance with the National
Electrical Code (NEC) and any applicable local code requirements.
• All wiring connections should be capped with UL approved recognized
wire connectors.
CAUTION RISK OF INJURY
• Wear gloves and safety glasses at all times when removing luminaire from carton,
installing, servicing or performing maintenance.
• Avoid direct eye exposure to the light source while it is on.
WARNING RISK OF BURN
• Allow lamp/fixture to cool before handling. Do not touch enclosure or light source.
• Do not exceed maximum wattage marked on luminaire label.
• Follow all manufacturer’s warnings, recommendations and restrictions for: driver
type, burning position, mounting locations/methods, replacement and recycling.
CAUTION RISK OF FIRE
• Keep combustible and other materials that can burn, away from lamp/lens.
• Do not operate in close proximity to persons, combustible materials or substances
affected by heat or drying.
CAUTION: RISK OF PRODUCT DAMAGE
• Never connect components under load.
• Do not mount or support these fixtures in a manner that can cut the outer jacket or
damage wire insulation.
• Never connect an LED product to an unapproved dimmer pack. Contact ABL
directly for any dimmers not specifically recommended for the product.
• Unless individual product specifications deem otherwise: Allow for some volume of
airspace around fixture. Avoid covering LED fixtures with insulation, foam, or other
material that will prevent convection or conduction cooling.
• Unless individual product specifications deem otherwise: Maximum ambient
temperature is 90°C. Do not operate fixture at temperatures higher than this.
• Unless individual product specifications deem otherwise: Never mount in places
where fixture will be exposed to rain, high humidity, extreme temperature changes
or restricted ventilation.
• LED products are Polarity Sensitive. Ensure proper Polarity before installation.
• Electrostatic Discharge (ESD): ESD can damage LED fixtures. Personal grounding
equipment must be worn during all installation or servicing of the unit.
• Do not touch individual electrical components as this can cause ESD, shorten lamp
life, or alter performance.
• There are no user serviceable parts inside the unit. Do not rewire, reconfigure,
or modify the unit or attempt any repairs yourself. Additionally, field replacement
of the LED assembly or lamps is not allowed by UL standards at this time. In the
unlikely event your unit may require service, stop using the unit immediately and
contact an ABL representative.
All luminaires that contain electronic devices that generate frequencies above 9kHz from
any component within the luminaire comply with one of the following Part 15 of the FCC
Rules. Operation is subject to the following two conditions:
(1) This device may not cause harmful interference
(2) This device must accept any interference received, including interference
that may cause undesired operation.
This device complies with Part 18 of the FCC Rules but may cause interference with
cordless and cell phones, radios, televisions, and other electronic devices. To correct
the problem move the device away from the luminaire or plug into a different outlet.
This product may cause interference to radio equipment and should not be installed near
maritime safety communications equipment or other critical navigation or communications equipment operating between 0.45-30MHz.
Failure to follow any of these instructions could void product warranties.
For a complete listing of product Terms and Conditions, please visit
www.acuitybrands.com.
OUR BRANDS
Indoor/Outdoor: Lithonia Lighting, Carandini, Holophane, RELOC
Indoor Lighting: Gotham, Mark Architectural Lighting, Peerless, Renaissance
Lighting, Winona Lighting
Outdoor Lighting: American Electric Lighting, Antique Street Lamps, Hydrel, Tersen
Controls: DARK TO LIGHT, Lighting Control & Design, ROAM, Sensor Switch,
Synergy
Acuity Brands Lighting, Inc. assumes no responsibility for claims arising out of
improper or careless installation or handling of its products.
ABL LED General Warnings, Form No. 503.203
© 2010 Acuity Brands Lighting, Inc. All rights reserved. 12/01/10
INSTALLATION INSTRUCTIONS
6BPMW LED (6” Baffle LED Module); 5BPMW LED (5” Baffle LED Module)
4BPMW LED (4” Baffle LED Module)
Prior to installing the fixture, disconnect ALL power supplies to the unit. This module may be installed in TYPE IC or NON-IC
installations. For TYPE NON-IC INSTALLATION ONLY: No insulation may be placed over the top of or within 3” (76mm) of the
fixture.
INSTALLATION INSTRUCTIONS FOR 6BPMW LED AND 5BPMW LED
Existing Housing
Step 1: 6BPMW LED - Determine Mounting Method
A. Housing with torsion brackets (see Figure 1); use torsion springs to
install LED module.
•
Go to Step 2 – Grounding Wire
Torsion
brackets
Figure 1
B. Housing without torsion brackets; use retention clips to install LED
module.
1.
Remove the springs (see Figure 2).
2.
Select retention clip position (Figure 3).
Torsion springs
• Housing inside diameter 6.20” or less; use upper clip slots
(Figure 4). Insert clips at the upper three slots (Figure 6).
• Housing inside diameter 6.20” or more; use lower clip slots
(Figure 5). Insert clips at the lower three slots (Figure 6).
3.
Figure 2
Figure 3
Go to Step 2 – Grounding Wire
Figure 4
Figure 5
Figure 6
•
If the retention clips are in the bottom position (see Figure 4), make sure there are no obstructions that will interfere with the clips 1”
from the bottom of the recessed housing.
•
If the retention clips are in the top position (see Figure 5), make sure there are no obstructions that will interfere with the clips within 21/4” from the bottom of the recessed housing
Step 1: 5BPMW LED - Determine Mounting Method
A. Housing with torsion brackets (see Figure 1); use torsion springs to install LED module.
•
Go to Step 2 – Grounding Wire
B. Housing without torsion brackets (see Figure 7); use retention
clips to install LED module.
1.
2.
3.
Top Cap Screws
Figure 7
Torsion
Bracket
Remove top cap screws and discard the torsion spring
brackets.
Insert three clips into upper slots.
Go to Step 2 – Grounding Wire
Lithonia Downlighting
One Lithonia Way / Conyers, GA 30012
800-315-4935 / www.lithonia.com
Part No. CJ5201106 Rev. E
©20011 Acuity Brands Lighting, Inc., 12/11
Page 2 of 5
INSTALLATION INSTRUCTIONS
6BPMW LED (6” Baffle LED Module); 5BPMW LED (5” Baffle LED Module)
4BPMW LED (4” Baffle LED Module)
Step 2: Grounding Wire
NOTE – DO NOT LET THE MODULE HANG UNSUPPORTED BY THE ORANGE
CONNECTOR (Figure 8)
A. Recessed housing with grounding wire:
1.
2.
Cut off the grounding wire eyelet from the LED module.
Pair the LED module’s bare copper grounding wire with the grounding wire from
the recessed housing and secure with a wire nut.
B. Recessed housing without grounding wire:
1.
2.
Orange
connector
Install the grounding wire eyelet into a 8-18 x 3/8” screw (Lithonia Lighting
housings). Or,
Install the eyelet through an 8-18 or equivalent self-tapping screw and secure
into the housing wall.
eyelet
Figure 8
Step 3: Determine Wiring Method (Select one wiring method)
A. E26 Socket Adapter:
1. Screw E26 socket adapter into the base socket inside the housing.
2. Plug the orange connector of E26 socket adapter into the LED module’s mating
Socket
adapter
orange connector (see Figure 9). Or,
B. LED Connector:
1.
Plug orange connector from the module into the mating orange connector in the
recessed housing. -This type of connection complies with Title 24 (permanent
LED installation). Or,
C. Hard Wire Connection Kit:
1.
2.
3.
4.
5.
6.
Cut existing socket wires inside the recessed housing close to the socket (discard
socket).
Cut the E26 socket adapter wires close to the screw base (discard screw base).
Match wires from socket adaptor and housing by color and insert each wire into
red splice connector openings until fully seated.
Using pliers, firmly squeeze the metal U-shaped insert into the wires.
Flip the cover closed to secure the connection. (see Figure 10)
Plug orange connector from the module into the mating orange connector in the
recessed housing.
Figure 9
Red splice
connector
Like option B, this is for permanent LED installation (where required), and meets
regulations such as Title 24.
Figure 10
Step 4: Installation of the module into the recessed housing
A. Torsion springs: Squeeze each torsion spring together and seat them inside the
housing torsion brackets. Release springs, and gently push module into housing until
flush with ceiling. (Figure 11)
B. Spring retention clips: Center the LED module in the housing opening and gently push
the module up into the housing evenly on all sides until flush with ceiling (Figure 12).
Figure 11
Figure 12
NOTE:
• Align the three retention clips with the recessed housing avoiding interference with anything protruding from the housing walls.
• For removal of a recessed LED module with retention clips, pull down and rotate back and forth until free. Use two standard flat blade screw
drivers to pry the module apart from the recessed housing. This will aid in the removal process.
Lithonia Downlighting
One Lithonia Way / Conyers, GA 30012
800-315-4935 / www.lithonia.com
Part No. CJ5201106 Rev. E
©20011 Acuity Brands Lighting, Inc., 12/11
Page 3 of 5
INSTALLATION INSTRUCTIONS
6BPMW LED (6” Baffle LED Module); 5BPMW LED (5” Baffle LED Module)
4BPMW LED (4” Baffle LED Module)
INSTALLATION INSTRUCTIONS FOR 4BPMW LED
Retrofit 4” Installation with Socket Adaptor into Existing or New Construction Recessed Can:
1.
Remove the existing lamp and reflector, leaving the socket hanging freely by the wires.
2.
Securely screw socket adapter into socket inside the can. While supporting the LED module, plug the orange connector of socket
adapter into the LED module’s mating orange connector.
DO NOT LET THE MODULE HANG UNSUPPORTED BY THE ORANGE CONNECTORS.
3.
Once all connections are complete, gently push the LED trim into the recessed can opening until clips engage inside of can, and
the trim is flush with the ceiling surface.
NOTE: If installing into a retrofit-style housing with internal ceiling support clips, be sure to offset the clips on the trim with the
clips inside can.
4. INSTALLATION COMPLETE.
Retrofit 4” Installation with Hardwire Connection Kit:
1.
Remove the existing lamp and reflector, leaving the socket hanging freely by the wires
2.
Cut existing socket wires inside the recessed can close to the socket, and discard the socket.
3.
Remove the socket adapter from the box. Cut both adapter wires close to the socket adapter and away from the orange
connector, and discard the socket. Remove the (2) red splice-connectors from the hardwire kit bag. Pair the housing and orange
connector wires by color into each red connector. Firmly squeeze the metal U-shaped insert into the wires. Flip the cover closed
to secure and insulate the connection.
4.
While supporting the LED module, plug connector from the module into the mating connector just installed into the recessed can.
Push the wires and mated connectors up into the recessed can. DO NOT LET THE MODULE HANG UNSUPPORTED BY THE
ORANGE CONNECTORS.
5.
Once all connections are complete, gently push the LED trim into the recessed can opening until clips engage inside of can, and
the trim is flush with the ceiling surface.
NOTE: If installing into a remodeler-style recessed can with internal ceiling support clips, be sure to offset the trim clips away
from the black clips inside can.
6.
INSTALLATION COMPLETE.
RECOMMENDED DIMMING SWITCHES: The LED Modules are compatible with a multiple of standard residential dimmers. A list of recommended
dimmers can be found at www.lithonia.com, keyword search 6BP. Exclusion from the list does not mean a dimmer will not work in conjunction with your
LED module. Consult with your dimmer manufacturer regarding compatibility with LED modules/lamps.
RECESSED CAN COMPATIBILITY: Lithonia's 6” LED modules are tested to fit in a minimum enclosure of 6.0” diameter by 5.75” height, with a
maximum flange diameter of 7.5”. For a list of compatible housings go to www.lithonialighting.com, keyword search 6BP.
LISTINGS: CSA certified to US and Canadian safety standards; Energy Star qualified; California Title 24 compliant; damp location listed; and WSEC
ASTEM E283 for Air-Tight rated with IC housings. Minimum lamp compartment 6 inches (151 mm) diameters by 7 inches (179 mm) tall or minimum
lamp compartment 198 IN3 (503cm3). Use only in open luminaires. Suitable for Type IC or Type Non-IC luminaires. The retrofit kit is accepted as a
component of a luminaries where the suitability of the combination shall be determined by CSA or authorities having jurisdiction.
PATENTS PENDING
Lithonia Downlighting
One Lithonia Way / Conyers, GA 30012
800-315-4935 / www.lithonia.com
Part No. CJ5201106 Rev. E
©20011 Acuity Brands Lighting, Inc., 12/11
Page 4 of 5
INSTALLATION INSTRUCTIONS
6BPMW LED (6” Baffle LED Module); 5BPMW LED (5” Baffle LED Module)
4BPMW LED (4” Baffle LED Module)
FIVE YEAR LIMITED WARRANTY – INDOOR LED ENERGY STAR QUALIFIED RESIDENTIAL DOWNLIGHTING PRODUCTS
Subject to the exclusions set forth below, Acuity Brands Lighting, Inc. (“Acuity”) warrants this Energy Star® qualified Lithonia Lighting
indoor light emitting diode (LED) residential downlighting product (“LED Product”), purchased from an authorized reseller, to be free
from defects in material and workmanship (the “Limited LED Warranty”) for a period of five (5) years from the date of purchase. The
LED arrays in the LED Product will be considered defective in material or workmanship only if the LED Product fails to operate or if a
total of 15% or more of the individual light emitting diodes in the LED Product fail to illuminate.
If the LED Product fails to comply with the terms of this Limited LED Warranty, Acuity will repair or replace the LED Product with the
same or a functionally equivalent LED Product or component part. If it is not commercially practicable for Acuity to repair or replace the
LED Product, Acuity will refund to you the purchase price paid by you for the LED Product. This Limited LED Warranty excludes labor
required to remove and/or reinstall original or replacement LED Product or component parts. The repair or replacement of the LED
Product or any component part is the sole and exclusive remedy for failure of the LED Product to comply with the terms of this Limited
LED Warranty and does not extend the Limited LED Warranty period. Warranty claims regarding the LED Product may be made by
contacting our Post Sale department at 1-800-315-4935 or [email protected] for a return authorization and shipping
instructions. You must provide proof of purchase when making a warranty claim with us. Sales receipt or online registration at
lightahome.com are examples of acceptable proof of purchase. If we ask you to return the product to us for repair or replacement, you
will be required to pay the cost of shipping the LED Product. In addition, you may also be able to make a warranty claim regarding the
LED Product by returning the LED Product to your authorized reseller for replacement, refund or credit, in accordance with its
applicable return policy.
This Limited LED Warranty extends only to the LED Product at the original installation location. This Limited LED Warranty applies only
when the LED Product is installed in applications in which ambient temperatures are within the range of intended operating
temperatures. Acuity will not be responsible under this Limited LED Warranty for any failure of the LED Product that is a result of
external causes such as acts of nature; physical damage; environmental conditions; vandalism; fire; power failure, improper power
supply, power surges or dips, or excessive switching; induced vibration; animal or insect activity; your fault or negligence or the fault or
negligence of anyone hired by you; improper or unauthorized use, installation, handling, storage, alteration, maintenance or service or
failure to comply with any applicable codes and/or recommendations, product specification sheets or instructions of Acuity; failure
resulting from use with non-Acuity products, processes or materials; or any other occurrences beyond Acuity’s reasonable control. This
Limited LED Warranty does not apply to LED downlighting products sold for commercial purposes, indoor residential LED downlighting
products that do not qualify for Energy Star ratings, or any other consumer or commercial products, all of which are governed by
separate limited warranty terms.
EXCEPT AS EXPRESSLY PROVIDED IN THIS LIMITED LED WARRANTY, ACUITY MAKES NO WARRANTIES OF ANY KIND WITH
RESPECT TO THIS PRODUCT, AND ALL IMPLIED WARRANTIES, INCLUDING, WITHOUT LIMITATION, WARRANTIES OF
MERCHANTABILITY OR FITNESS FOR A PARTICULAR PURPOSE, ARE HEREBY EXPRESSLY LIMITED TO THE FIVE (5) YEAR
DURATION OF THIS LIMITED WARRANTY. ACUITY'S TOTAL LIABILITY ARISING IN ANY MANNER IN CONNECTION WITH THIS
LED PRODUCT SHALL BE LIMITED TO THE AMOUNT OF THE PURCHASE PRICE PAID BY YOU AND IN NO EVENT SHALL
ACUITY BE LIABLE FOR ANY INCIDENTAL, CONSEQUENTIAL, SPECIAL OR INDIRECT DAMAGES, INCLUDING, WITHOUT
LIMITATION, LOSS OF PROFITS OR REVENUES OR LOSS OF USE OF THIS LED PRODUCT.
NOTE: This warranty gives you specific legal rights and you may also have other rights which vary from state to state. Some states do
not allow limitations on how long an implied warranty lasts or the exclusion or limitation of incidental or consequential damages, so the
above limitations or exclusions may not apply to you.
Lithonia Downlighting
One Lithonia Way / Conyers, GA 30012
800-315-4935 / www.lithonia.com
Part No. CJ5201106 Rev. E
©20011 Acuity Brands Lighting, Inc., 12/11
Page 5 of 5