1
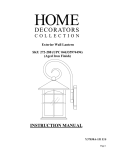
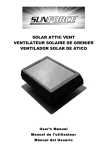
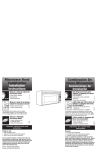
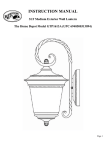
OUTDOOR SECURITY LIGHTING FIXTURE
INSTALLATION INSTRUCTIONS
MODEL NO. 7791-03B
Congratulations on your purchase of a Newport Coastal ‘Outdoor security lighting fixture.’ You have purchased a safe, dependable, and easy-to-install lighting system. You can use this fixture at home for outdoor lighting applications.
WHAT’S INCLUDED: A - Cross Bar
B - Mounting Screws (2)
C - Wire Connectors (3)
D - Fixture Base
E - Fixture Mounting Screw (1)
F - Globe
Tools Required: Phillips Screwdriver, Silicone Sealant or Caulk
IMPORTANT SAFETY INFORMATION
THIS PRODUCT MUST BE INSTALLED IN ACCORDANCE WITH ALL APPLICABLE INSTALLATION CODES.
• IF YOU ARE NOT FAMILIAR WITH ELECTRICAL WIRING, IT IS RECOMMENDED THAT YOU SECURE THE SERVICES OF A WELL QUALIFIED ELECTRICIAN WHO CAN ASSURE THAT THIS
INSTALLATION MEETS LOCAL, STATE, AND NATIONAL CODES.
• BE SURE POWER IS TURNED OFF AT THE MAIN POWER PANEL OR FUSE BOX PRIOR TO INSTALLATION OR REPLACING FIXTURE.
• Before installing this fixture, be sure to check with local ordinances regarding approved outdoor lighting. This fixture style may not be allowed in some areas.
• This fixture is for outdoor use only.
• This fixture should be mounted to a grounded junction box marked for use in wet locations.
• The electrical system and the method of connecting the fixture to the system must be in accordance with local, state, and national electric codes.
• This fixture is to be connected to a 120 volt, 60 Hz power source. Connecting to a different power source may create a hazard and will void the warranty.
• This fixture is suitable for wet locations.
• Do not use near or around flammable/combustible material or liquids.
• Never use a lamp (bulb) with a higher wattage than the stated maximum allowed on this fixture. Using a higher wattage lamp may cause a fire hazard and/or damage to the unit.
• The lamp (bulb) and fixture can get hot during use. Turn off the power and allow the fixture to cool down for at least 10 minutes prior to working on the unit.
• FOR FLUORESCENT LAMPS (BULBS) – COLD WEATHER STARTING INFORMATION: For temperatures below 30°F, leave the lamp on continuously – starting with a warm lamp (bulb). If
starting becomes difficult in cold weather applications, remove lamp (bulb) from fixture (note safety information above), bring the lamp (bulb) indoors to warm, re-install lamp (bulb) into
the fixture – then leave on continuously. Do NOT place CFL lamps (bulb) in oven, microwave or similar heat producing device.
PRIOR TO INSTALLATION: Carefully read through the entire installation instructions before installing this security light fixture.
WARNING: BE SURE POWER IS OFF AT MAIN POWER PANEL/FUSE BOX BEFORE INSTALLING OR REPLACING FIXTURE. THIS PRODUCT MUST BE INSTALLED IN ACCORDANCE
WITH THE APPLICABLE INSTALLATION CODES BY A PERSON FAMILIAR WITH THE CONSTRUCTION AND OPERATION OF THE PRODUCT AND THE HAZARDS INVOLVED.
INSTALLATION INSTRUCTIONS
BE SURE POWER IS TURNED OFF. Remove old lighting fixture. If installing at a new location, contact a qualified electrician.
1. Attach cross-bar (A) to junction box with mounting screws (B) – Figure 1.
2. Connect wires using twist-on wire connectors (C) – Figure 2.
- White wires from the fixture (D) to the white wire from the junction box.
- Black wire from the fixture (D) to the black wire from the junction box.
- Bare copper ground wire from the fixture (D) to the ground wire (bare or green) from the junction box.
3. Position the Fixture Base (D) over the junction box and secure in place using the fixture mounting screw (E). Screw to be placed into mounting hole o fixture base (D), then
threaded into hole located at center of cross bar (A) – Figure 3.
4. Screw lamp (bulb) into socket. Lamp (bulb) not to exceed 60 watts. See safety information above.
5. Screw globe (F) into fixture base (D). Do not over-tighten.
6. Use a clear silicone caulk around the outside of the fixture base to provide a water-tight seal when fixture is installed.
7. Turn power back on.
Caulk
Mounting Screws (B)
Wire Connectors (C)
Fixture (D)
Fixture
Mounting
Screw (E)
Fixture (D)
Ground Wire
Ground Wire(s)
Cross Bar (A)
Globe (F)
Figure 1
Outlet Box
Cross Bar (A)
Figure 2
Figure 3
TROUBLESHOOTING
Does not function at all
• Make sure wall switch (if applicable) is ON and that the wiring is correct.
• Check that the circuit breaker, fuse, and main circuit breaker or main power switch are ON.
• Check lamp (bulb).
LIMITED LIFETIME WARRANTY – This product is warranted to be free from defects in material and workmanship for life of product. If a defect occurs, call 1-800-562-5625 for instructions on
how to have defective product repaired or replaced free of charge. LIMITATIONS - This warranty only covers Newport Coastal assembled lighting products and accessories and is not
extended to other components, Lamp Bulb(s), or equipment used on the product. Warranty extends to original purchaser of product. Receipt or other approved proof of purchase required for
warranty service. NOT LIABLE FOR INCIDENTAL, INDIRECT, OR CONSEQUENTIAL DAMAGES. Some states do not allow the exclusion or limitation of incidental or consequential damages, so
the above limitation or exclusion may not apply to you. This warranty gives you specific legal rights, and you may also have other rights which vary from state to state. NOT COVERED Product failure not relating to faulty material or workmanship, corrosion of brass components, reimbursement for installation or unauthorized service.
Hampton Products International Corp.
50 Icon, Foothill Ranch, California 92610-3000
Made In China
© 2012 Hampton Products International Corp.
999-60885_7791-03B_REVA 1/12
DISPOSITIVO DE ILUMINACIÓN DE SEGURIDAD EXTERIOR
INSTRUCCIONES DE INSTALACIÓN
MODELO NO. 7791-03B
Felicitaciones en su compra de una “Dispositivo de iluminación de seguridad exterior” de Newport Coastal. Usted ha comprado un sistema de iluminación seguro, confiable y fácil de instalar. Usted puede utilizar este
dispositivo en su hogar para iluminar áreas exteriores.
QUE INCLUYE: A – Barra transversal
B – Tornillos de montaje (2)
C - Conectores de cable (3)
D - Base del dispositivo E – Tornillo de montaje de dispositivo (1) F – Globo
Herramientas requeridas: Desarmador de cruz Phillips, sellador o masilla para calafatear de silicona
IMPORTANTE INFORMACIÓN DE SEGURIDAD
ESTE PRODUCTO DEBE SER INSTALADO DE CONFORMIDAD CON TODOS LOS CÓDIGOS DE INSTALACIÓN APLICABLES.
• SI USTED NO ESTÁ FAMILIARIZADO CON CABLEADO ELÉCTRICO, SE RECOMIENDA QUE USTED CONTRATE LOS SERVICIOS DE UN ELECTRICISTA EXPERIMENTADO QUE PUEDA ASEGURAR QUE ESTA
INSTALACIÓN CUMPLE CON LOS CÓDIGOS LOCALES, ESTATALES Y NACIONALES.
• ASEGÚRESE QUE SE HA DESCONECTADO LA ALIMENTACIÓN ELÉCTRICA EN EL PANEL DE ALIMENTACIÓN PRINCIPAL O EN LA CAJA DE FUSIBLES ANTES DE INSTALAR O REEMPLAZAR EL DISPOSITIVO.
• Asegúrese de verificar los reglamentos locales en cuanto a iluminación exterior aprobada antes de instalar este dispositivo. Este estilo de dispositivo puede no ser permitido en algunas áreas.
• Este dispositivo es para uso en exteriores únicamente.
• Este dispositivo debe montarse a una caja de empalmes conectada a tierra y marcada para usarse en sitios húmedos.
• El sistema eléctrico y el método utilizado para conectar este dispositivo al sistema debe estar de conformidad con los códigos eléctricos locales, estatales y nacionales.
• Este producto se debe conectar a una fuente de alimentación de 120 volts, 60Hz. El hecho de conectar a una fuente de alimentación diferente puede constituir un peligro y anulará la garantía.
• Este dispositivo es adecuado para sitios húmedos.
• No use en sitios cercanos o alrededor de materiales o líquidos inflamables o combustibles.
• Nunca use un foco con una capacidad en watts superior a la máxima permitida para el dispositivo. El uso de una foco con mayor capacidad en watts puede constituir un peligro de incendio y/o dañar la unidad.
• El foco y el dispositivo pueden calentarse demasiado durante el uso. Desconecte la alimentación eléctrica y permita que el dispositivo se enfríe durante cuando menos diez (10) minutos antes de trabajar en la unidad.
• PARA LÁMPARAS FLUORESCENTES (FOCOS) – INFORMACIÓN DE USO EN TEMPERATURAS FRÍAS: Para temperaturas inferiores a -1°C, deje encendida la lámpara todo el tiempo – para mantener caliente el
foco. Si se dificulta el encendido en sitios fríos, desmonte el foco del dispositivo (observe la información de seguridad dada arriba), meta el foco bajo techo para que se caliente, vuelva a instalar el foco en el
dispositivo, y deje encendida la lámpara todo el tiempo. NO COLOQUE los focos CFL (lámparas fluorescentes compactas) en un horno, microondas o dispositivo similar que produce calor.
ANTES DE LA INSTALACIÓN: Lea cuidadosamente el contenido total de las instrucciones de instalación antes de instalar este dispositivo de iluminación de seguridad.
ADVERTENCIA: ASEGÚRESE DE DESCONECTAR LA ALIMENTACIÓN ELÉCTRICA EN EL PANEL PRINCIPAL DE DISYUNTORES O EN LA CAJA DE FUSIBLES ANTES DE INSTALAR O REEMPLAZAR ESTE DISPOSITIVO.
ESTE PRODUCTO DEBE SER INSTALADO DE ACUERDO CON LOS CÓDIGOS DE INSTALACIÓN CORRESPONDIENTES POR UNA PERSONA FAMILIARIZADA CON LA CONSTRUCCIÓN Y FUNCIONAMIENTO DEL PRODUCTO
Y DE LOS PELIGROS QUE CONLLEVA.
INSTRUCCIONES DE INSTALACIÓN
ASEGÚRESE DE DESCONECTAR LA ALIMENTACIÓN ELÉCTRICA. Desmonte el dispositivo viejo. Si se instala en un sitio nuevo, la instalación debe ser hecha por un electricista
experimentado.
1. Instale la barra transversal (A) en la caja de empalmes; use los tornillos de montaje para la caja de empalmes (B) – Figura 1.
2. Conecte los cables mediante el uso de los conectores de cable para cables trenzados (C) – Figura 2.
- El cable blanco del dispositivo (D) se conecta al cable blanco de la caja de empalmes.
- El cable negro del dispositivo (D) se conecta al cable negro de la caja de empalmes.
- El cable de cobre sin revestimiento de conexión a tierra del dispositivo (D) se conecta al cable de conexión a tierra (cable verde o sin revestimiento) de la caja de empalmes.
3. Coloque la Base del Dispositivo (D) sobre la caja de empalmes y asegúrela mediante el uso del tornillo de montaje (E). El tornillo debe ser insertado en el orificio de montaje de
la base del dispositivo (D), y luego roscado en el agujero situado en el centro de la barra transversal (A) – Figura 3.
4. Atornille el foco en el enchufe. El foco no debe exceder los 60 watts. Vea la información de seguridad dada arriba.
5. Atornille el globo (F) en el interior de la base del dispositivo (D. No apriete demasiado.
6. Cuando se haya instalado el dispositivo, use masilla de silicona transparente alrededor del exterior de la base del dispositivo para obtener un sello hermético.
7. Vuelva a conectar la alimentación eléctrica.
Masilla
Conectores de cable (C)
Dispositivo (D)
Tornillos de montaje (B)
Dispositivo (D)
Tornillo de
montaje de
dispositivo (E)
Cable de
conexión a tierra
Barra transversal (A)
Cable(s) de
conexión a tierra
Globo (F)
Figura 1
Caja de
empalmes
Barra
transversal (A) Figura 2
Figura 3
LOCALIZACIÓN DE AVERÍAS
No funciona
• Asegúrese de que el interruptor de pared (si se tiene instalado) está en posición de ENCENDIDO (“ON”) y que el cableado ha sido instalado correctamente.
• Revise que el fusible del disyuntor de circuito y el disyuntor de circuito principal o el interruptor de alimentación principal están conectados (“ON”).
• Revise el foco.
GARANTÍA LIMITADA DE POR VIDA - Se garantiza que este producto está libre de defectos en materiales y mano de obra durante la vida de servicio del producto. Si se encuentra un defecto en los materiales o en
la mano de obra, llame al 1-800-562-5625 para recibir instrucciones sobre cómo repararlo o reemplazarlo sin cargo alguno. LIMITACIONES - Esta garantía únicamente cubre productos y accesorios de iluminación
ensamblados de Newport Coastal y no se extiende a otros componentes, focos o bombillas o equipos utilizados en este producto. Se requiere la presentación de un recibo de compra u otra prueba de compra
aprobada antes de la prestación del servicio bajo la garantía. NO HAY RESPONSABILIDAD ALGUNA POR DAÑOS INCIDENTALES O INDIRECTOS. Algunos estados o provincias no permiten la exclusión de daños
indirectos o emergentes, por lo que la anterior limitación o exclusión puede no ser aplicable. Esta garantía le otorga derechos específicos, y usted podrá tener otros derechos que varían de estado a estado. SIN
COBERTURA - La falla del producto no relacionada con materiales o mano de obra defectuosos; el reembolso por la instalación o servicio no autorizado.
Hampton Products International Corp.
50 Icon, Foothill Ranch, California 92610-3000
Hecho en China
© 2012 Hampton Products International Corp.
999-60885_7791-03B_REVA 1/12