1
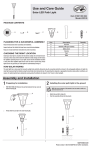
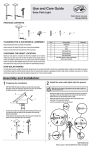
Item #905-007
Model #82056-055SR
USE AND CARE GUIDE
SOLAR ROPE LIGHT
Questions, problems, missing parts? Before returning to the store,
call Hampton Bay Customer Service
8 a.m. - 6 p.m., EST, Monday-Friday
1-830-249-1200
HAMPTONBAY.COM
THANK YOU
We appreciate the trust and confidence you have placed in Hampton Bay through the purchase of this solar rope light. We strive to continually create quality
products designed to enhance your home. Visit us online to see our full line of products available for your home improvement needs. Thank you for choosing
Hampton Bay!
Table of Contents
Tools Required ......................................................................... 3
Hardware Included ................................................................... 3
Package Contents .................................................................... 3
Installation ..................................................................... 4
Maintenance .................................................................. 5
Care and Cleaning ........................................................ 5
Troubleshooting............................................................ 5
Table of Contents .......................................................... 2
Safety Information ......................................................... 2
Warranty ......................................................................... 2
What is Covered ....................................................................... 2
What is Not Covered ................................................................. 2
Pre-Installation .............................................................. 3
Planning Installation ................................................................ 3
Safety Information
WARNING: Do not puncture, cut, shorten, or splice the rope
light.
WARNING: Do not submerse the rope light in liquids or use
the product in the vicinity of standing water.
WARNING: Your solar light may not function in temperatures
below -4º
F (-20º
C) or above 140º
F (60º
C).
CAUTION: Use a rechargeable battery only. Recycle or
dispose of batteries properly.
CAUTION: Do not open, short circuit, or mutilate batteries as
injury may occur.
Warranty
ONE YEAR LIMITED WARRANTY
WHAT IS COVERED
The manufacturer warrants this product to be free of defects in material and workmanship for a period of one (1) year from the date of purchase. This
warranty only applies to the original consumer purchaser and only to products used in normal use and service. The manufacturer’s only obligation
and your exclusive remedy, is the repair or replacement of the product at the manufacturer’s discretion, provided that the product has not been
damaged through misuse, abuse, accident, modification, alternation, neglect, or mishandling. Proof of purchase and evidence of manufacturer’s
date coding must accompany all warranty claims. Manufacturer’s date coding is printed and adhered to each product.
WHAT IS NOT COVERED
This warranty does not apply to products that are found to have been improperly installed, set-up, or used in any way not in accordance with the
instructions supplied with the product. This warranty does not apply to a failure of the product as a result of an accident, misuse, abuse, negligence,
alteration, or faulty installation. Batteries supplied with this product are not included in this warranty. This warranty shall not apply to the finish on
any portion of the product, such as surface and/or weathering, as this is considered normal wear and tear. The manufacturer does not warrant and
specially disclaims any warranty, whether express or implied, of fitness for a particular purpose, other than the warranty contained herein. This
warranty does not cover consequential or incidental loss or damage, including but not limited to any labor/expense costs involved in the
replacement or repair of the product.
Contact the Customer Service Team at 1-830-249-1200 or visit www.hamptonbay.com.
2
Pre-Installation
PLANNING INSTALLATION
Ensure the mounting location for your solar rope light allows the remote solar panel to receive direct sunlight. Do not locate the remote solar panel in
shaded areas as this will significantly reduce performance.
Position the remote solar panel such that during evening hours the ambient light from other light sources does not affect the photosensor built into
the solar panel. High ambient light levels can cause the lamp to turn off during evening hours.
.
NOTE: The solar light is equipped with a photosensor that turns
the unit on at dusk and off at dawn. Ambient light can affect the
operation of the photosensor.
TOOLS REQUIRED
Phillips
screwdriver
HARDWARE INCLUDED
NOTE: Hardware not shown to actual size.
Part
Description
AA
BB
Mounting bracket
Large mounting screw
Quantity
Part
Description
1
2
CC
DD
Mounting clip
Small mounting screw.
Quantity
9
9
PACKAGE CONTENTS
A
Part
A
B
Description
Solar assembly/LED rope
Stake
B
C
Quantity
Part
1
1
C
D
3
D
Description
Ground stake
Battery (Pre-assembled)
Quantity
1
1
HAMPTONBAY.COM
Please contact 1-830-249-1200 for further assistance.
Installation
1 Installing the solar panel
NOTE: Do not use a hammer. If the ground is hard, use water to
soften.
A
This step provides two options for installing the solar panel:
Ground installation and Mounted installation. Follow the
applicable steps below based upon your installation choice.
□
□
□
For ground installation, insert the ground stake (C) firmly into the
ground at the installation location. If the ground is too hard, soak
the ground with water to soften the ground or drive a metal rod or
screwdriver into the ground to create a hole for the ground stake
(C). Then connect the stake (B) to the ground stake (C).
For a mounted installation, install the wall mounting bracket (AA)
to the installation location using large mounting screws (BB). Then
connect the stake (B) to the mounting bracket (AA).
Connect the solar assembly (A) to the stake (B) and ensure the
solar panel is pointed towards the sun.
2 Installing the rope light
CAUTION: Do not submerse the rope light in liquids or use the
product in the vicinity of standing water.
NOTE: Prior to use, set the AUTO/OFF switch located on the
back of the solar box to the AUTO position and allow it to charge
a full sunny day.
NOTE: Approximately 6 feet of the first portion of your rope
light is non-illuminated lead wire only.
□
□
Use the small mounting screws (DD) to install the mounting clips
(CC) to a flat surface in the location where you would like to install
the rope light. Ensure the clips (CC) are evenly spaced about 2 feet
apart.
Attach the lighted rope to the fixed mounting clips (CC).
4
B
BB
C
AA
Maintenance
Replacing the battery
NOTE: Use one 18500 Lithium Phosphate, 600mAh, 3.2V
rechargeable battery. For best performance, replace with a
Lithium phosphate rechargeable battery(s) every 18 months.
NOTE: To reduce the risk of damage to the electrical
connections, exercise caution when separating the back plate (E)
from the solar assembly (A).
A
IMPORTANT: Dispose of the battery in accordance with local,
state, and federal regulations.
D
IMPORTANT: When storing any solar product for an extended
period of time, remove the batteries. Storing any solar product
without regular recharge or removal of batteries could cause
permanent damage to the rechargeable batteries.
□
□
□
E
Unscrew the battery cover (E) from the back of solar assembly (A)
and remove it.
Remove the old battery (D). Replace with a new 18500, 3.2V Lithium
Phosphate rechargeable battery – The recommended replacement
battery capacity should be 600~1000mAh.
Replace the battery cover (E) with the four screws.
Care and Cleaning
Periodic cleaning of the solar panel and glass housing is quick and easy:
□
□
The solar panel should be cleaned periodically with a damp cloth to help maintain optimum performance.
Do not use any cleaners with chemicals, solvents, or harsh abrasives.
Troubleshooting
Problem
Possible Cause
The nightly run time is
shorter.
The battery is not fully charged.
The battery is reaching the end of its useful life.
The solar light does not
turn on at night.
Your solar light is equipped with an AUTO/OFF switch
on the back of the solar box. This switch must be set to
AUTO prior to use.
The solar light is installed close to other light sources,
which may keep the solar light from turning on at night
automatically.
5
Solution
Ensure the solar light is located in an area where it can
receive the maximum amount of full, direct sunlight every
day. Keeping the solar panel clean is equally important to
ensure the maximum charging performance.
Replace the old battery with a Lithium phosphate
rechargeable battery.
Prior to use, check that the unit has been set to the AUTO
position and allowed to charge a full sunny day.
Relocate the fixture or eliminate other light sources.
HAMPTONBAY.COM
Please contact 1-830-249-1200 for further assistance.
Questions, problems, missing parts? Before returning to the store,
call Hampton Bay Customer Service
8 a.m. - 6 p.m., EST, Monday-Friday
1-830-249-1200
HAMPTONBAY.COM
Retain this manual for future use.
Núm. de artículo 905-007
Núm. de modelo 82056-055SR
GUÍA DE USO Y CUIDADO
LÁMPARA SOLAR DE CUERDA
¿
Tiene preguntas, problemas o faltan piezas? Antes de regresar a la tienda,
llame a Servicio al Cliente de Hampton Bay
de lunes a viernes de 8 a.m. y 6 p.m., hora local del Este
1-830-249-1200
HAMPTONBAY.COM
GRACIAS
Agradecemos la confianza que ha puesto en Hampton Bay a travé
s de la compra de esta lá
mpara solar de cuerda. Nos esforzamos por crear continuamente
productos de calidad diseñ
ados para mejorar su hogar. Visí
tenos en internet para ver nuestra lí
nea completa de productos disponibles para sus necesidades
de mejorar su hogar. ¡
Gracias por elegir a Hampton Bay!
Tabla de contenido
Herramientas requeridas .......................................................... 3
Herraje incluido ........................................................................ 3
Contenido del paquete ............................................................. 3
Instalación ..................................................................... 4
Mantenimiento............................................................... 5
Cuidado y limpieza ....................................................... 5
Resolución de fallas ..................................................... 5
Tabla de contenido ....................................................... 2
Información de seguridad ............................................ 2
Garantía .......................................................................... 2
Lo que estácubierto ................................................................. 2
Lo que no estácubierto ............................................................ 2
Pre-instalación .............................................................. 3
Planificació
n de la instalació
n .................................................. 3
Información de seguridad
ADVERTENCIA: No pinche, corte, acorte, ni empalme la
lá
mpara de cuerda.
ADVERTENCIA: No sumerja la lá
mpara de cuerda en
lí
quidos ni use el producto en la vecindad de agua estancada.
ADVERTENCIA: Su lá
mpara solar podrí
a no funcionar a
temperaturas menores de -4°F (-20°C) o mayores de
140°F (60°C).
PRECAUCIÓN: Use una baterí
a recargable solamente.
Recicle o deseche las baterí
as adecuadamente.
PRECAUCIÓN: No abra, no provoque un cortocircuito,
ni mutile las baterí
as ya que puede ocurrir una lesió
n.
Garantía
GARANTÍ
A LIMITADA DE UN AÑO
LO QUE ESTÁCUBIERTO
El fabricante garantiza que este producto estálibre de defectos en materiales y mano de obra por un periodo de un (1) añ
o a partir de la fecha de
compra. Esta garantí
a aplica ú
nicamente al comprador consumidor final y ú
nicamente para los productos usados en condiciones de uso y servicio
normal. La ú
nica obligació
n del fabricante y la ú
nica reparació
n, es reparar o reemplazar el producto a discreció
n del fabricante, siempre y cuando
el producto no haya sido dañ
ado por mal uso, abuso, accidente, modificaciones, alteraciones, negligencia o mal manejo. Prueba de compra y
evidencia de codificació
n de la fecha del fabricante deben acompañ
ar todos los reclamos de la garantí
a. La codificació
n de la fecha del fabricante
estáimpresa y adherida en cada producto.
LO QUE NO ESTÁCUBIERTO
Esta garantí
a no aplicaráa ningú
n producto que se detecte que se haya instalado, configurado o usado incorrectamente de alguna manera que no
sea de acuerdo con las instrucciones proporcionadas con el producto. Esta garantí
a no aplicaráa fallas del producto como resultado de un
accidente, mal uso, abuso, negligencia, alteració
n o instalació
n incorrecta. Las baterí
as suministradas con este producto no está
n incluidas en esta
garantí
a. Esta garantí
a no aplicaráal acabado de cualquier parte del producto, como la superficie y/o intemperizació
n, ya que esto es considerado
deterioro por uso. El fabricante no garantiza ni deniega especí
ficamente ninguna garantí
a, sea expresa o implí
cita, o idoneidad para un propó
sito
particular, que no sea la garantí
a contenida en el presente. Esta garantí
a no cubre pé
rdidas o dañ
os incidentales o consecuentes, incluyendo pero
no limitados a los gastos de mano de obra u otros gastos relacionados al reemplazo o reparació
n de dicho producto.
Pó
ngase en contacto con el Equipo de Servicio al Cliente llamando al 1-830-249-1200 o visite www.hamptonbay.com.
2
Pre-instalación
PLANIFICACIÓN DE LA INSTALACIÓN
Asegú
rese de que el lugar del montaje de su lá
mpara solar de cuerda permita que el panel solar remoto reciba luz directa del sol.
No ubique el panel solar remoto en á
reas sombreadas ya que esto reducirásignificativamente el desempeñ
o.
Coloque el panel solar remoto de modo que durante las horas de la tarde la luz ambiental de otras fuentes de luz no afecte el fotosensor incorporado
en el panel solar. Los altos niveles de luz ambiental pueden hacer que la lá
mpara se apague durante las horas de la tarde.
.
NOTA: La lá
mpara solar estáequipada con un fotosensor que
enciende la unidad al anochecer y la apaga al amanecer. La luz
ambiental puede afectar el funcionamiento del fotosensor.
HERRAMIENTAS REQUERIDAS
Destornillador
Phillips
HERRAJE INCLUIDO
NOTA: No se muestra el herraje en el tamañ
o real.
Pieza
AA
BB
Descripció
n
Cantidad
Pieza
1
2
CC
DD
Soporte de montaje
Tornillo de montaje grande
Descripció
n
Cantidad
Gancho de montaje
Tornillo de montaje pequeñ
o
9
9
CONTENIDO DEL PAQUETE
A
Pieza
A
B
Descripció
n
Ensamblaje solar/cuerda LED
Estaca
B
C
Cantidad
Pieza
1
1
C
D
Descripció
n
Estaca de tierra
Baterí
a (Preensamblada)
D
Cantidad
1
1
3
HAMPTONBAY.COM
Para obtener asistencia, pó
ngase en contacto llamando al 1-830-249-1200.
Instalación
1 Instalación del panel solar
NOTA: No use un martillo. Si el suelo estáduro, use agua para
ablandarlo.
A
Este paso brinda dos opciones para la instalació
n del panel solar:
Instalació
n en el suelo e instalació
n montada. Siga los pasos
correspondientes con base en su elecció
n de instalació
n.
□
□
□
Para instalació
n en el suelo, inserte la estaca de tierra (C) con
firmeza en el suelo en el lugar de la instalació
n. Si el suelo está
demasiado duro, humedezca el suelo con agua para ablandarlo o
use una varilla de metal o destornillador en el suelo para crear un
agujero para la estaca de suelo (C). Luego conecte la estaca (B) en
la estaca de suelo (C).
Para una instalació
n montada, instale el soporte de montaje (AA)
de pared en el lugar de instalació
n usando tornillos de montaje
grandes (BB). Luego conecte la estaca (B) en el soporte de
montaje (AA).
Conecte el ensamblaje solar (A) en la estaca (B) y asegú
rese de
que el panel solar apunte hacia el sol.
2 Instalación de la lámpara de cuerda
PRECAUCIÓN: No sumerja la lá
mpara de cuerda en lí
quidos
ni use el producto en la vecindad de agua estancada.
NOTA: Antes de usarla, coloque el interruptor AUTO/OFF
localizado en la parte trasera de la caja solar en la posició
n
AUTO y deje que cargue un dí
a soleado completo.
NOTA: Aproximadamente 6 pies de la primera porció
n de su
lá
mpara de cuerda es un cable conductor no iluminado.
□
□
Use los tornillos de montaje pequeñ
os (DD) para instalar los
ganchos de montaje (CC) en una superficie plana en el lugar que le
gustarí
a instalar la lá
mpara de cuerda. Asegú
rese de que los
ganchos (CC) esté
n separados uniformemente a 2 pies.
Instale la cuerda iluminada en los ganchos de montaje
fijados (CC).
4
B
BB
C
AA
Mantenimiento
Reemplazo de la baterí
a
NOTA: Use una baterí
a recargable de fosfato de litio 18500,
600mAh, 3.2V. Para un mejor desempeñ
o, reemplace con una
baterí
a recargable de fosfato de litio cada 18 meses.
NOTA: Para reducir el riesgo de dañ
oa a las conexiones
elé
ctricas, tenga precaució
n cuando separe la placa trasera (E)
del ensamblaje solar (A).
A
IMPORTANTE: Elimine la baterí
a usada de acuerdo con
regulaciones locales, estatales y federales.
D
IMPORTANTE: Retire las baterí
as cuando guarde cualquier
producto solar durante un largo periodo de tiempo. Almacenar
cualquier producto solar sin recarga regular o sin retirar las
baterí
as podrí
a causar dañ
os permanentes a las baterí
as
recargables.
□
□
□
E
Desatornille la cubierta de la baterí
a (E) de la parte trasera del
ensamblaje solar (A) y retí
rela.
Retire la baterí
a vieja (D). Reemplace con una baterí
a recargable de
fosfato de litio 18500, 3.2V – La capacidad recomendada de la
baterí
a de reemplazo debe ser de 600~1000mAh.
Vuelva a colocar la cubierta de la baterí
a (E) con los cuatro tornillos.
Cuidado y limpieza
La limpieza perió
dica del panel solar y la carcasa de vidrio es rá
pida y fá
cil:
□
□
Limpie perió
dicamente el panel solar con un pañ
o hú
medo para ayudar a mantener un desempeñ
oó
ptimo.
No use ningú
n limpiador con quí
micos, solventes o abrasivos á
speros.
Resolución de fallas
Problema
Posible causa
El tiempo de
funcionamiento nocturno
es má
s corto.
La baterí
a no estátotalmente cargada.
La baterí
a estáalcanzando el final de su vida ú
til.
La lá
mpara solar no
enciende en la noche.
Su lá
mpara solar estáequipada con un interruptor
AUTO/OFF en la parte trasera de la caja solar. Este
interruptor debe estar en AUTO antes del uso.
La lá
mpara solar estáinstalada cerca de otras fuentes
de luz, lo que puede hacer que la lá
mpara no encienda
en la noche automá
ticamente.
Solució
n
Asegú
rese de que la lá
mpara solar estéubicada en un
á
rea donde pueda recibir la má
xima cantidad de luz solar
directa todos los dí
as. Mantener el panel solar limpio es
igualmente importante para garantizar el má
ximo
desempeñ
o de carga.
Reemplace la baterí
a vieja con una baterí
a recargable de
fosfato de litio.
Antes del uso, compruebe que la unidad haya sido
colocada en la posició
n AUTO y que se haya dejado
cargar un dí
a soleado completo.
Reubique el dispositivo o elimine otras fuentes de luz.
5
HAMPTONBAY.COM
Para obtener asistencia, pó
ngase en contacto llamando al 1-830-249-1200.
¿
Tiene preguntas, problemas o faltan piezas? Antes de regresar a la tienda,
llame a Servicio al Cliente de Hampton Bay
de lunes a viernes de 8 a.m. y 6 p.m., hora local del Este
1-830-249-1200
HAMPTONBAY.COM
Conserve este manual para uso futuro.