1
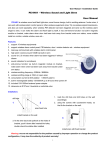
60503
ASSEMBLY INSTRUCTIONS
MODEL:
READ AND SAVE THESE INSTRUCTIONS
3.) Slide the LED light body through the
bottom of your deck.
READ INSTRUCTIONS ALL THE WAY THROUGH
PRIOR TO ASSEMBLY.
Assembly Time: 10 Minutes.
UNPACK THE SOLAR LED LIGHT STRING
The following parts should be included in your
solar light kits; (5) Solar LED Lights, (1) Solar
panel, (1) Adjustable bracket and stake set, (1)
Countersink Spade Bit.
TOOLS
A drill will be required for deck or hard surface
installation.
DECK INSTALLATION
1.) Using your drill with the included spade bit,
carefully drill through your deck, keep drilling
until the flag touches the deck's surface.
4.) Once through the hole, screw the lens to the
body.
5.) Drop in place.
GROUND INSTALLATION
Bury the Solar LED Light String bodies in grass,
mulch, or gravel. You may wish to create a small
trench between lights in order to conceal the
cable.
2.) Remove the lens from the body.
TIP:
Use your drill and the included spade bit for
greater precision.
60503
ASSEMBLY INSTRUCTIONS
MODEL:
READ AND SAVE THESE INSTRUCTIONS
3.) Join the connectors and screw the cap
tightly together.
PANEL ASSEMBLY AND INSTALLATION
1.) Push tube and stake together as shown below.
4.) Insert the solar panel into the ground in a
sunny area.
2.) Attach bracket to back of the solar panel.
Position bracket & solar panel as shown below,
where the tab is on the bottom of the bracket &
the screw is on the same side as the power
button on the solar panel, the bracket will lock
on to the connector on the back of the solar
panel by pressing the tab against the back of
the panel & sliding the bracket upward, follow
arrows on diagram.
Note: You can adjust the angle of the solar
panel by loosing the screw.
5.) Once charged for 6~8 hours, your LED Light
String is ready for use. Press the power button on
the back of the unit to turn the lights on.
Timer
60503
ASSEMBLY INSTRUCTIONS
MODEL:
READ AND SAVE THESE INSTRUCTIONS
SETTING THE TIME DURATION
1.) Press the timer button & watch for the
number of flashes from the led light. The
number of flashes indicates the number of hours
that the light will stay on, on the last flash, the
light will stay on and remain on for 1 hour per
flash (4, 5, or 6 hours).
2.) The timer will remember what was set last
and automatically come on at dusk until the
timer is reset.
3.) Once the timer is set and the light is on, you
may press the timer button again to select a
different time, you may select from 4, 5, or 6
hours. Do not press button while the light is
flashing, wait until it is on.
ADJUSTMENT OF TIMER
1. Timer options: 4 hours, 5 hours and 6 hours.
2. Led light will flash to advise the selection that
you have made.
a. 4 hour timer = 4 flashes.
b. 5 hour timer = 5 flashes.
TROUBLE SHOOTING:
1.) If your Solar LED Light is not functioning
properly or losing power mid-cycle, then ensure
the solar panel is positioned in direct sunlight.
Your solar panel will need to collect between 6 ~
8 hours of sunlight to function throughout a full
cycle.
2.) Check your connections to the solar panel - a
loose or improperly connected cable will cause
the LED Light String to malfunction.
3.) Although the battery inside your Seriously
Solar panel is designed for maximum longevity,
overtime performance will drop - replacing the
battery will correct this issue.
IMPORTANT NOTES:
1.) The led light will light for 4/5/6 hours each
time (based on the timer you have chosen) after
you turn on it.
2.) The led light will turn on automatically every
night.
3.) If you want the led light work agiain after
timer, press the power switch, timer will be
recalled.
4.) When the led light is turned off manually,
timing will be cancelled.
c. 6 hour timer = 6 flashes.
5.) Although there may be some initial charge in
battery, we recommend fully charging it before
first use. turn off the led light and leave the solar
panel in good sunlight for 6 hours to ensure the
batteries are fully charged.
6.) To maximize solar energy intake, the solar
panel may be cleaned periodically with a soft rag
and water, do not use chemical solvents.