1
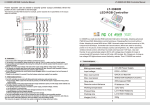
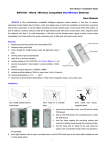
User Manual / Installation Guide
PE-8201 – Wireless Roller Shutter Magnetic Contact
User Manual
PE-8201 is Mini wireless roller shutter magnetic contact, with novelty and streamline design, it included 3 parts
wireless emitter, metallic sensor and metallic magnet, when the metallic sensor is separated from metallic magnet
more than 4 cm, it will cause short circuit and the wireless emitter alarm LED indication will flash and also send out
wireless alarm signal to the control panel at the same time, with higher sensitivity within 120m away from control
panel via built-in antenna, wireless coding or entering the 9 digit address code with alarm control panel, and it fits
well the surroundings and can be decorative at residence.
Features:
1. adopted special micro-power low consumption CPU
2. adopted patented multi code
3. Code: 28-digit ID, 8-digit function code, 36 digit date code in
total
4. working status report automatically
5. loss alarm / periodic report when roller shutter is not well closed
6. working voltage is 3.0V (1pc x CR123A 3.0V Lithium Battery)
7. current consumption: ≤5uA (static) / ≤15mA (alarm)
8. wireless emitting frequency: 433MHz / 868MHz
9. wireless emitting distance: 120m (in open area)
10. working temperature is -10℃ ~ +50℃
11. dimension is 80*32*25mm (wireless emitter) / 74*20*12mm (metallic magenet) /105*37*10mm (metallic sensor)
/ ivory white color
Installation:
install metallic magnet
install metallic sensor
1. mark the drill hole and drill holes at the bottom of roller shutter, fix
the metallic magnet on the roller shutter with screws;
2. drill holes on the ground and parallelled to metallic magnet, so that
fix the metallic sensor on the ground;
3. connect the two wires of metallic sensor to NC and COM terminal
of wireless emitter;
4. install wireless emitter on the wall inside of roller shutter.
1
connect wireless emitter with
metallic sensor via wired
User Manual / Installation Guide
Installation Emitter / Battery:
1. remove the wireless emitter cover, you will see the inside PCB board;
2. take out the PCB board, the mounting frame is under the PCB board;
3. hold the frame against the mounting surface and mark the 2 drilling points through the mounting holes;
4. drill the holes and fix frame to the wall using the screws with countersink heads which had been packed in
the package;
5. the 9 digit address code is under mounting frame, put the PCB board back to the frame after installed on
the wall or other stable place;
6. insert 1pc CR123A 3.0V Lithium Battery on the battery tray, pay attention to the anode and cathode, and
then LED light will flash 3 times, so that make sure the battery had been connected;
7. close the wireless emitter cover.
Coding Method:
(between detector and alarm control panel)
1. detector on normal mode, place 1pc 3.0V CR123A lithium battery and LED light will flash; alarm control panel
on wireless coding mode (please refer to control panel user manual), move the metallic magnet more than 4cm
from metallic sensor, it will cause short circuit and the wireless emitter alarm LED indication will flash and also
send out wireless signal to the control panel at the same time, if alarm control panel make the corresponding
indicate sound, it means match code successfully.
2. alarm control panel on manual coding mode, enter the 9 digit address code to match, this will be a higher
probability of coding success.
Change Battery:
Battery life is around 1 year, should change the battery when the signal between detector and control panel
becomes weak. The detector also can send the low battery alarm indication to alarm control panel.
(CR123A 3.0V Lithium Battery / pay attention to the anode and cathode)
Battery Testing:
After replaced the new batteries, the detector will be in testing mode via LED light flash indicate for each triggering,
and detector will auto enter the normal mode after 5 mins, and the LED light indicate will be switched off, battery
energy for power-saving function.
Maintenance:
After being long use, detector may get dirty on surface, use wet cloth or sponge to rub it. Don’t let the water inside
unit, so that avoid break the inside electronic accessory, please re-test after cleaning it.
Warning: we are not responsible for the problem caused by improper operation or change the product
configuration, it may lose the authority of product warranty!
2