1
Installation
1
□
□
2
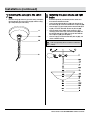
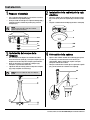
Preparing for installation
□
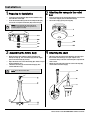
Fasten the mounting bracket (AA) onto the outlet box using
two outlet box screws (BB).
Screw the threaded tube (II) into the mounting bracket (AA),
and secure it using the lock washer (HH) and hex nut (FF).
□
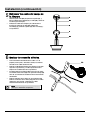
Attaching the canopy to the outlet
box
Place the canopy (A) over the threaded tube (II), and screw the
screw collar loop (EE) onto the threaded tube (II).
Secure the canopy (A) using the ring (DD).
NOTE: This threaded tube (II) should extend long
enough to protrude through the canopy when it is
mounted. (Adjust as needed)
II
AA
A
BB
DD
II
HH
EE
FF
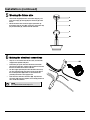
3 Assembling the fixture body
□
□
□
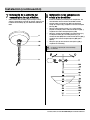
4 Attaching the chain
□
Guide the fixture wire with bare copper grounding wire
through the loop (C), and screw the loop (C) onto the nipple
joint on the fixture body (D) securely.
Adjust the three arms on the fixture body (D) to make an equal
distance between arms.
Attach the metal ring (E) over the fixture body (D), then
secured with the nut (F).
□
Adjust the chain (B) to the desired height by spreading apart
the end link of the chain (B). Use a pair of pliers and a
screwdriver. Wrap a soft cloth around the pliers to protect the
chain’s finish.
Attach one end of the chain (B) to the screw collar loop (EE)
and the other end to the loop (C).
EE
NOTE: Do not twist the fixture wire.
B
C
5
HAMPTONBAY.COM
Please contact 1-855-HD-HAMPTON for further assistance.