1
LOCATION:
Select the location with direct sunlight so that the solar panel can receive at least 5-8
hours of sunlight each day. Avoid a shady location. The location should not be near a
strong lighting source such as street lights or other bright night time light sources. This
might cause the LED light may be very dim or to turn off as there is a sensor inside
the solar light that will switch off once it senses any strong lighting sources. The light
is designed to turn on automatically when the area turns dark during the night. At
dawn, it will automatically turn off and it will start charging the rechargeable battery
by absorbing solar energy through the solar panel. Charging by the battery varies with
the intensity of the sunlight. As the sunlight intensity decreases in winter, the light
illuminating hours may reduce respectively.
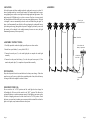
ASSEMBLY:
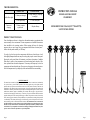
1. Faux Crystal
Starburst Head (x5)
2. LED
3. Metal Post
ASSEMBLY INSTRUCTIONS:
1. Carefully unpack the solar stake light; layout all parts on a clean surface.
2. Attach faux crystal shade (1), on top of the LED (2).
3. Connect the metal post (3), to the stake light spike to complete the stake light
assembly.
4. Connect the solar panel with battery (5) to the solar panel center post (6). Then
attach solar panel spike (7) to complete solar panel stake assembly.
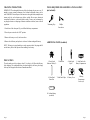
WINTER TIPS:
Keep the solar panel clear of snow and debris so the battery can recharge. If the solar
panels are covered by snow or debris for an extended period of time, allow the battery
to charge in full direct sunlight for at least 6-8 hours.
5. Solar Panel with
Battery Compartment
6. Solar Panel
Center Post
4. Stake Light Spike
7. Solar Panel
Spike
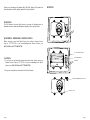
FOR FIRST-TIME USE:
Do not switch to the “AUTO” position until the solar light has been charged in
full sunlight for 24 hours with the switch in the “OFF” position. This allows the
rechargeable battery to reach its maximum capacity. If the light does not come on after
24 hours of charging, make sure the slide switch is in the “AUTO” position. Check
the battery to ensure that it is making secure contact with the terminal. Be sure that the
light is in a bright, sunny location and not in a shady area.
Page 4
Page 5