1
5
Planning
A. Planning for new local installations:
Select a downspout on which to locate the RainRouter selector valve, keeping in mind the route to the areas that you intend
to send the water to and elevation changes or obstacles along the path of the hose. For garden hose or remote rain barrel
installations, it is recommended you lay out the hose before installing the diverter. For conventional rain barrel installations,
refer to the instructions included with your EarthMinded rain barrel.
B. Planning for new remote installations:
A rain barrel can be located away from a downspout to a different location such as the center of a garden by using a garden
hose to connect a rain barrel to the downspout. Follow the instructions in this guide for marking the height of the diverter
instead of the instructions in the EarthMinded rain barrel user guide.
RainRouter Multi-Function Diverter System
™
GARDEN
User Guide v.1
Turn a downspout into a spigot when it rains!
DOWNSPOUTS
HOUSE
Warnings Regarding
Potential Hazards
PLEASE REFER TO HAZARD WARNINGS BOOKLET
FOR MORE INFORMATION AND RETAIN THIS
BROCHURE FOR FUTURE REFERENCE.
Drowning Hazard
Installation Hazard
Electrocution Hazard
Infestation Hazard
Tipping Hazard
Wear Safety Glasses
Contamination Hazard
Wear Safety Gloves
RAIN BARREL
(REMOTE)
GARDEN HOSE
1 About the RainRouter Multi-Function Diverter System
28”/ 71cm
RAIN BARREL
(LOCAL)
6 About the FlexiFit diverter
This kit includes all parts needed to add a state-of-the-art diverter system to a rain barrel. The RainRouter Multi-Function Diverter
System can be used to send rainwater from a downspout to multiple collection spots. The RainRouter system lets you connect
two (2) garden hoses, a garden hose and a rain barrel, or two (2) rain barrels to a single installed diverter. A rain barrel can also
be located to a more convenient location, such as the center of a garden, using a garden hose to connect the rain barrel to the
downspout.
DO NOT CUT THE DOWNSPOUT UNTIL READING THE ENTIRE GUIDE!
Some areas prohibit the use of rain barrels. Please check local regulations before installing.
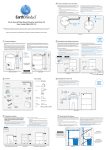
IMPORTANT: There are two ways to install the diverter depending on the type of barrel you use. If the barrel is a sealed container
without a lid or screen, the diverter can be located at the same level as the rim of the barrel or higher. This will improve the filling
efficiency of the diverter.
If the barrel has a removable lid or screen, the center of the diverter hole must be drilled 3” (76mm) below the level of the rim of
the barrel to prevent water from leaking from the lid seam or screen. The diverter will not work if it is placed below the level of the
water inlet on the barrel.
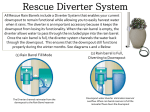
The FlexiFit diverter redirects water from your downspout to the barrel and automatically passes water through the downspout
when the barrel is full of rainwater. The diverter is installed in a hole that is cut in the downspout.
1. The hole must be cut at the correct height for the diverter to work properly.
2. If the diverter is installed too low, the barrel will not fill properly.
3. If the diverter is installed too high, water will overflow from the rim of the barrel (this only applies to open top barrels).
The diverter provided in this kit is not for use with round downspouts.
A round downspout diverter available as an accessory at www.earthmindedconsumerproducts.com
1
2
WARNING
Damage to home or
property may occur if
improperly installed.
3
Rain barrel and garden hose
2 Rain barrels
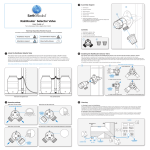
2 Operating settings
7 Easy diverter installation method
1’/300mm
This method does not automatically bypass water to the downspout
Water flows to right outlet only
Water flows to both outlets
ACTIVE SETTING INDICATOR
During rain, the water will continue to flow to this location unless the selector valve is set to the OFF mode.
A. For use with garden hose(s) only, without a rain barrel connection
Make a reference mark on the downspout where you will install the diverter as high as is convenient, at least 1’ (300mm) above
the highest point in the hose run.
TIP: CAP
UNUSED OUTLET
TO PREVENT
ACCIDENTAL
FLOODING
B. For connecting a sealed rain barrel, or a rain barrel with an overflow hose where flooding is not a concern
Make a reference mark on the downspout where you will install the diverter as high as is convenient, at least 1’ (300mm) above
the level of the rim of the barrel or highest point in the hose run. The barrel will overflow when full. If flooding is an issue, use
the precision installation method or attach an overflow hose near the rim of the barrel.
A
Water flows to left outlet
B
No water flow to outlets, water automatically bypasses the downspout
1’/300mm
1’/300mm
TIP: CAP
UNUSED OUTLET
TO PREVENT
ACCIDENTAL
FLOODING
8
3 Assembly diagram
1. Downspout
This method is recommended for:
• Connecting rain barrel(s) using the FlexiFit diverter’s automatic bypass function
• Connecting both a rain barrel and a garden hose
8
2. FlexiFit™ diverter
Precision diverter installation method
1
3. Valve housing
1. If the barrel is going to be installed near the downspout, place a level on the rim of the barrel, and mark the height of the rim of
the barrel on the downspout.
4. Active setting indicator
2. Measure down 3” (76mm) below that mark - this will become your reference mark for drilling the hole in the downspout.
5. Selector dial
When installing both a local and a remote barrel, measure from the rim of the barrel nearest the downspout (local rain barrel) and
be sure to use a sealed barrel or install an overflow hose to the remote barrel.
6. Garden hose connection
Note: The height of the top of the diverter will dictate the fill level of the rain barrel. If it is above the rim of the barrel, the barrel
will flood. If it is below the rim of the barrel, the barrel will only fill to the height of the diverter.
2
7. Multi-hose adaptor connects to:
eeeeea. 1-1/2”(38mm) and 1-1/4”(32mm) diameter bilge hose
eeeeeb. EarthMinded rain barrel fill hose
eeeeec. Male end of a garden hose
4
8. Winter hole cover
3
9. Self-tapping screws
1
2
1’/300mm
5
6
3”
3”
9
7
4 Contents
Tools needed
9
Remotely locating a rain barrel
1. RainRouter selector valve
1. Safety glasses
2. Multi-hose adaptors (2)
2. Pencil or marker
A rain barrel can be located away from a downspout to a more convenient location such as the center of a garden by using a
garden hose to connect the rain barrel to the downspout.
3. Drill
1. iFor the easy installation method, fitting an overflow hose to the barrel is recommended.
5. Screws (2)
4. Safety gloves
6. Fill hoses
5. Measuring tape or ruler
6. Phillips screwdriver
2. For the precision installation method follow the special instructions for marking the diverter height at the downspout. When
installing a top-fill rain barrel, the overflow hose will need to be removed and plugged to maintain the automatic bypass function
and discourage infestation. If two (2) barrels are connected, the rims of both barrels need to be at the same height or the lower
barrel will overflow.
7. Level
For garden hose or remote rain barrel installations, the entire hose length must be lower than the level of the diverter or water will
not flow to the collection spot.
3. FlexiFit™ diverter
4. Winter hole cover
7. Fill hose seals
8. Threaded seal
9. Garden hose connection assembly
10.3 pc. hole saw set
eeThe cutting edge of the hole saw is sharp and presents a hazard.
eeIt must be used only as directed in this User Guide.
11. User guide (not pictured)
12.Hazard warnings booklet (not pictured)
1
1
3
2
4
1
2
2
3
7
6
5
4
9
8
5
10
6
7
Easy installation method - barrel will overflow
Precision installation method - water passes
through downspout when barrel is full
10 Installing the garden hose fitting for remote installations
15 Installing the RainRouter selector valve
The remote rain barrel will fill using a garden hose connected to the bottom drain. If your barrel does not have a bottom drain,
install the garden hose connector provided.
After the diverter is installed into the downspout, the RainRouter selector valve is ready to be inserted into the diverter.
2. Measure approximately 2.5” (65mm) up from the bottom of the barrel and mark the center for the hole.
1. Hold the valve with the Y outlet ends facing down and press into the diverter opening until there is no gap between the valve and
the diverter. If there is a gap, gently twist the valve from side to side while pushing inward until the valve seats against the front
edge of the diverter with no gap.
3. Drill a hole using the (SMALL) 1-1/4”(32mm) hole saw included in the set.
2. Position the valve based on the connection(s) you are trying to achieve.
1. Consider the path of the hose when locating the garden hose connector.
4. Insert the threaded rubber seal into the hole. Pinch the seal into a “U” shape for easier insertion.
5. Thread the garden hose connector into the seal until the hex collar sits firmly against the seal. Soapy water or hand lotion on the
eeethreads will reduce friction and improve fit.
BLUE ARROW INDICATES ACTIVE SETTING
1
2
VALVE ORIENTATION
When remotely locating a sealed barrel (no removable lid), you will need to add air vents to allow the barrel to fill. Drill a few small
holes into the top of the barrel with a 3/64” (1.45mm) or smaller drill bit to allow air to escape while discouraging infestation.
TIP: CAP
UNUSED OUTLET
TO PREVENT
ACCIDENTAL
FLOODING
Inside of
barrel
a. Single connection rain barrel
c. Dual connection garden hose
Rubber Seal
Garden hose
connector
TIP: CAP
UNUSED OUTLET
TO PREVENT
ACCIDENTAL
FLOODING
2.5”-3”
2.5”-3”
2.5”-3”
Add air vents
b. Single connection garden hose
11 Marking the diverter height for remote installations
d. Dual connection rain barrel/garden hose
16 Connecting a garden hose or a rain barrel to the RainRouter selector valve
Special instructions for marking the diverter height at the downspout for new remote installations
A. To connect to a garden hose: Thread the female end of the hose directly to the threaded end of the valve.
1. iPlace the rain barrel in its intended location, which should be on a solid and level base. Remove the cap from the bottom drain
eeand attach the female end of the hose to the barrel.
B. To connect to an EarthMinded rain barrel fill hose or bilge hose: Attach the multi-hose adaptor to the threaded end of
eeithe selector valve first. Next, press the hose over the barbed end of the adaptor. Two multi-hose adaptors are included
eeifor connecting two rain barrels to the selector valve.
2. Screw the cap on the male end of the hose and run it to the downspout. This is how the hose will connect to the RainRouter
eediverter system.
3. Fill the barrel with water to the the rim.
4. Raise the end of the hose near the downspout and remove the cap. Slowly lower the hose until the water is just level with the
eeend of the hose. This indicates the level of the barrel rim at the downspout. Slowly raise and lower the hose a second time just
eeto verify.
C. To connect a remote rain barrel: Connect the male end of the garden hose to the outlet on the selector valve using the
eeimuli-hose adaptor. The female end of the hose should connect to the rain barrel for a water tight connection.
Remember to set the selector valve to the desired operating setting.
5. Make a mark on the downspout at this level.
6. Next, measure down 3” (76mm) and make a second mark. The second mark will now be your reference mark for the diverter
eeheight.
A
2
C
B
3
5
4
3”
TIP: CAP UNUSED OUTLET
TO PREVENT ACCIDENTAL
FLOODING
6
1
12 Marking the FlexiFit diverter hole
17 Installing the fill hose fitting for local rain barrel installations
Using the reference mark on the downspout, measure and mark the horizontal center point on the 3” (76mm) side of the
Use the EarthMinded fill hose and seal provided
downspout.
1. Select a location for the water inlet about 3” (76mm) below the rim of the barrel.
For 2”x 3” downspouts, this will be the front face. (Fig.A)
2. Make sure the inlet is located on a flat or evenly curved surface; avoid ridges or other features that could affect the hose seal.
For larger 3”x 4” downspouts, it will be the narrow side. (Fig B)
3. Drill a hole in the barrel using the 1-1/2” (38mm) hole saw included.
4. Insert the rubber hose seal into the hole. Pinch the seal into a “U” shape for easier insertion.
*Water capture percentage is reduced with 3”x 4” downspouts
5. Press the end of the fill hose into the hose seal.
If using a top fill rain barrel with an existing overflow hose you will need to plug the overflow hole to maintain the FlexiFit
diverter’s bypass function and discourage infestation.
A
2"x 3" downspout
B
3"x 4" downspout
4”
3”
3”
2”
3”
3” (76mm)
13 Drilling the hole for the FlexiFit diverter
18 Removal, maintenance, and winterization of the RainRouter Multi-Function Diverter System
1. Drill a hole in the downspout with a 2 1/8” (54 mm) hole saw. The center bit of the hole saw should align with the center point
marked on downspout. After drilling, carefully remove the hole saw to prevent the cut-out piece from falling into the downspout.
The RainRouter Multi-Function Diverter System and hose can be damaged if left installed in freezing temperatures. To winterize:
2. When cutting, do not force the drill. Cut slow and steady. Hold the drill with both hands.
2. Remove the FlexiFit diverter from the downspout by removing the two (2) screws, and then pull out and upward at the
1. Remove the RainRouter valve from the FlexiFit diverter by gently twisting the valve from side to side while pulling outward.
eeesame time.
The cut edge of the downspout can be sharp. Wear protective safety gloves.
3. Remove any debris that may have collected in the downspout above the diverter.
Always wear safety glasses and gloves when cutting or drilling!
4. Cover the hole in the downspout with the winter hole cover and replace the screws.
The valve, diverter, and winter hole cover can be cleaned with soap and water.
For remote rain barrel installations, the fill hose should occasionally be connected to a household spigot and turned on to flush out
any algae or debris.
For 3”x4” downspout, drill hole
on narrow 3” side
WARNING
3”
Wear Safety Gloves
2-1/8”
(54 mm)
Hole Saw
14 Installing the FlexiFit diverter
19 Troubleshooting
1. Insert the diverter into the downspout hole by squeezing the sides, making sure the collection cup faces up. Push in until the
diverter’s flange sits flat against the downspout. Check that the arrow on the outside of the diverter is pointing straight up.
Water is not reaching the collection spot
2. Use the two (2) self-tapping screws to attach the diverter to the downspout.
•Remove the diverter and check that the downspout, diverter, valve, and fill hose are not blocked by debris.
•Make sure the diverter is installed with the collection cup (arrow) facing up.
•Make sure no point of the fill hose is above the level of the diverter.
•Check that the water inlet on the rain barrel is level or lower than the diverter.
•Check the fill hose to make sure that water is not leaking.
The diverter collection cup must face up to work. Make sure the arrow on the outside of diverter is pointing straight up!
•Check the top of the gutter for blockage at the downspout connection.
•Check to see that the active setting indicator (protruding ridge on the valve housing) is aligned with the desired ON settings.
•Make sure that no point along the hose has any kinks; water pressure is low and will not work out kinks in a hose.
•Check that no point on the hose is above the level of the diverter.
•This is a low-pressure gravity fed system; it not suitable for use with sprinklers or other devices requiring pressure. We recommend
eusing a non-kinking hose.
•For remote rain barrel installations, the fill hose should occasionally be connected to a household spigot and turned on to flush out
eany algae or debris.
WARNING
The rain barrel floods
•The barrel is too low. To Correct: drain the barrel and construct a solid surface base to raise the barrel so both ends of the fill hose
eare level.
2
1
•An overflow hose can be added to the rim of the barrel to drain off excess water. (overflow hose not included)