Transcript
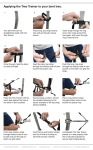
Assembling the Tree Trainer.
1
A.
• Thread the head counter
clockwise into the turnbuckle
• Thread
the head
counter
(the piece
and end
with the
clockwise
into
the
turnbuckle
“L” signifying left handed
(the
piece and end with the
threads).
“L” signifying left handed
B.
•threads).
Thread the saddle clockwise in
the opposite end of the
• Thread
the saddle
clockwise
turnbuckle
with the
groove inin
the
end
the
theopposite
lower end
of of
turnbuckle.
turnbuckle with the groove in
lowerhead
end and
of turnbuckle.
C.
•the
Thread
saddle all the
way into the barrel.
• Thread head and saddle all the
into the
barrel.remove
D.
•way
To attach
straps,
hairpins and clevis pins from
• To
attach
remove
the
head.straps,
Place loops
into
hairpins
and
clevis
pins
from
head and insert clevis pin
the
head.the
Place
loops
through
loop
end into
of the
head
and
insert
clevis
pin
strap and replace hairpin. The
through
the loop
endassembled
of the
Tree Trainer
is now
strap
and replace
and ready
for use.hairpin. The
Tree Trainer is now assembled
ready
E.
•and
Insert
padfor
intouse.
saddle before
applying to bent tree.
• Insert pad into saddle before
applying to bent tree.
1-855-GROW-RIGHT
[email protected]
2
1
3
3
2
4
4
Note: “Left Hand”
means to turn
Note:
“Left
Hand”
counter
clockwise
means
to while
turn
one end
counter
clockwise
threading
both
one
end
while
ends together.
threading both
ends together.
5
5
6
6
Grove signifies
Groove
or “R”
right hand
thread.
Grove
signifies
signifies
right hand
turn. hand thread.
right
PARTS:
7
7
1. HEAD
PARTS:
2. SHORT
END STRAP
1.3.HEAD
CLEVIS PIN
2.4.SHORT
END STRAP
HAIR PIN
3.5.CLEVIS
PIN
BARREL
4.6.HAIR
PIN
SADDLE
5.7.BARREL
INSERT PAD
6. SADDLE
7. INSERT PAD
TreeTrainer.com
© 2012 Roy Enterprises L.L.C. All Rights Reserved.